
Patient results · Ennis Plastic Surgery
Revision Surgery
Before & After Photos
Explore 65 cases and 128 photo views in our revision surgery collection. Use the arrows to browse additional views of a case.
Each patient's anatomy, goals, and treatment plan is unique. Individual results vary.
Explore the comparisons.
Showing 8 of 65 cases.
Individual results vary.
A case may include several photo views. Combined procedures can appear in more than one category.
Some cases do not specify gender. Choose “All genders” to see every case.
No comparisons match these filters.
Adjust your filters to keep exploring. You can also ask about relevant patient examples at your consultation.


Face
Deep plane facelift & complementary procedures
Combined with buccal fat pad removal, lower blepharoplasty and an Obagi Blue Peel.
Explore comparison — Deep plane facelift & complementary proceduresView all deep plane facelift before and after photos


Face
Deep plane facelift & brow lift
Combined with endoscopic brow lift, buccal fat pad removal and an Obagi Blue Peel.
Explore comparison — Deep plane facelift & brow liftView all deep plane facelift before and after photos


Face
Neck liposuction & buccal fat removal
Case 57221: combined neck and cheek treatment.
Explore comparison — Neck liposuction & buccal fat removalView all neck liposuction before and after photos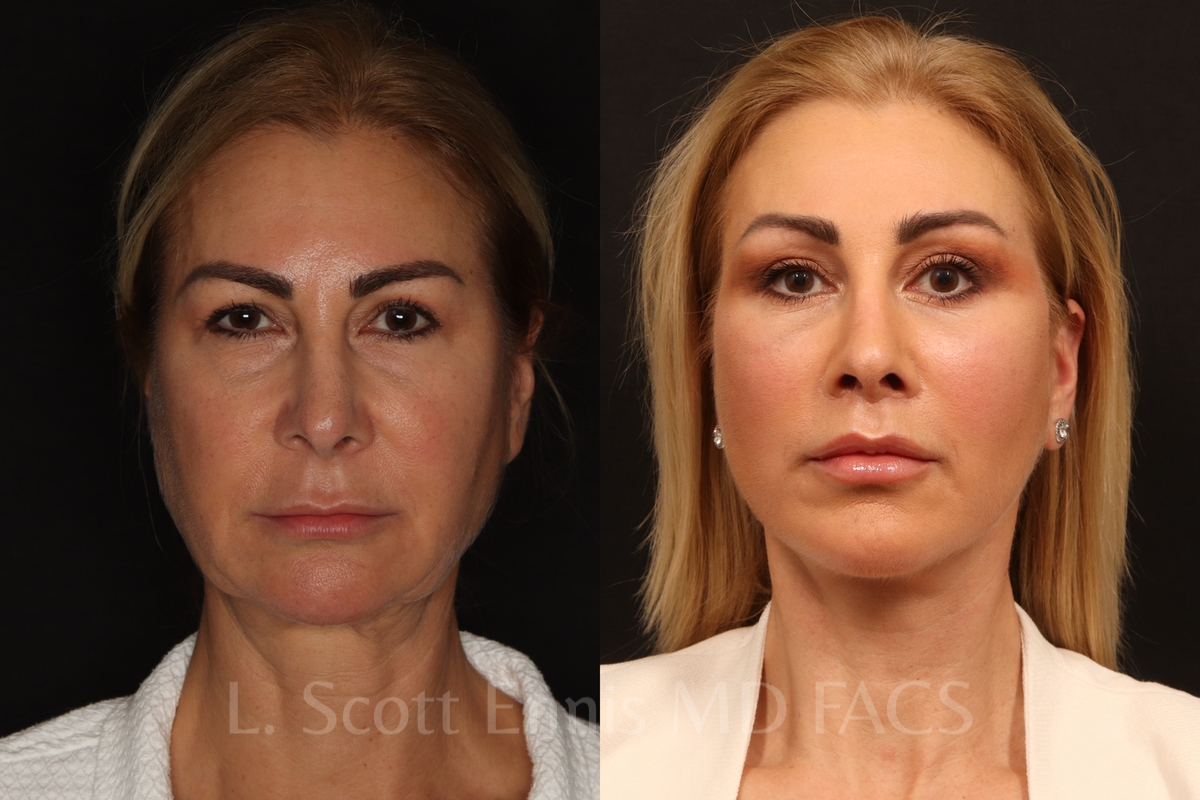


Face
Lip lift & facial rejuvenation
Combined with endoscopic brow lift, lower blepharoplasty, deep plane facelift and buccal fat removal.
Explore comparison — Lip lift & facial rejuvenationView all deep plane facelift before and after photos


Face
Lip lift & facelift
Case 53626: combined with facelift and buccal fat pad removal.
Explore comparison — Lip lift & faceliftView all facelift before and after photos


Face
Buccal fat removal & facelift
Case 39602: combined lower-face treatment.
Explore comparison — Buccal fat removal & faceliftView all facelift before and after photos


Face
Buccal fat removal & facial rejuvenation
Case 26979: combined with endoscopic brow lift, lower blepharoplasty and deep plane facelift.
Explore comparison — Buccal fat removal & facial rejuvenationView all deep plane facelift before and after photos
Face
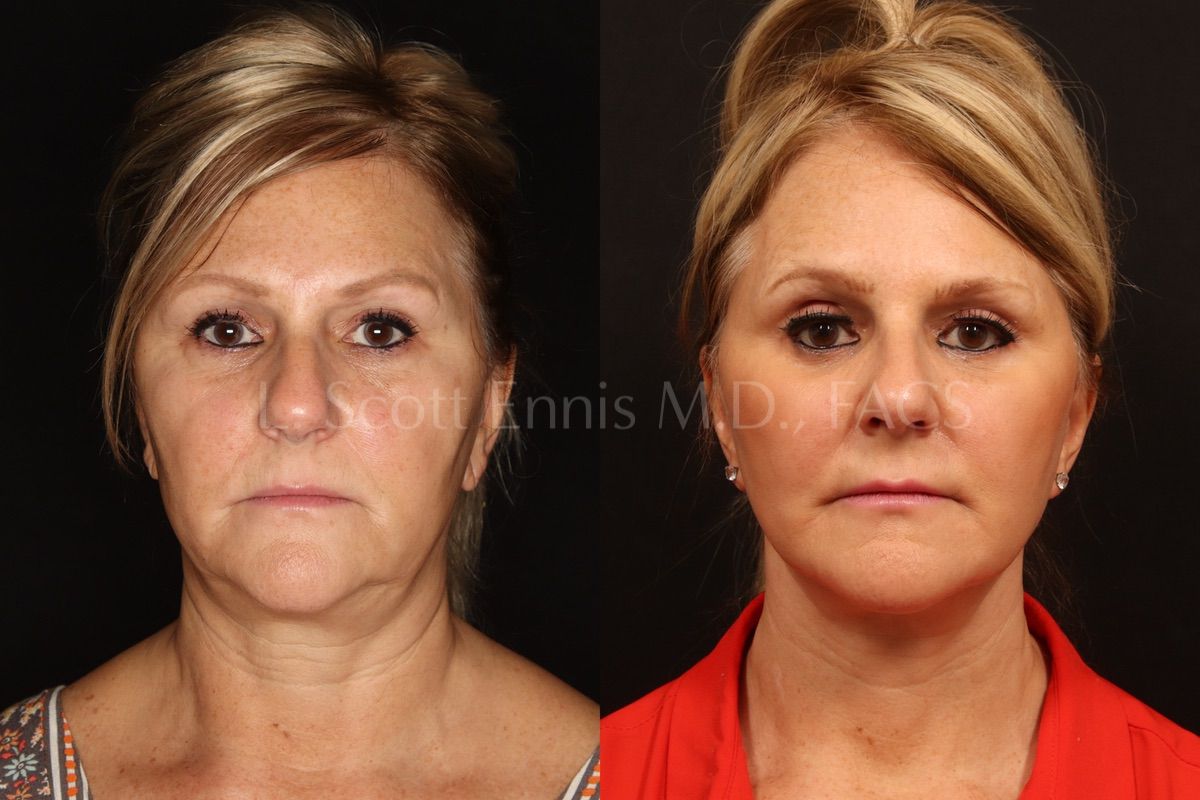
Buccal fat pad removal
Case 51059: front-view comparison.
Explore comparison — Buccal fat pad removalView all buccal fat removal before and after photos




Before & after
Deep plane facelift & complementary procedures
Enlarge to inspect details. Scroll across the image with touch, a trackpad, or the arrow keys.
About this comparison
Combined with buccal fat pad removal, lower blepharoplasty and an Obagi Blue Peel.
Individual results vary. Where procedures were combined, the photographs show the overall result.
Before & after
Deep plane facelift & brow lift
Enlarge to inspect details. Scroll across the image with touch, a trackpad, or the arrow keys.
About this comparison
Combined with endoscopic brow lift, buccal fat pad removal and an Obagi Blue Peel.
Individual results vary. Where procedures were combined, the photographs show the overall result.
Before & after
Neck liposuction & buccal fat removal
Enlarge to inspect details. Scroll across the image with touch, a trackpad, or the arrow keys.
About this comparison
Case 57221: combined neck and cheek treatment.
Individual results vary. Where procedures were combined, the photographs show the overall result.
Before & after
Lip lift & facial rejuvenation
Enlarge to inspect details. Scroll across the image with touch, a trackpad, or the arrow keys.
About this comparison
Combined with endoscopic brow lift, lower blepharoplasty, deep plane facelift and buccal fat removal.
Individual results vary. Where procedures were combined, the photographs show the overall result.
Before & after
Lip lift & facelift
Enlarge to inspect details. Scroll across the image with touch, a trackpad, or the arrow keys.
About this comparison
Case 53626: combined with facelift and buccal fat pad removal.
Individual results vary. Where procedures were combined, the photographs show the overall result.
Before & after
Buccal fat removal & facelift
Enlarge to inspect details. Scroll across the image with touch, a trackpad, or the arrow keys.
About this comparison
Case 39602: combined lower-face treatment.
Individual results vary. Where procedures were combined, the photographs show the overall result.
Before & after
Buccal fat removal & facial rejuvenation
Enlarge to inspect details. Scroll across the image with touch, a trackpad, or the arrow keys.
About this comparison
Case 26979: combined with endoscopic brow lift, lower blepharoplasty and deep plane facelift.
Individual results vary. Where procedures were combined, the photographs show the overall result.
Before & after
Buccal fat pad removal
Enlarge to inspect details. Scroll across the image with touch, a trackpad, or the arrow keys.
About this comparison
Case 51059: front-view comparison.
Individual results vary. Where procedures were combined, the photographs show the overall result.
Before & after
Buccal Fat Removal
Enlarge to inspect details. Scroll across the image with touch, a trackpad, or the arrow keys.
About this comparison
Individual results vary. Where procedures were combined, the photographs show the overall result.
Before & after
Buccal Fat Removal
Enlarge to inspect details. Scroll across the image with touch, a trackpad, or the arrow keys.
About this comparison
Individual results vary. Where procedures were combined, the photographs show the overall result.
Before & after
Earlobe Repair
Enlarge to inspect details. Scroll across the image with touch, a trackpad, or the arrow keys.
About this comparison
Individual results vary. Where procedures were combined, the photographs show the overall result.
Before & after
Earlobe Repair
Enlarge to inspect details. Scroll across the image with touch, a trackpad, or the arrow keys.
About this comparison
Individual results vary. Where procedures were combined, the photographs show the overall result.
Before & after
Buccal Fat Removal
Enlarge to inspect details. Scroll across the image with touch, a trackpad, or the arrow keys.
About this comparison
Individual results vary. Where procedures were combined, the photographs show the overall result.
Before & after
Brow Lift
Enlarge to inspect details. Scroll across the image with touch, a trackpad, or the arrow keys.
About this comparison
Individual results vary. Where procedures were combined, the photographs show the overall result.
Before & after
Brow Lift
Enlarge to inspect details. Scroll across the image with touch, a trackpad, or the arrow keys.
About this comparison
Individual results vary. Where procedures were combined, the photographs show the overall result.
Before & after
Brow Lift
Enlarge to inspect details. Scroll across the image with touch, a trackpad, or the arrow keys.
About this comparison
Individual results vary. Where procedures were combined, the photographs show the overall result.
Before & after
Brow Lift
Enlarge to inspect details. Scroll across the image with touch, a trackpad, or the arrow keys.
About this comparison
Individual results vary. Where procedures were combined, the photographs show the overall result.
Before & after
Brow Lift
Enlarge to inspect details. Scroll across the image with touch, a trackpad, or the arrow keys.
About this comparison
Individual results vary. Where procedures were combined, the photographs show the overall result.
Before & after
Brow Lift
Enlarge to inspect details. Scroll across the image with touch, a trackpad, or the arrow keys.
About this comparison
Individual results vary. Where procedures were combined, the photographs show the overall result.
Before & after
Brow Lift
Enlarge to inspect details. Scroll across the image with touch, a trackpad, or the arrow keys.
About this comparison
Individual results vary. Where procedures were combined, the photographs show the overall result.
Before & after
Breast Implant Removal
Enlarge to inspect details. Scroll across the image with touch, a trackpad, or the arrow keys.
About this comparison
Individual results vary. Where procedures were combined, the photographs show the overall result.
A historical case by Dr. L. Scott Ennis. Current treatment-provider assignments may differ.
Before & after
Breast Implant Removal
Enlarge to inspect details. Scroll across the image with touch, a trackpad, or the arrow keys.
About this comparison
Individual results vary. Where procedures were combined, the photographs show the overall result.
A historical case by Dr. L. Scott Ennis. Current treatment-provider assignments may differ.
Before & after
Breast Implant Exchange
Enlarge to inspect details. Scroll across the image with touch, a trackpad, or the arrow keys.
About this comparison
Individual results vary. Where procedures were combined, the photographs show the overall result.
A historical case by Dr. L. Scott Ennis. Current treatment-provider assignments may differ.
Before & after
Breast Implant Removal
Enlarge to inspect details. Scroll across the image with touch, a trackpad, or the arrow keys.
About this comparison
Individual results vary. Where procedures were combined, the photographs show the overall result.
A historical case by Dr. L. Scott Ennis. Current treatment-provider assignments may differ.
Before & after
Breast Implant Exchange
Enlarge to inspect details. Scroll across the image with touch, a trackpad, or the arrow keys.
About this comparison
Individual results vary. Where procedures were combined, the photographs show the overall result.
A historical case by Dr. L. Scott Ennis. Current treatment-provider assignments may differ.
Before & after
Breast Implant Exchange
Enlarge to inspect details. Scroll across the image with touch, a trackpad, or the arrow keys.
About this comparison
Individual results vary. Where procedures were combined, the photographs show the overall result.
A historical case by Dr. L. Scott Ennis. Current treatment-provider assignments may differ.
Before & after
Breast Implant Exchange
Enlarge to inspect details. Scroll across the image with touch, a trackpad, or the arrow keys.
About this comparison
Individual results vary. Where procedures were combined, the photographs show the overall result.
A historical case by Dr. L. Scott Ennis. Current treatment-provider assignments may differ.
Before & after
Breast Implant Exchange
Enlarge to inspect details. Scroll across the image with touch, a trackpad, or the arrow keys.
About this comparison
Individual results vary. Where procedures were combined, the photographs show the overall result.
A historical case by Dr. L. Scott Ennis. Current treatment-provider assignments may differ.
Before & after
Breast Implant Exchange
Enlarge to inspect details. Scroll across the image with touch, a trackpad, or the arrow keys.
About this comparison
Individual results vary. Where procedures were combined, the photographs show the overall result.
A historical case by Dr. L. Scott Ennis. Current treatment-provider assignments may differ.
Before & after
Breast Implant Exchange
Enlarge to inspect details. Scroll across the image with touch, a trackpad, or the arrow keys.
About this comparison
Individual results vary. Where procedures were combined, the photographs show the overall result.
A historical case by Dr. L. Scott Ennis. Current treatment-provider assignments may differ.
Before & after
Breast Implant Exchange
Enlarge to inspect details. Scroll across the image with touch, a trackpad, or the arrow keys.
About this comparison
Individual results vary. Where procedures were combined, the photographs show the overall result.
A historical case by Dr. L. Scott Ennis. Current treatment-provider assignments may differ.
Before & after
Breast Revision
Enlarge to inspect details. Scroll across the image with touch, a trackpad, or the arrow keys.
About this comparison
Individual results vary. Where procedures were combined, the photographs show the overall result.
A historical case by Dr. L. Scott Ennis. Current treatment-provider assignments may differ.
Before & after
Breast Revision
Enlarge to inspect details. Scroll across the image with touch, a trackpad, or the arrow keys.
About this comparison
Individual results vary. Where procedures were combined, the photographs show the overall result.
A historical case by Dr. L. Scott Ennis. Current treatment-provider assignments may differ.
Before & after
Breast Revision
Enlarge to inspect details. Scroll across the image with touch, a trackpad, or the arrow keys.
About this comparison
Individual results vary. Where procedures were combined, the photographs show the overall result.
A historical case by Dr. L. Scott Ennis. Current treatment-provider assignments may differ.
Before & after
Breast Implant Exchange
Enlarge to inspect details. Scroll across the image with touch, a trackpad, or the arrow keys.
About this comparison
Individual results vary. Where procedures were combined, the photographs show the overall result.
A historical case by Dr. L. Scott Ennis. Current treatment-provider assignments may differ.
Before & after
Breast Implant Exchange
Enlarge to inspect details. Scroll across the image with touch, a trackpad, or the arrow keys.
About this comparison
Individual results vary. Where procedures were combined, the photographs show the overall result.
A historical case by Dr. L. Scott Ennis. Current treatment-provider assignments may differ.
Before & after
Breast Implant Exchange
Enlarge to inspect details. Scroll across the image with touch, a trackpad, or the arrow keys.
About this comparison
Individual results vary. Where procedures were combined, the photographs show the overall result.
A historical case by Dr. L. Scott Ennis. Current treatment-provider assignments may differ.
Before & after
Breast Implant Exchange
Enlarge to inspect details. Scroll across the image with touch, a trackpad, or the arrow keys.
About this comparison
Individual results vary. Where procedures were combined, the photographs show the overall result.
A historical case by Dr. L. Scott Ennis. Current treatment-provider assignments may differ.
Before & after
Breast Implant Exchange
Enlarge to inspect details. Scroll across the image with touch, a trackpad, or the arrow keys.
About this comparison
Individual results vary. Where procedures were combined, the photographs show the overall result.
A historical case by Dr. L. Scott Ennis. Current treatment-provider assignments may differ.
Before & after
Breast Implant Exchange
Enlarge to inspect details. Scroll across the image with touch, a trackpad, or the arrow keys.
About this comparison
Individual results vary. Where procedures were combined, the photographs show the overall result.
A historical case by Dr. L. Scott Ennis. Current treatment-provider assignments may differ.
Before & after
Breast Implant Removal
Enlarge to inspect details. Scroll across the image with touch, a trackpad, or the arrow keys.
About this comparison
Individual results vary. Where procedures were combined, the photographs show the overall result.
A historical case by Dr. L. Scott Ennis. Current treatment-provider assignments may differ.
Before & after
Breast Implant Exchange
Enlarge to inspect details. Scroll across the image with touch, a trackpad, or the arrow keys.
About this comparison
Individual results vary. Where procedures were combined, the photographs show the overall result.
A historical case by Dr. L. Scott Ennis. Current treatment-provider assignments may differ.
Before & after
Breast Implant Exchange
Enlarge to inspect details. Scroll across the image with touch, a trackpad, or the arrow keys.
About this comparison
Individual results vary. Where procedures were combined, the photographs show the overall result.
A historical case by Dr. L. Scott Ennis. Current treatment-provider assignments may differ.
Before & after
Breast Implant Exchange
Enlarge to inspect details. Scroll across the image with touch, a trackpad, or the arrow keys.
About this comparison
Individual results vary. Where procedures were combined, the photographs show the overall result.
A historical case by Dr. L. Scott Ennis. Current treatment-provider assignments may differ.
Before & after
Breast Implant Removal
Enlarge to inspect details. Scroll across the image with touch, a trackpad, or the arrow keys.
About this comparison
Individual results vary. Where procedures were combined, the photographs show the overall result.
A historical case by Dr. L. Scott Ennis. Current treatment-provider assignments may differ.
Before & after
Breast Implant Exchange
Enlarge to inspect details. Scroll across the image with touch, a trackpad, or the arrow keys.
About this comparison
Individual results vary. Where procedures were combined, the photographs show the overall result.
A historical case by Dr. L. Scott Ennis. Current treatment-provider assignments may differ.
Before & after
Breast Augmentation
Enlarge to inspect details. Scroll across the image with touch, a trackpad, or the arrow keys.
About this comparison
Individual results vary. Where procedures were combined, the photographs show the overall result.
A historical case by Dr. L. Scott Ennis. Current treatment-provider assignments may differ.
Before & after
Breast Implant Exchange
Enlarge to inspect details. Scroll across the image with touch, a trackpad, or the arrow keys.
About this comparison
Individual results vary. Where procedures were combined, the photographs show the overall result.
A historical case by Dr. L. Scott Ennis. Current treatment-provider assignments may differ.
Before & after
Breast Lift with Augmentation
Enlarge to inspect details. Scroll across the image with touch, a trackpad, or the arrow keys.
About this comparison
Individual results vary. Where procedures were combined, the photographs show the overall result.
A historical case by Dr. L. Scott Ennis. Current treatment-provider assignments may differ.
Before & after
Breast Lift with Augmentation
Enlarge to inspect details. Scroll across the image with touch, a trackpad, or the arrow keys.
About this comparison
Individual results vary. Where procedures were combined, the photographs show the overall result.
A historical case by Dr. L. Scott Ennis. Current treatment-provider assignments may differ.
Before & after
Breast Implant Exchange
Enlarge to inspect details. Scroll across the image with touch, a trackpad, or the arrow keys.
About this comparison
Individual results vary. Where procedures were combined, the photographs show the overall result.
A historical case by Dr. L. Scott Ennis. Current treatment-provider assignments may differ.
Before & after
Breast Implant Exchange
Enlarge to inspect details. Scroll across the image with touch, a trackpad, or the arrow keys.
About this comparison
Individual results vary. Where procedures were combined, the photographs show the overall result.
A historical case by Dr. L. Scott Ennis. Current treatment-provider assignments may differ.
Before & after
Breast Implant Exchange
Enlarge to inspect details. Scroll across the image with touch, a trackpad, or the arrow keys.
About this comparison
Individual results vary. Where procedures were combined, the photographs show the overall result.
A historical case by Dr. L. Scott Ennis. Current treatment-provider assignments may differ.
Before & after
Breast Implant Exchange
Enlarge to inspect details. Scroll across the image with touch, a trackpad, or the arrow keys.
About this comparison
Individual results vary. Where procedures were combined, the photographs show the overall result.
A historical case by Dr. L. Scott Ennis. Current treatment-provider assignments may differ.
Before & after
Breast Implant Removal
Enlarge to inspect details. Scroll across the image with touch, a trackpad, or the arrow keys.
About this comparison
Individual results vary. Where procedures were combined, the photographs show the overall result.
A historical case by Dr. L. Scott Ennis. Current treatment-provider assignments may differ.
Before & after
Breast Implant Exchange
Enlarge to inspect details. Scroll across the image with touch, a trackpad, or the arrow keys.
About this comparison
Individual results vary. Where procedures were combined, the photographs show the overall result.
A historical case by Dr. L. Scott Ennis. Current treatment-provider assignments may differ.
Before & after
Breast Implant Exchange
Enlarge to inspect details. Scroll across the image with touch, a trackpad, or the arrow keys.
About this comparison
Individual results vary. Where procedures were combined, the photographs show the overall result.
A historical case by Dr. L. Scott Ennis. Current treatment-provider assignments may differ.
Before & after
Breast Implant Exchange
Enlarge to inspect details. Scroll across the image with touch, a trackpad, or the arrow keys.
About this comparison
Individual results vary. Where procedures were combined, the photographs show the overall result.
A historical case by Dr. L. Scott Ennis. Current treatment-provider assignments may differ.
Before & after
Breast Implant Exchange
Enlarge to inspect details. Scroll across the image with touch, a trackpad, or the arrow keys.
About this comparison
Individual results vary. Where procedures were combined, the photographs show the overall result.
A historical case by Dr. L. Scott Ennis. Current treatment-provider assignments may differ.
Before & after
Breast Implant Exchange
Enlarge to inspect details. Scroll across the image with touch, a trackpad, or the arrow keys.
About this comparison
Individual results vary. Where procedures were combined, the photographs show the overall result.
A historical case by Dr. L. Scott Ennis. Current treatment-provider assignments may differ.
Before & after
Breast Implant Exchange
Enlarge to inspect details. Scroll across the image with touch, a trackpad, or the arrow keys.
About this comparison
Individual results vary. Where procedures were combined, the photographs show the overall result.
A historical case by Dr. L. Scott Ennis. Current treatment-provider assignments may differ.
Before & after
Breast Implant Removal
Enlarge to inspect details. Scroll across the image with touch, a trackpad, or the arrow keys.
About this comparison
Individual results vary. Where procedures were combined, the photographs show the overall result.
A historical case by Dr. L. Scott Ennis. Current treatment-provider assignments may differ.
Before & after
Breast Implant Exchange
Enlarge to inspect details. Scroll across the image with touch, a trackpad, or the arrow keys.
About this comparison
Individual results vary. Where procedures were combined, the photographs show the overall result.
A historical case by Dr. L. Scott Ennis. Current treatment-provider assignments may differ.
Before & after
Breast Revision
Enlarge to inspect details. Scroll across the image with touch, a trackpad, or the arrow keys.
About this comparison
Individual results vary. Where procedures were combined, the photographs show the overall result.
A historical case by Dr. L. Scott Ennis. Current treatment-provider assignments may differ.
Before & after
Breast Implant Exchange
Enlarge to inspect details. Scroll across the image with touch, a trackpad, or the arrow keys.
About this comparison
Individual results vary. Where procedures were combined, the photographs show the overall result.
A historical case by Dr. L. Scott Ennis. Current treatment-provider assignments may differ.
Continue exploring
Browse by procedure.
Your consultation
Your next chapter
starts with a conversation.
Bring your questions and the results that interest you. We will help you understand your options and connect you with the appropriate provider.
Or call 561-405-9020