
Patient results · Ennis Plastic Surgery
A closer look.
A personal perspective.
Explore real patient comparisons. Each patient's anatomy, goals, and treatment plan is unique. Individual results vary.
Explore the comparisons.
Showing 8 of 598 cases.
Individual results vary.
A case may include several photo views. Combined procedures can appear in more than one category.
Some cases do not specify gender. Choose “All genders” to see every case.
No comparisons match these filters.
Adjust your filters to keep exploring. You can also ask about relevant patient examples at your consultation.

Body
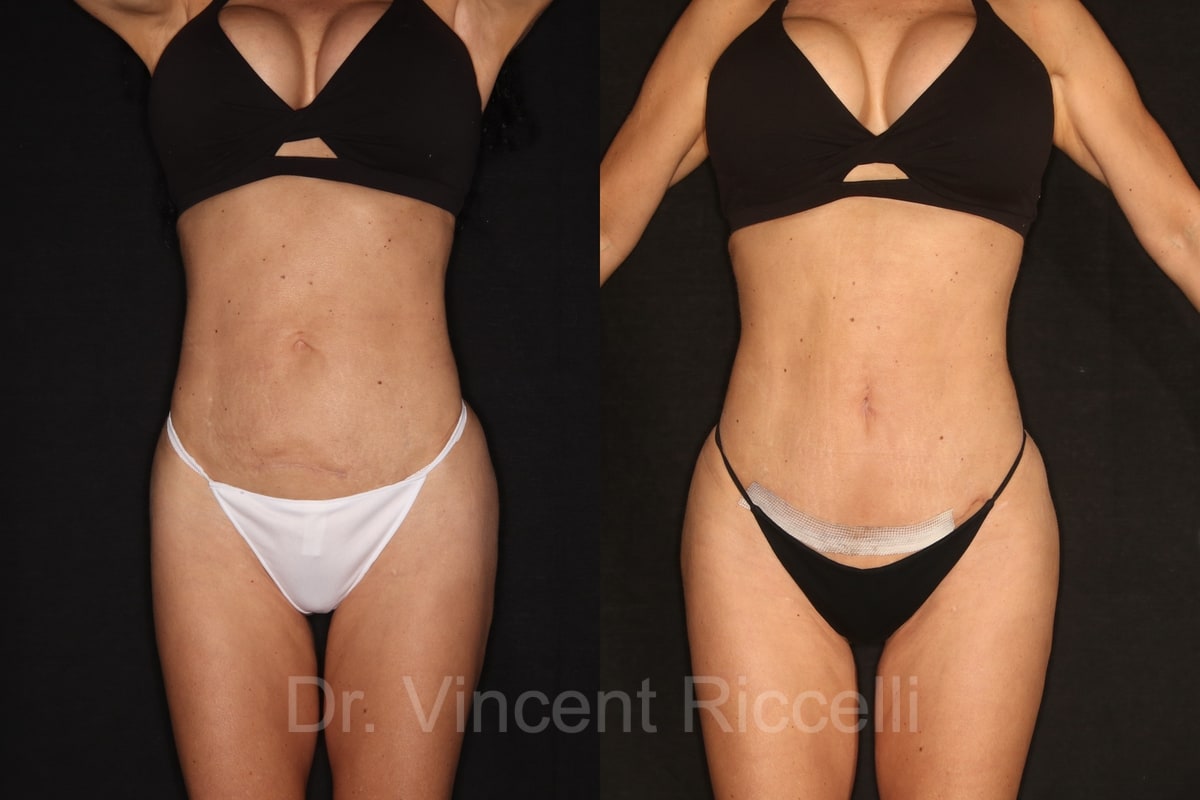
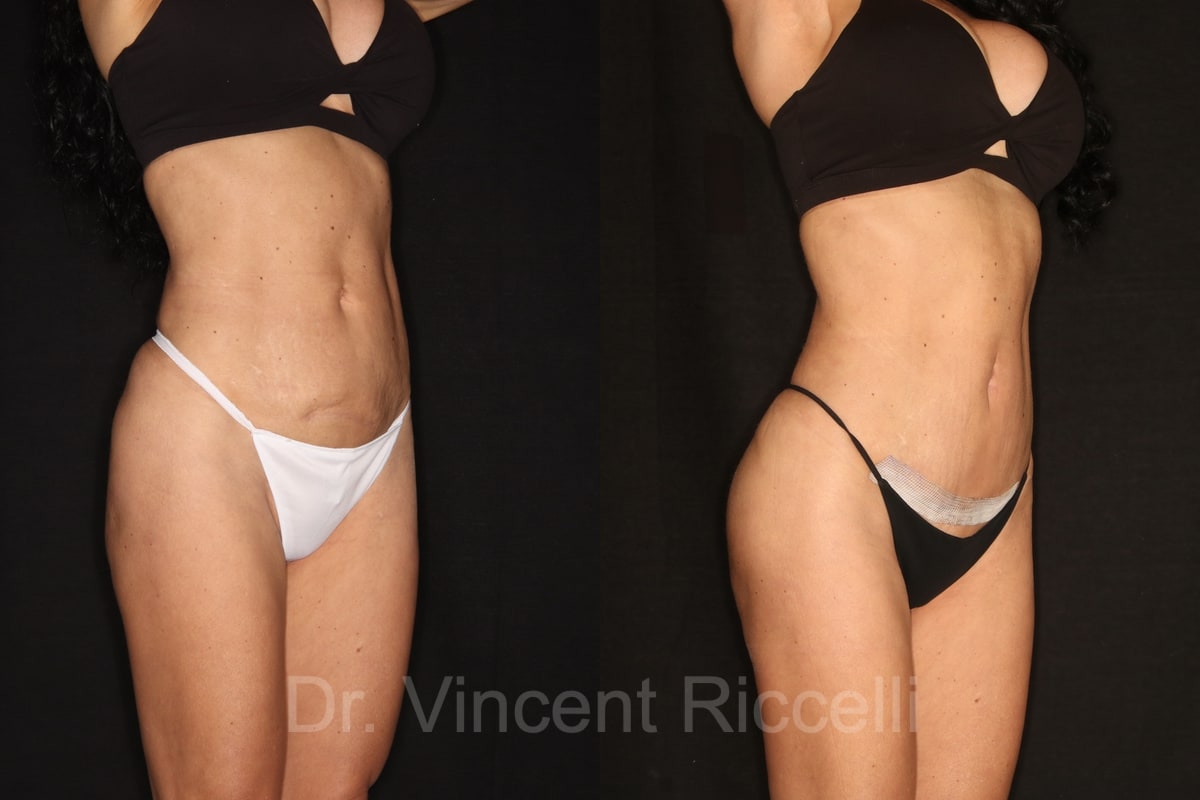
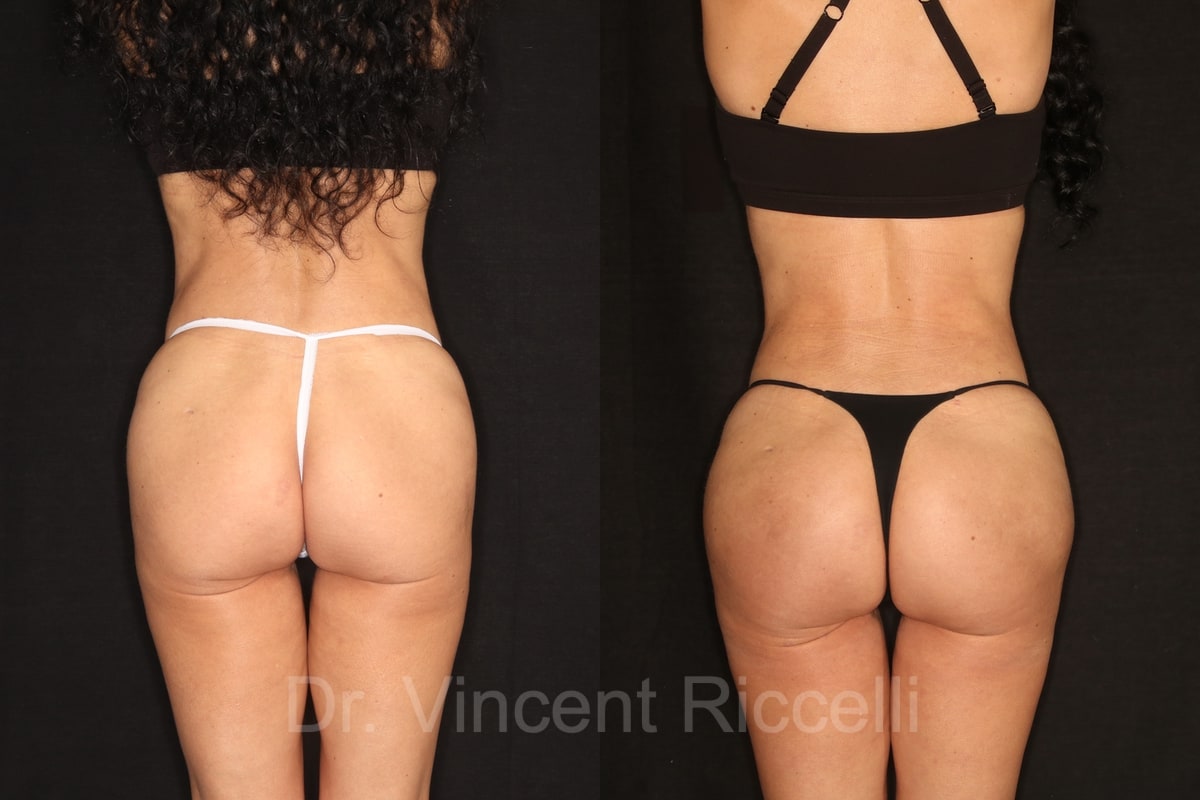
Mini-abdominoplasty, Liposuction 360 & AlloClae
Mini-abdominoplasty, liposuction 360, and gluteal fat grafting with AlloClae. These photographs show the combined result.
Explore comparison — Mini-abdominoplasty, Liposuction 360 & AlloClaeView all tummy tuck before and after photos


Face
Deep plane facelift & lower eyelid surgery
A combined procedure: deep plane facelift and lower blepharoplasty.
Explore comparison — Deep plane facelift & lower eyelid surgeryView all deep plane facelift before and after photos


Face
Deep plane facelift & complementary procedures
Combined with buccal fat pad removal, lower blepharoplasty and an Obagi Blue Peel.
Explore comparison — Deep plane facelift & complementary proceduresView all deep plane facelift before and after photos


Face
Deep plane facelift & lip lift
Combined with lower blepharoplasty, upper lip lift, nasal filler and an Obagi Blue Peel.
Explore comparison — Deep plane facelift & lip liftView all deep plane facelift before and after photos


Face
Deep plane facelift & brow lift
Combined with endoscopic brow lift, buccal fat pad removal and an Obagi Blue Peel.
Explore comparison — Deep plane facelift & brow liftView all deep plane facelift before and after photos
Face
Facelift & neck lift
Combined with lower blepharoplasty and an Obagi Blue Peel.
Explore comparison — Facelift & neck liftView all facelift before and after photos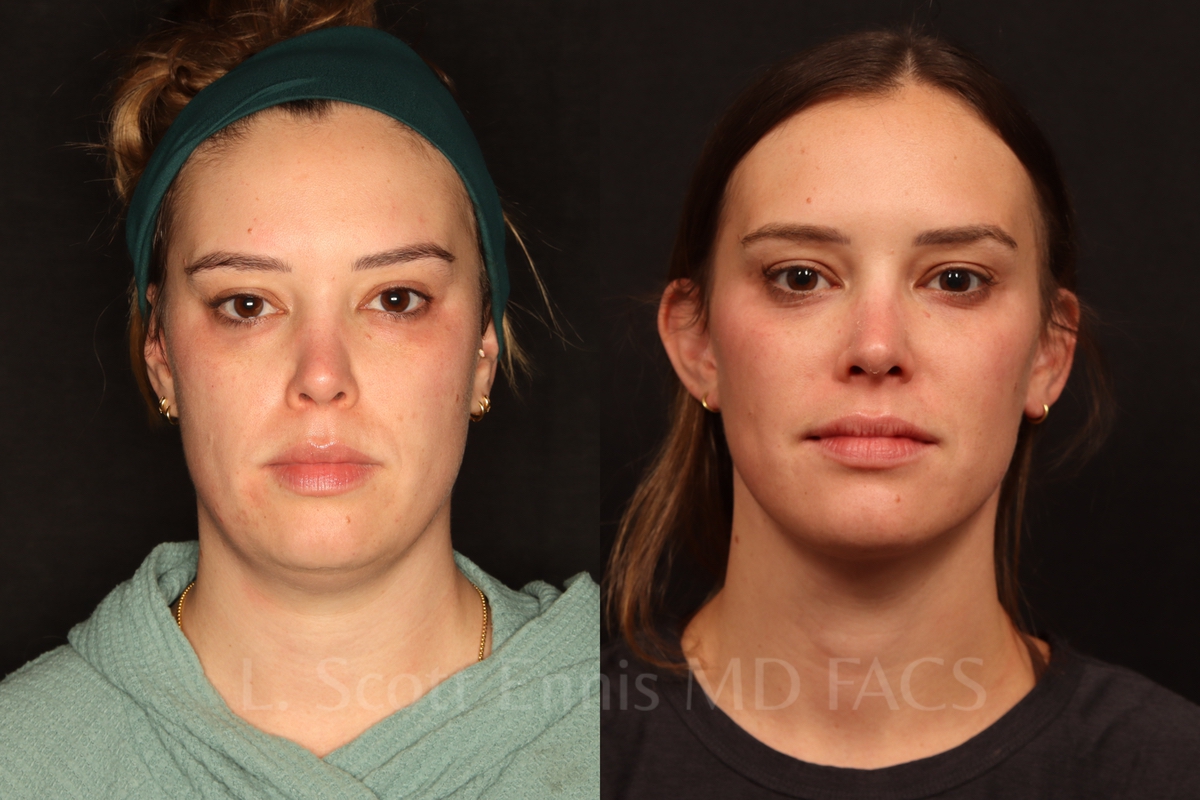


Face
Neck liposuction & mini facelift
A combined approach to fullness beneath the chin and lower-face contour.
Explore comparison — Neck liposuction & mini faceliftView all facelift before and after photos


Face
Mini facelift
Published in the practice’s neck lift gallery; this case is identified as a mini facelift.
Explore comparison — Mini faceliftView all facelift before and after photos
Face
SMAS facelift & skin resurfacing
SMAS facelift combined with an Obagi Blue Peel, from the practice’s neck lift gallery.
Explore comparison — SMAS facelift & skin resurfacingView all facelift before and after photos


Face
Lower blepharoplasty
A closer look at the lower eyelids in front-facing views.
Explore comparison — Lower blepharoplastyView all eyelid surgery before and after photos

Face
Upper & lower blepharoplasty
The upper and lower eyelids shown from two angles.
Explore comparison — Upper & lower blepharoplastyView all eyelid surgery before and after photos


Face
Upper & lower blepharoplasty
Front and three-quarter views from the practice’s published gallery.
Explore comparison — Upper & lower blepharoplastyView all eyelid surgery before and after photos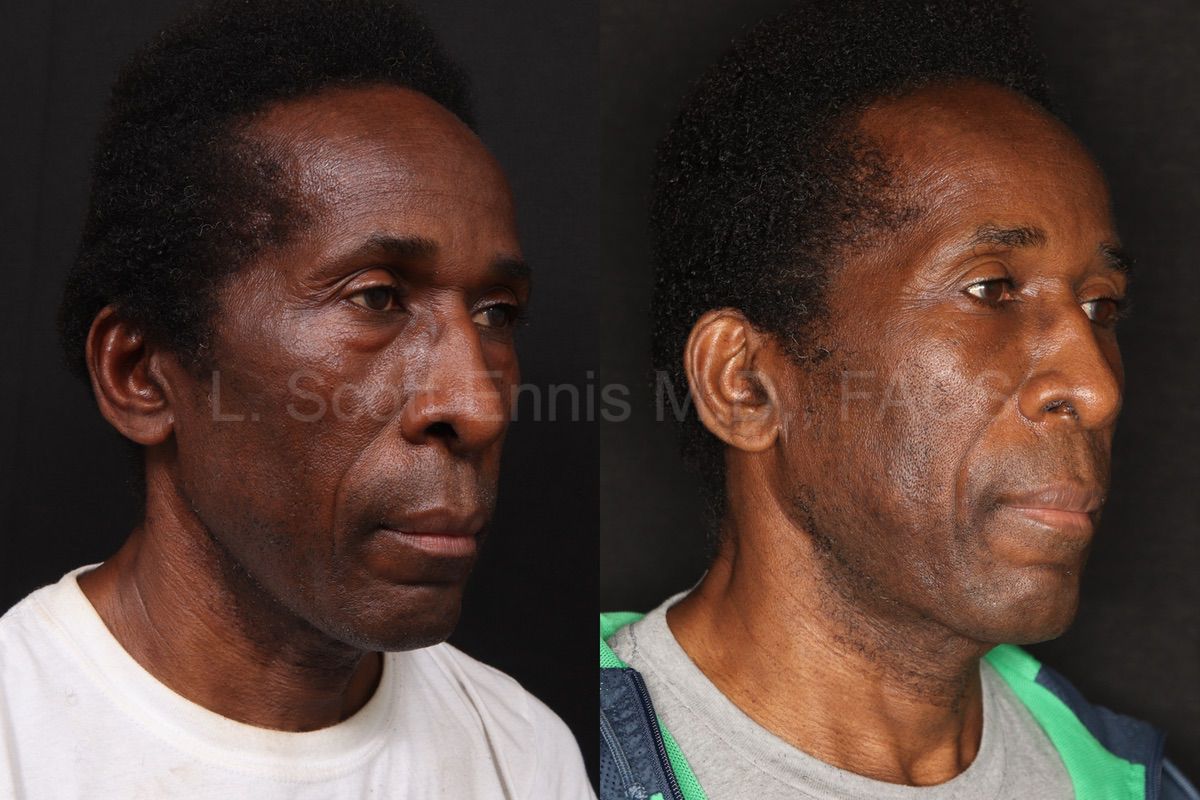
Face
Lower blepharoplasty
Lower eyelid surgery shown in three-quarter views.
Explore comparison — Lower blepharoplastyView all eyelid surgery before and after photos
Face
Brow lift
A case from the practice’s published baby brow lift series.
Explore comparison — Brow liftView all brow lift before and after photos


Face
Modified endoscopic brow lift
Combined with lower blepharoplasty and an Obagi Blue Peel.
Explore comparison — Modified endoscopic brow liftView all eyelid surgery before and after photos


Face
Brow lift & lower blepharoplasty
Brow and lower eyelid surgery shown together from three angles.
Explore comparison — Brow lift & lower blepharoplastyView all eyelid surgery before and after photos


Face
Endoscopic brow lift & facelift
Combined with a deep plane facelift and an Obagi Blue Peel.
Explore comparison — Endoscopic brow lift & faceliftView all deep plane facelift before and after photos


Face
Neck liposuction
Case 55703: profile comparison.
Explore comparison — Neck liposuctionView all neck liposuction before and after photos


Face
Neck liposuction & buccal fat removal
Case 57221: combined neck and cheek treatment.
Explore comparison — Neck liposuction & buccal fat removalView all neck liposuction before and after photos
Face
Neck liposuction
Two views of one patient from the published procedure page.
Explore comparison — Neck liposuctionView all neck liposuction before and after photos

Face
Secondary facelift & buccal fat removal
Case 50479: a combined secondary facelift and buccal fat pad removal.
Explore comparison — Secondary facelift & buccal fat removalView all facelift before and after photos
Face
Rhinoplasty
Case 41217: three-angle comparison.
Explore comparison — RhinoplastyView all rhinoplasty before and after photos
Face
Rhinoplasty
Case 37624: three-angle comparison.
Explore comparison — RhinoplastyView all rhinoplasty before and after photos
Face
Rhinoplasty
Case 27198: three-angle comparison.
Explore comparison — RhinoplastyView all rhinoplasty before and after photos

Face
Rhinoplasty
Two close-up views from the practice’s published nose-surgery gallery.
Explore comparison — RhinoplastyView all rhinoplasty before and after photos
Face
Upper lip lift
Close-up comparison from the practice’s published lip lift series.
Explore comparison — Upper lip liftView all lip lift before and after photos
Face
Upper lip lift
A second close-up comparison from the published lip lift series.
Explore comparison — Upper lip liftView all lip lift before and after photos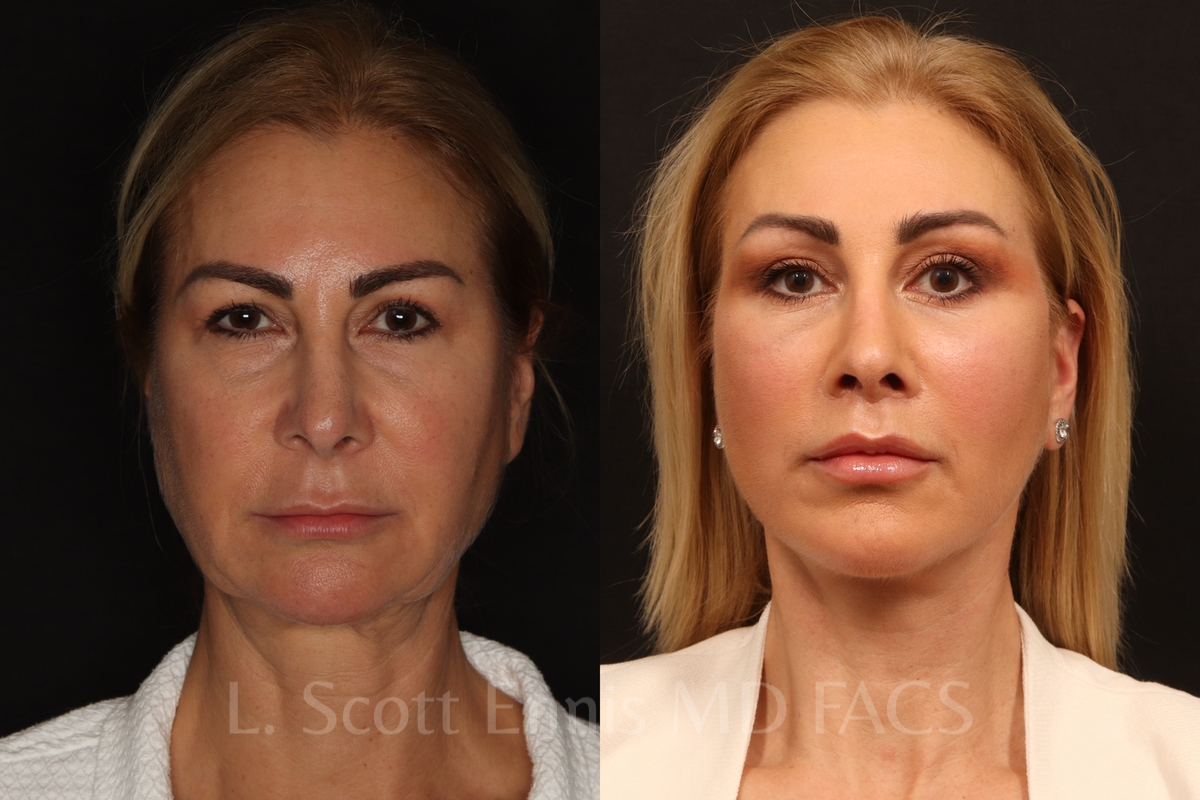


Face
Lip lift & facial rejuvenation
Combined with endoscopic brow lift, lower blepharoplasty, deep plane facelift and buccal fat removal.
Explore comparison — Lip lift & facial rejuvenationView all deep plane facelift before and after photos


Face
Lip lift & facelift
Case 53626: combined with facelift and buccal fat pad removal.
Explore comparison — Lip lift & faceliftView all facelift before and after photos


Face
Buccal fat removal & facelift
Case 39602: combined lower-face treatment.
Explore comparison — Buccal fat removal & faceliftView all facelift before and after photos


Face
Buccal fat removal & facial rejuvenation
Case 26979: combined with endoscopic brow lift, lower blepharoplasty and deep plane facelift.
Explore comparison — Buccal fat removal & facial rejuvenationView all deep plane facelift before and after photos
Face
Buccal fat pad removal
Case 51059: front-view comparison.
Explore comparison — Buccal fat pad removalView all buccal fat removal before and after photos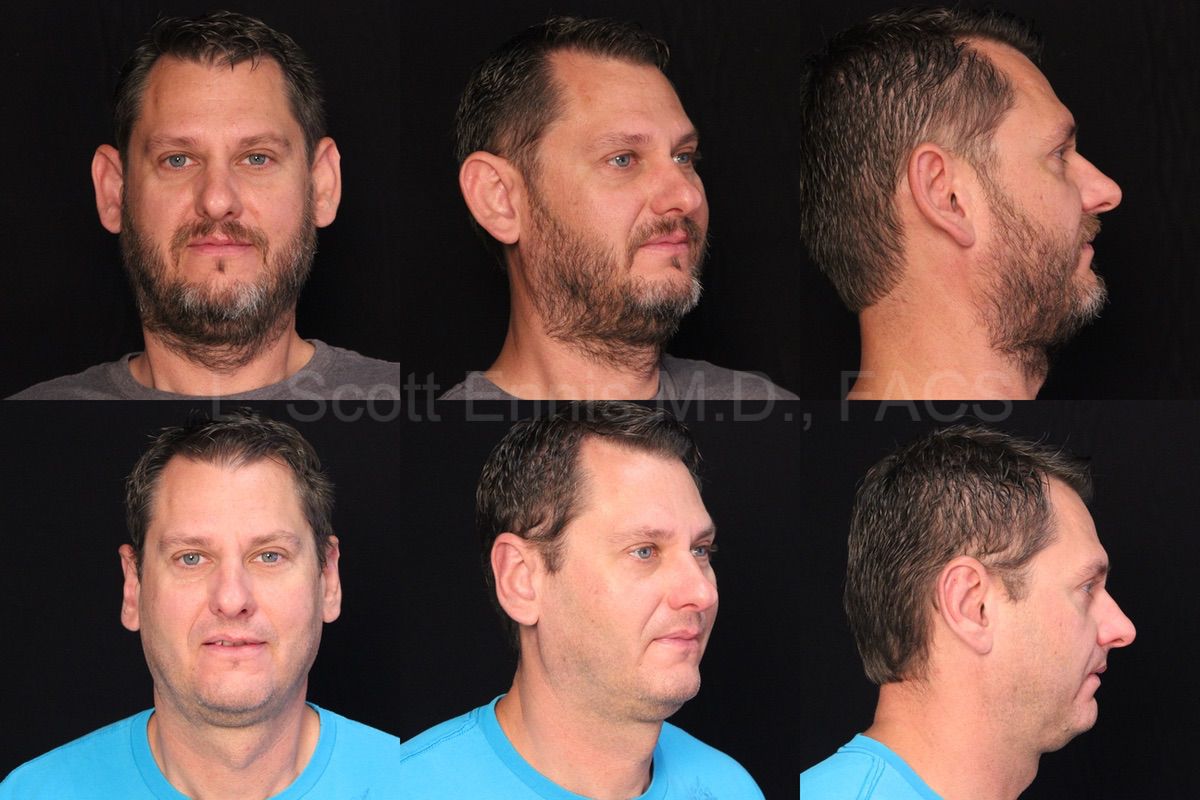


Face
Otoplasty
Case 43481: three-angle comparison.
Explore comparison — OtoplastyView all otoplasty before and after photos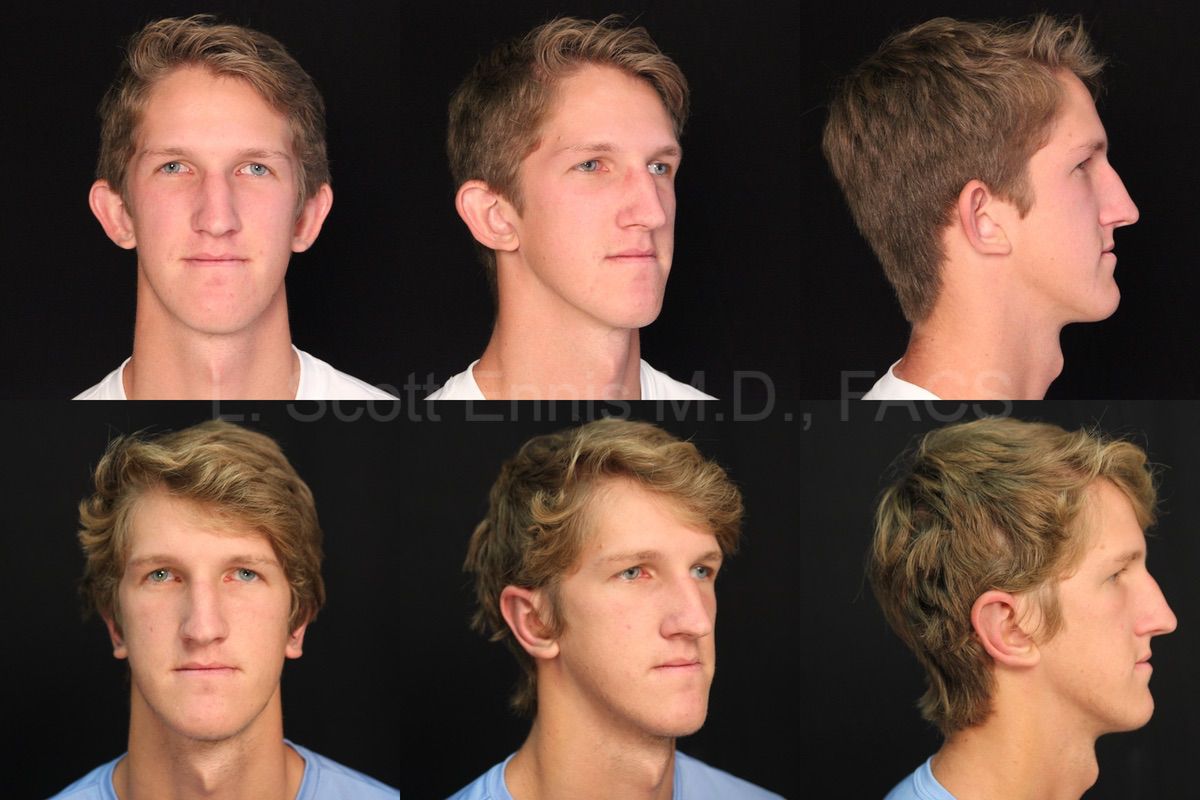


Face
Bilateral otoplasty
Case 14078: both ears treated.
Explore comparison — Bilateral otoplastyView all otoplasty before and after photos

Face
Otoplasty
Three views of one patient from the published ear-surgery gallery.
Explore comparison — OtoplastyView all otoplasty before and after photos

Face
Otoplasty
An additional patient from the practice’s published gallery.
Explore comparison — OtoplastyView all otoplasty before and after photos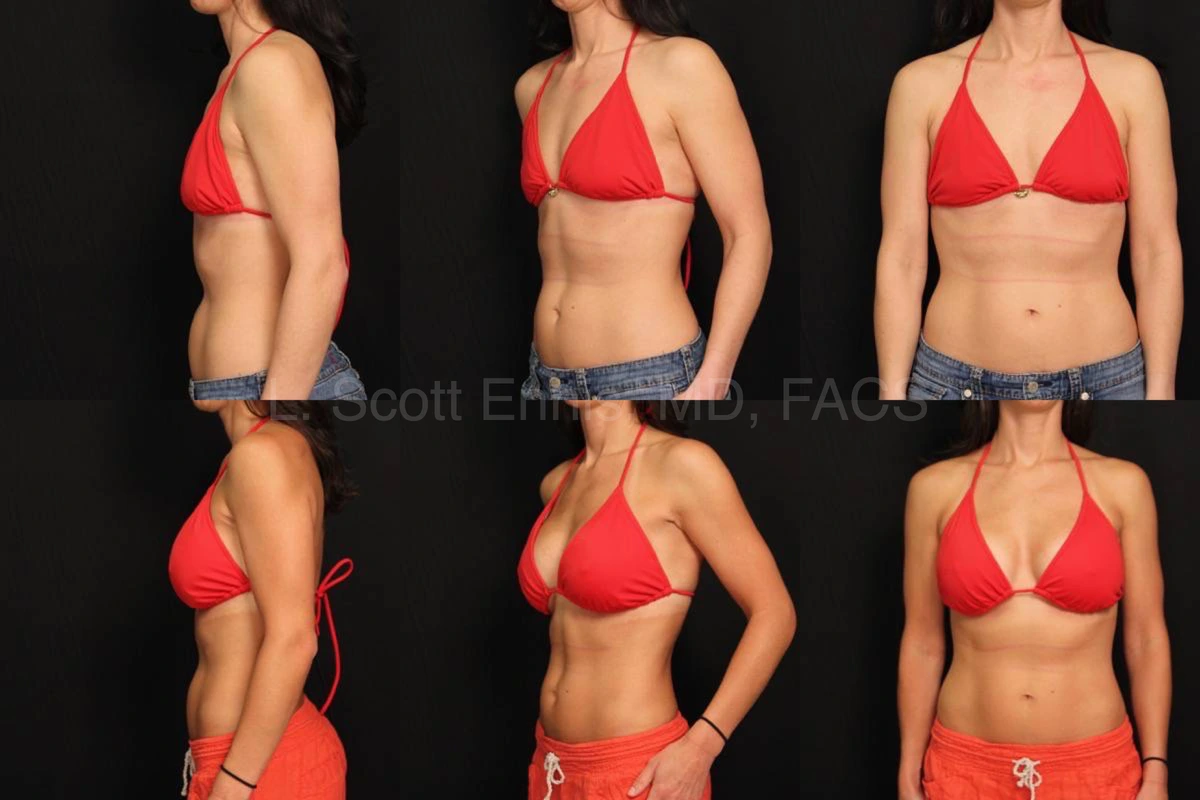
Breast
Breast augmentation
Breast augmentation. Original multi-view patient comparison.
Explore comparison — Breast augmentationView all breast augmentation before and after photos
Breast
Breast augmentation
Breast augmentation. Original multi-view patient comparison.
Explore comparison — Breast augmentationView all breast augmentation before and after photos

Breast
Breast augmentation
Mentor implants. Original patient comparison from Dr. Ennis’s breast augmentation gallery.
Explore comparison — Breast augmentationView all breast augmentation before and after photos

Breast
Breast augmentation
Silicone implants. Original patient comparison from Dr. Ennis’s breast augmentation gallery.
Explore comparison — Breast augmentationView all breast augmentation before and after photos

Breast
Breast augmentation
Silicone implants. Original patient comparison from Dr. Ennis’s breast augmentation gallery.
Explore comparison — Breast augmentationView all breast augmentation before and after photos

Breast
Breast augmentation
Sientra implants. Original patient comparison from Dr. Ennis’s underarm augmentation gallery.
Explore comparison — Breast augmentationView all breast augmentation before and after photos

Breast
Breast augmentation
Sientra implants. Original patient comparison from Dr. Ennis’s underarm augmentation gallery.
Explore comparison — Breast augmentationView all breast augmentation before and after photos

Breast
Breast augmentation
Silicone implants. Original patient comparison from Dr. Ennis’s underarm augmentation gallery.
Explore comparison — Breast augmentationView all breast augmentation before and after photos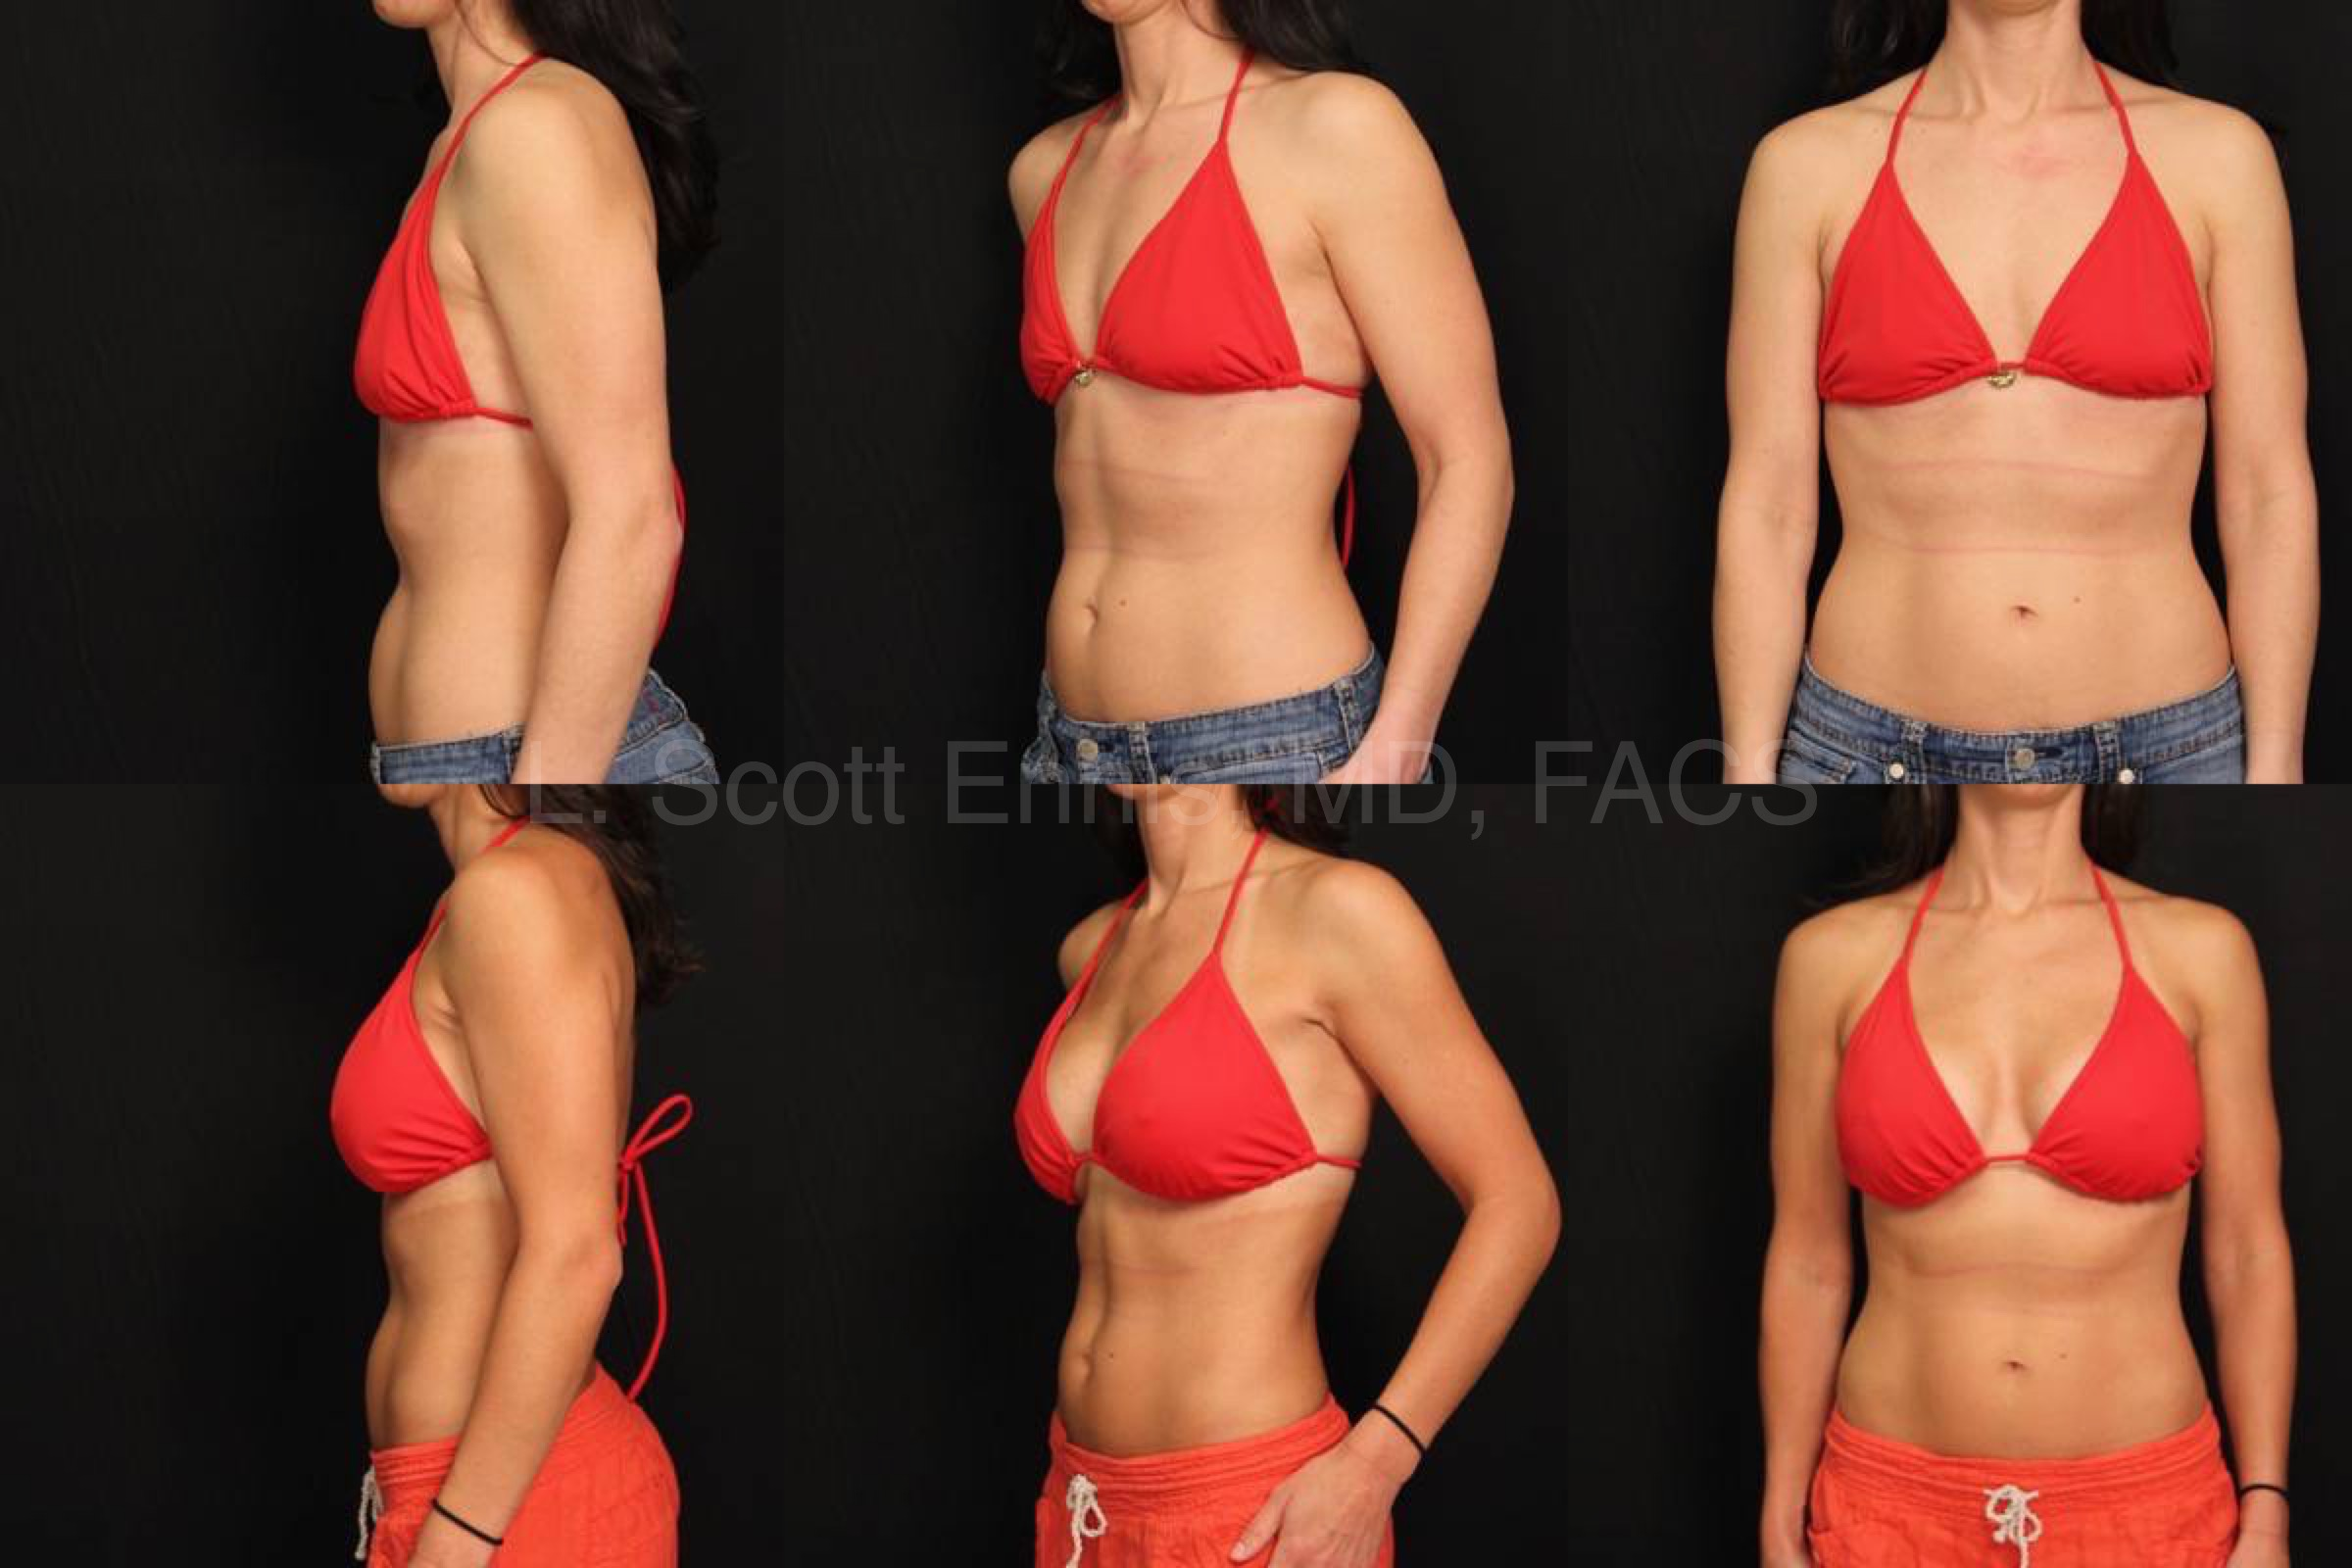
Breast
Breast augmentation
Breast augmentation comparison. These photographs are not verified as Preservé or Motiva results.
Explore comparison — Breast augmentationView all breast augmentation before and after photos
Breast
Breast augmentation
Breast augmentation comparison. These photographs are not verified as Preservé or Motiva results.
Explore comparison — Breast augmentationView all breast augmentation before and after photos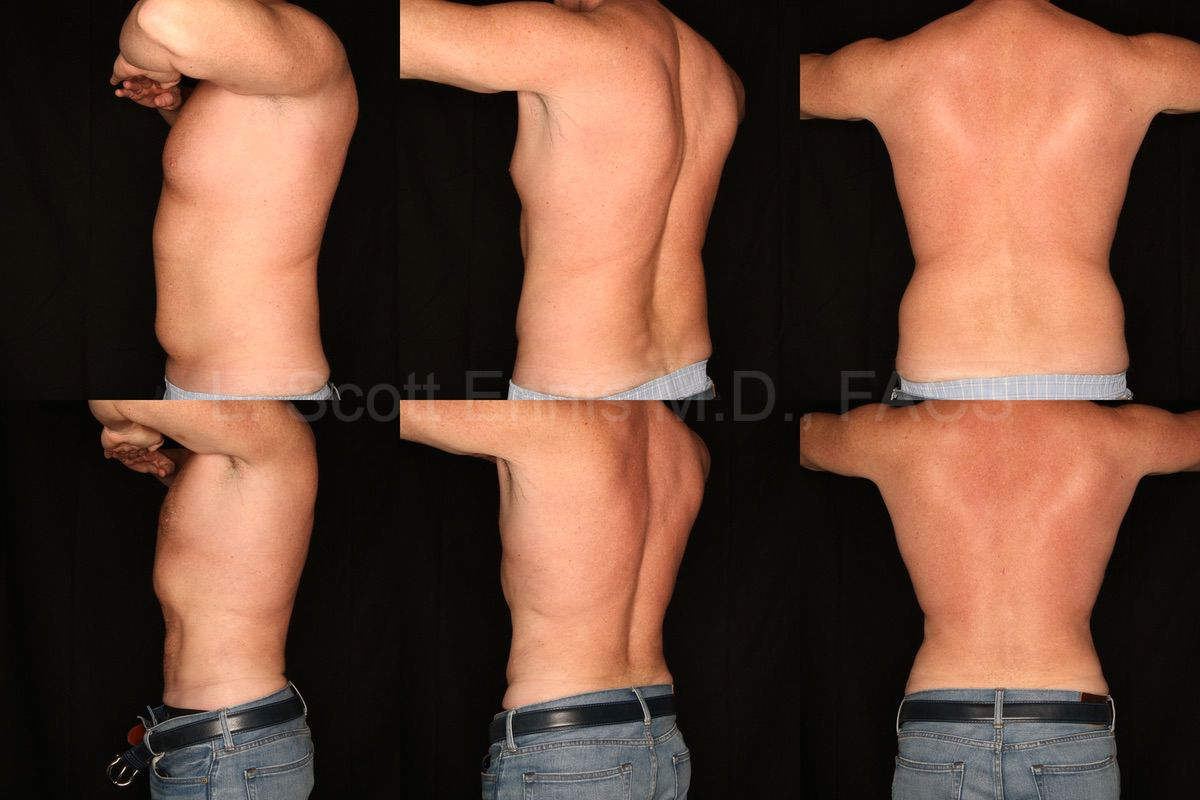
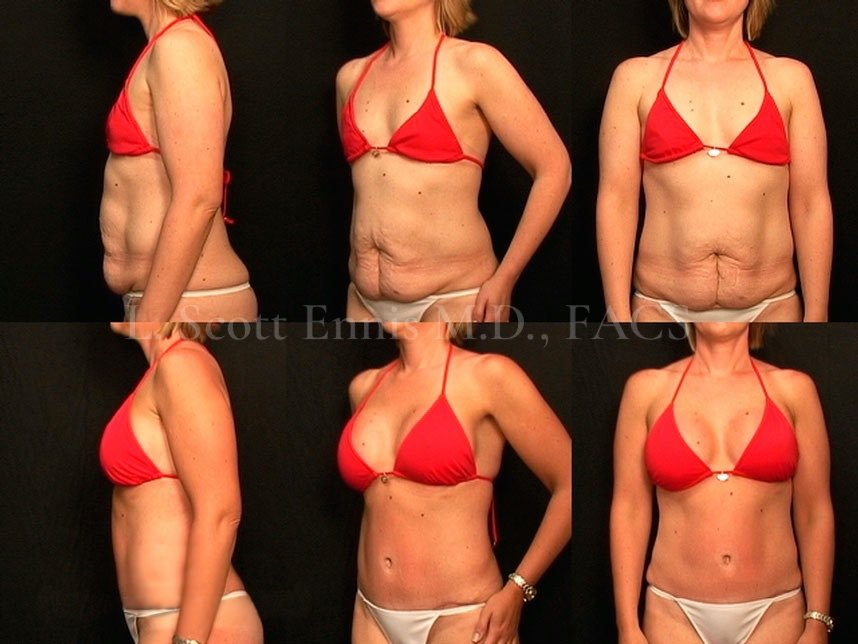
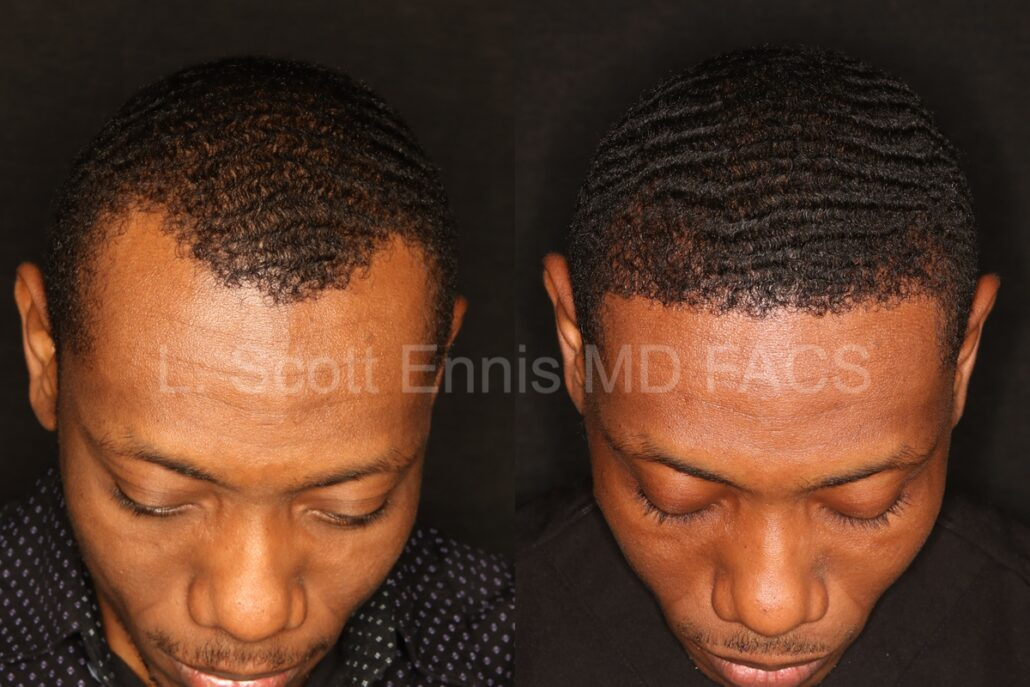
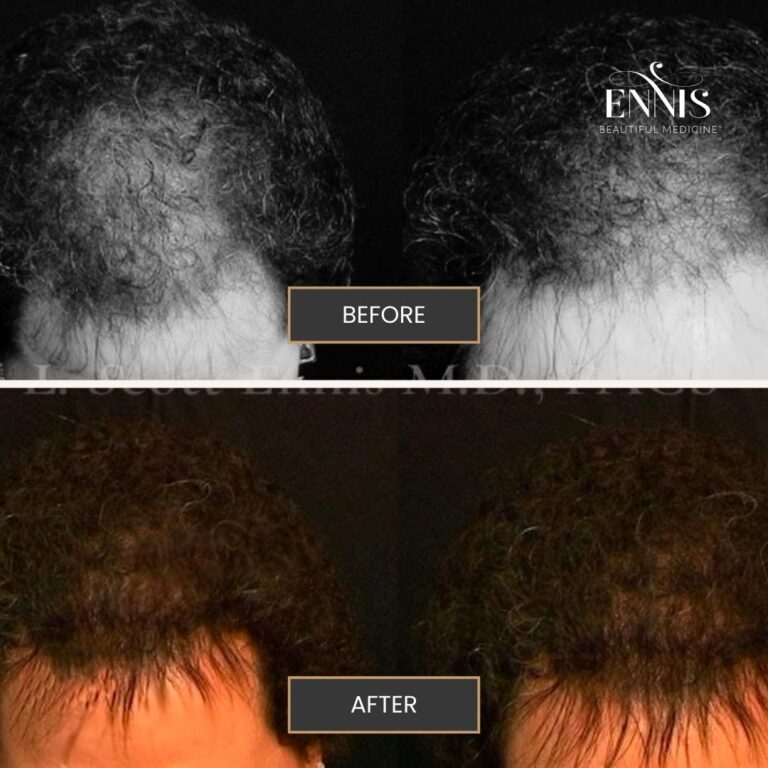
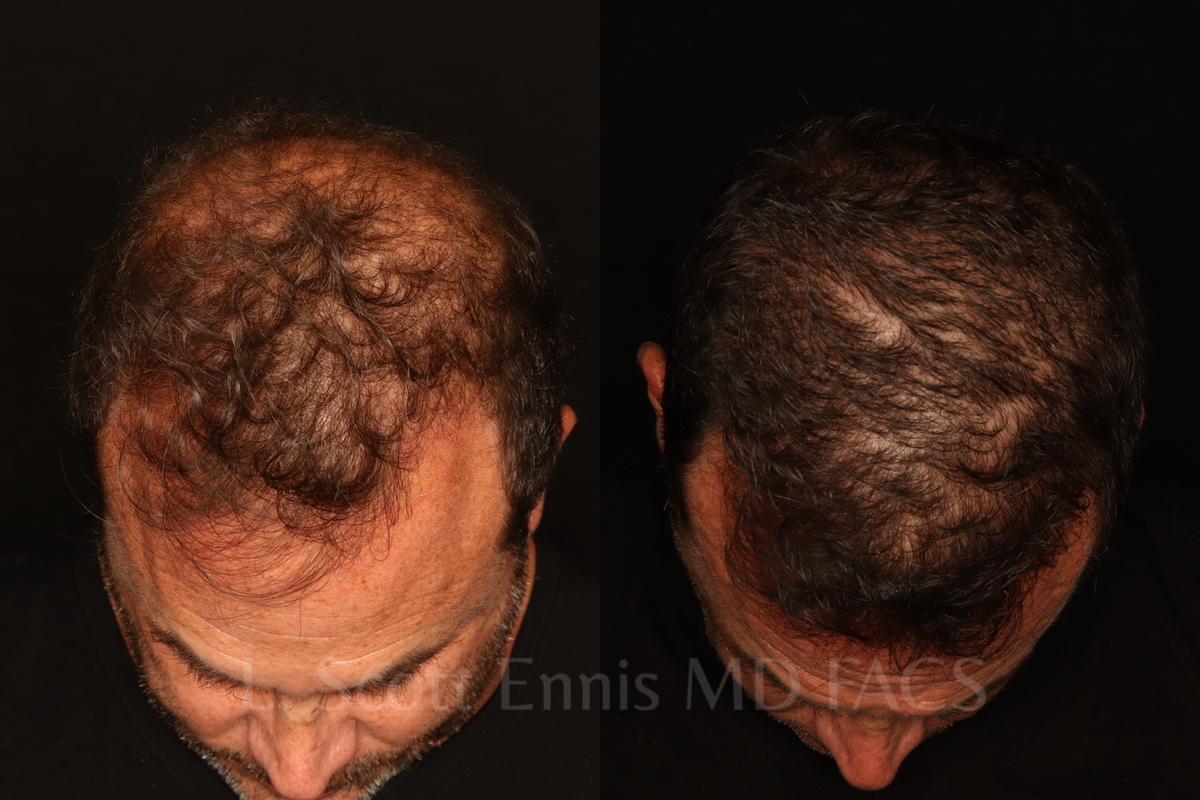
Hair
Hair restoration
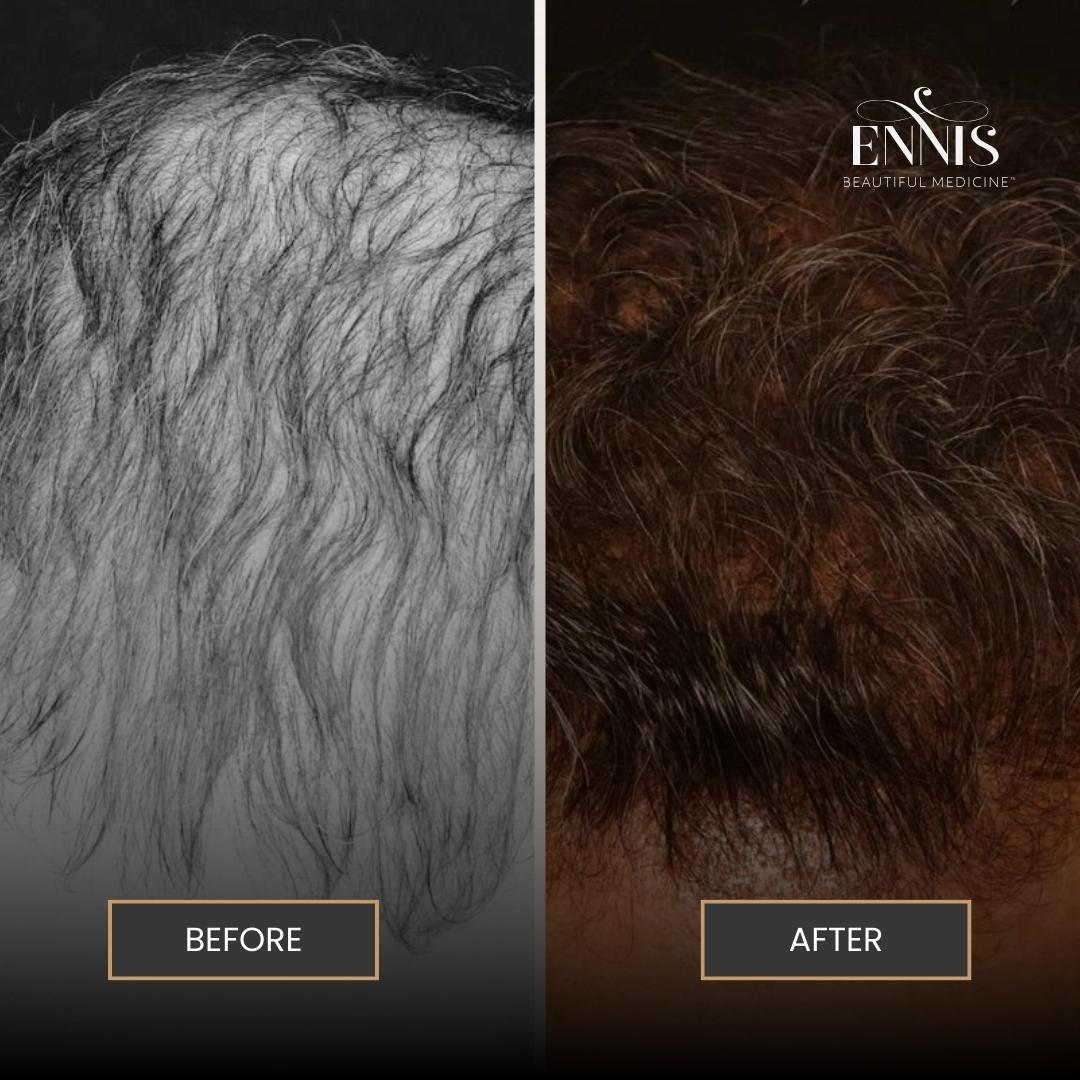
Hair restoration comparison from Dr. Ennis’s published collection.
Explore comparison — Hair restorationView all hair restoration before and after photos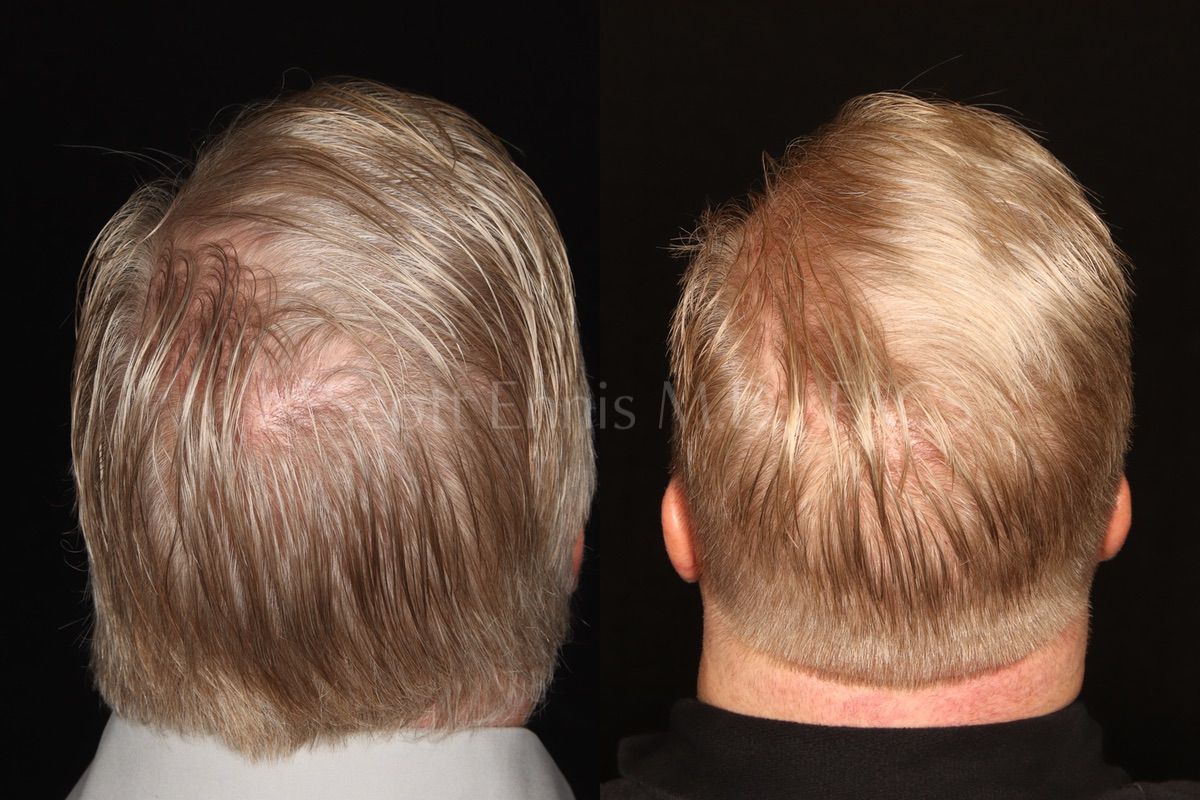
Hair
Hair restoration
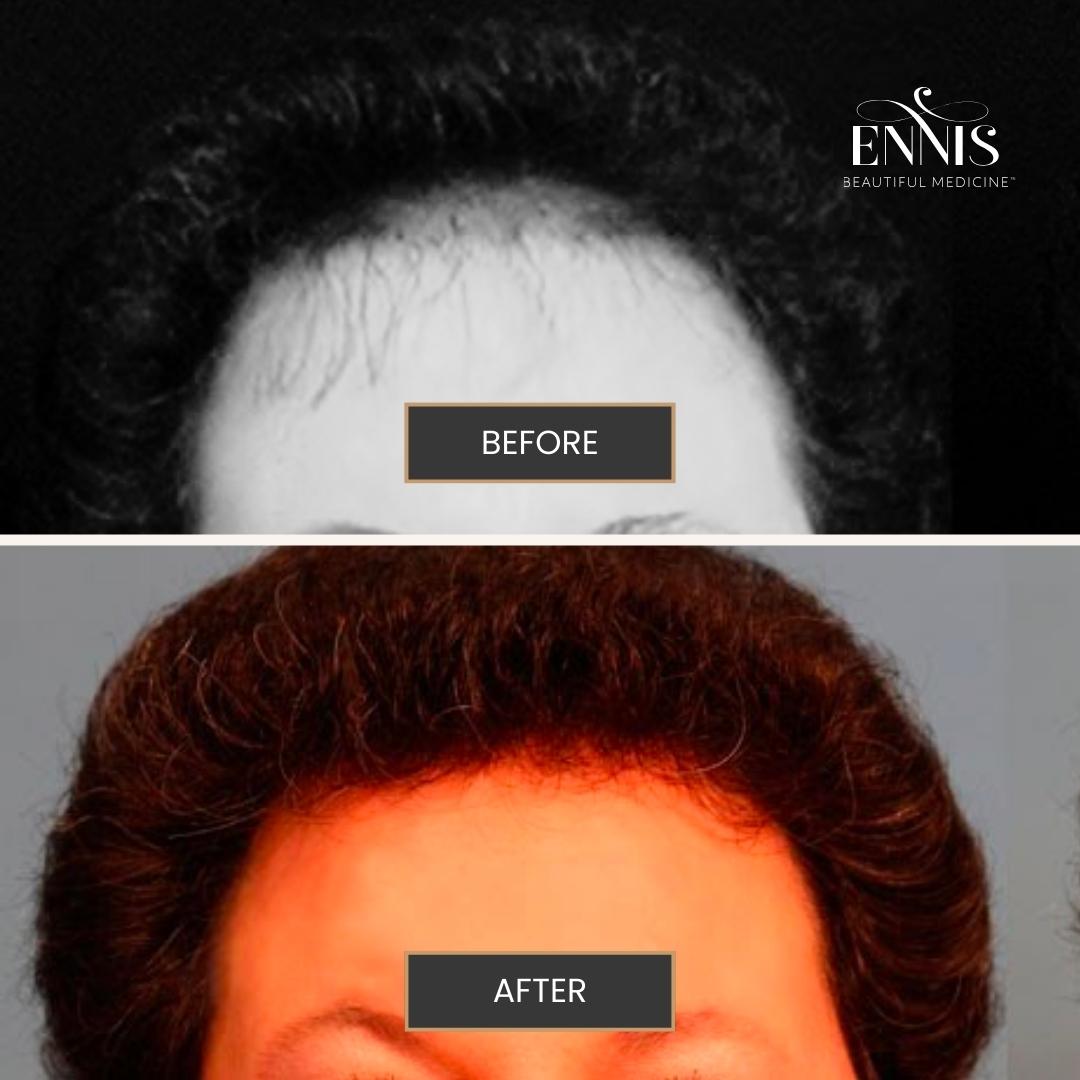
Hair restoration comparison from Dr. Ennis’s published collection.
Explore comparison — Hair restorationView all hair restoration before and after photos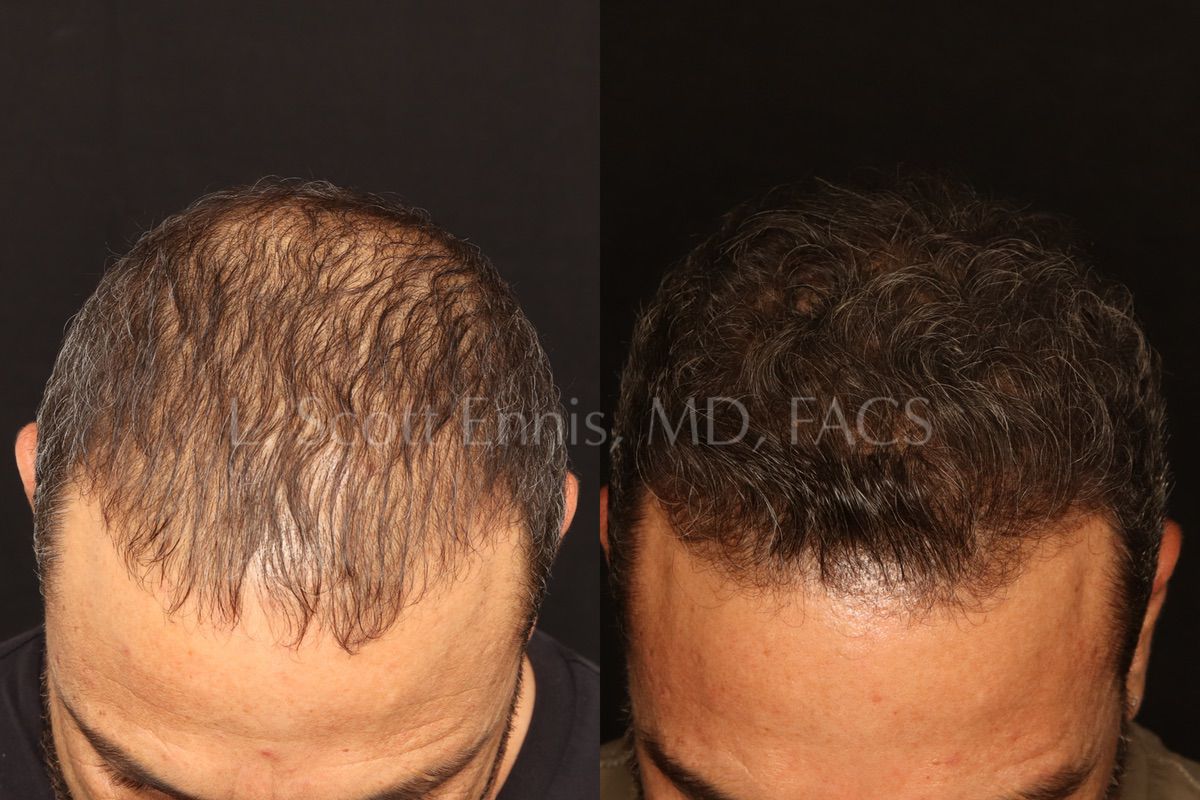
Hair
Hair restoration
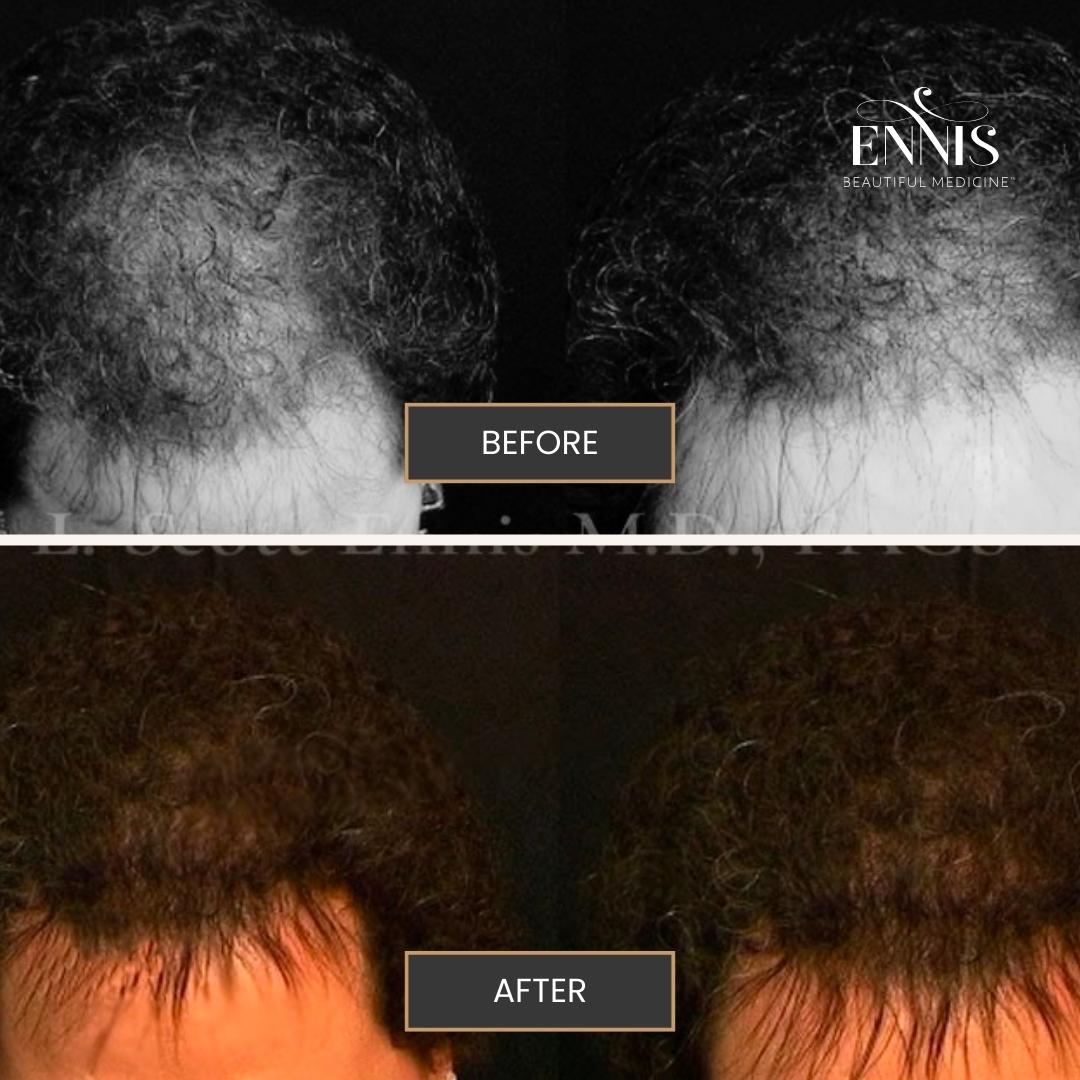
Hair restoration comparison from Dr. Ennis’s published collection.
Explore comparison — Hair restorationView all hair restoration before and after photos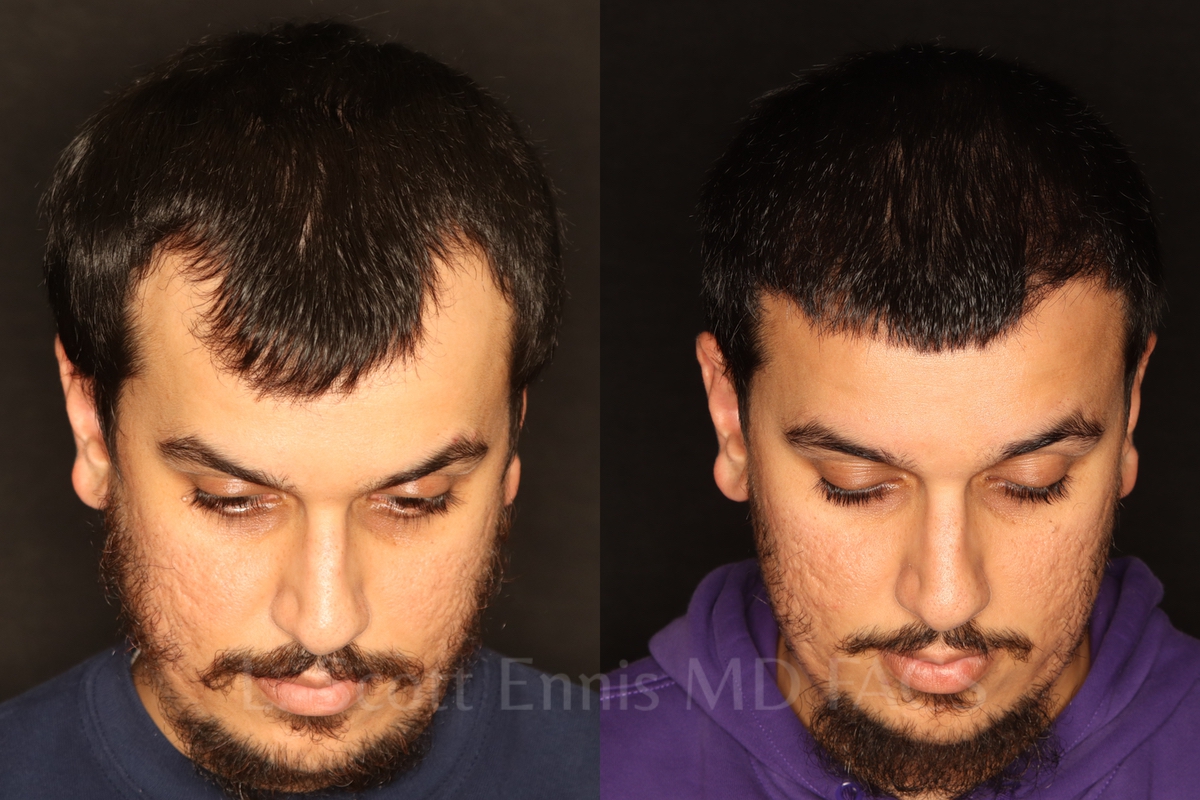
Hair
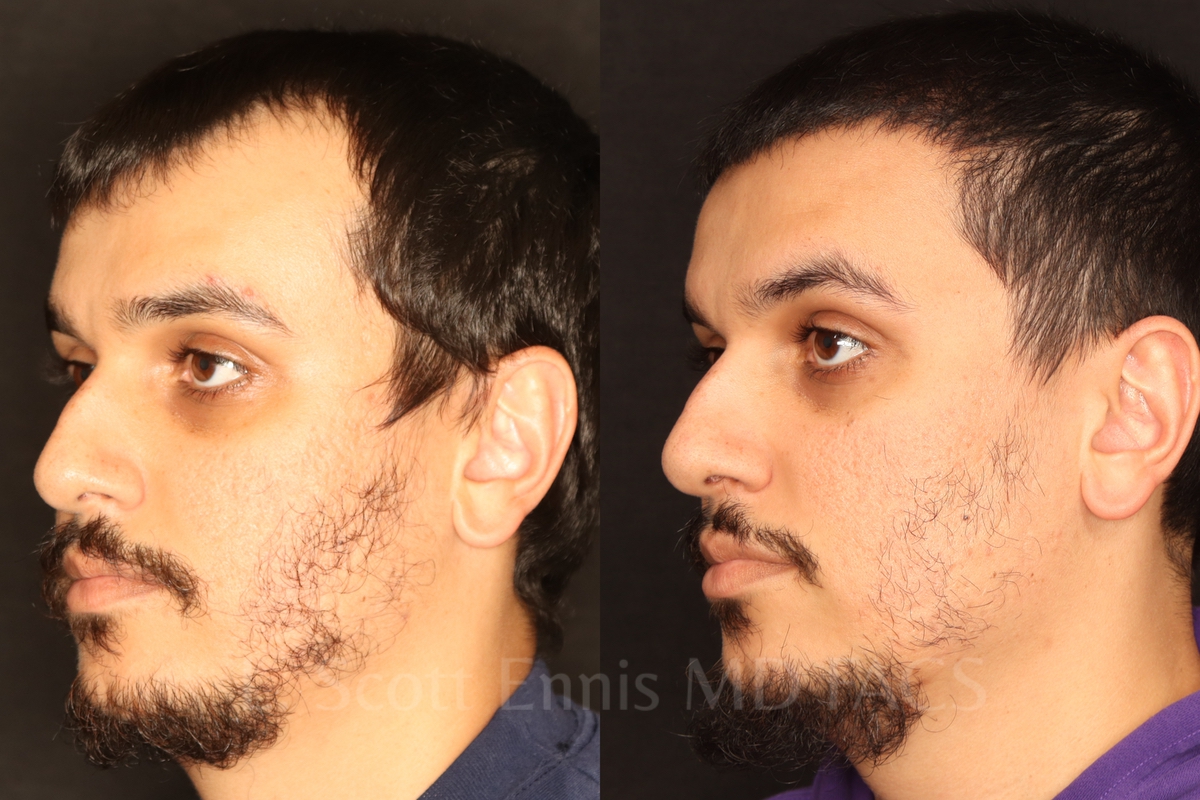
Hair restoration
Hair restoration comparison from Dr. Ennis’s published collection.
Explore comparison — Hair restorationView all hair restoration before and after photos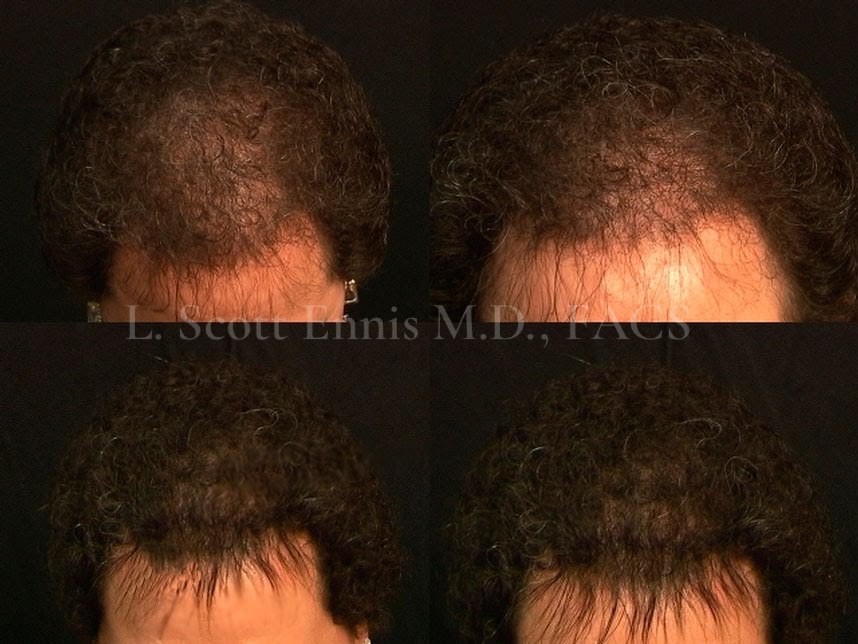
Hair
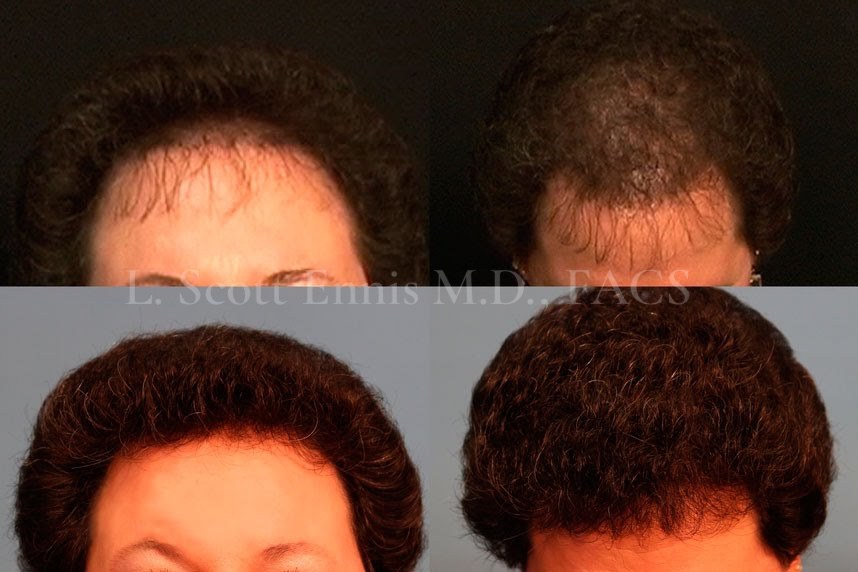
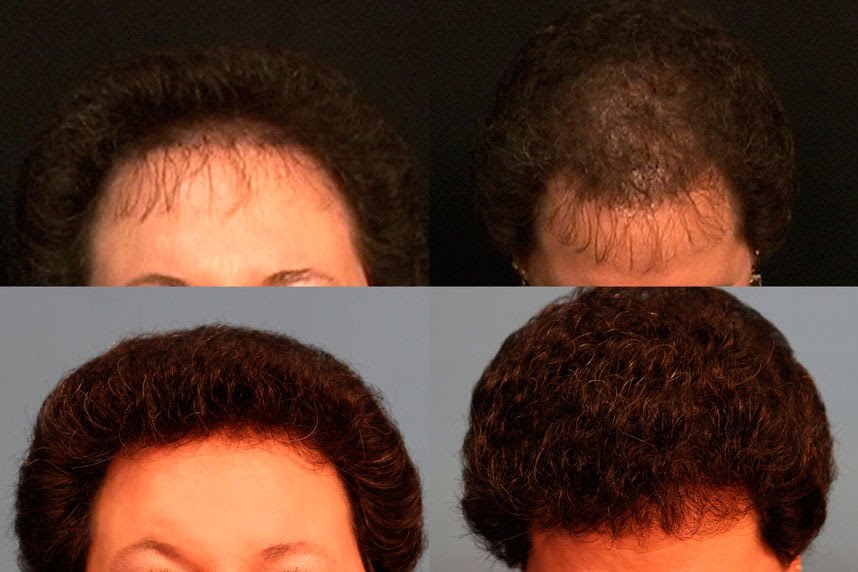
Hair restoration
Hair restoration comparison from Dr. Ennis’s published collection.
Explore comparison — Hair restorationView all hair restoration before and after photos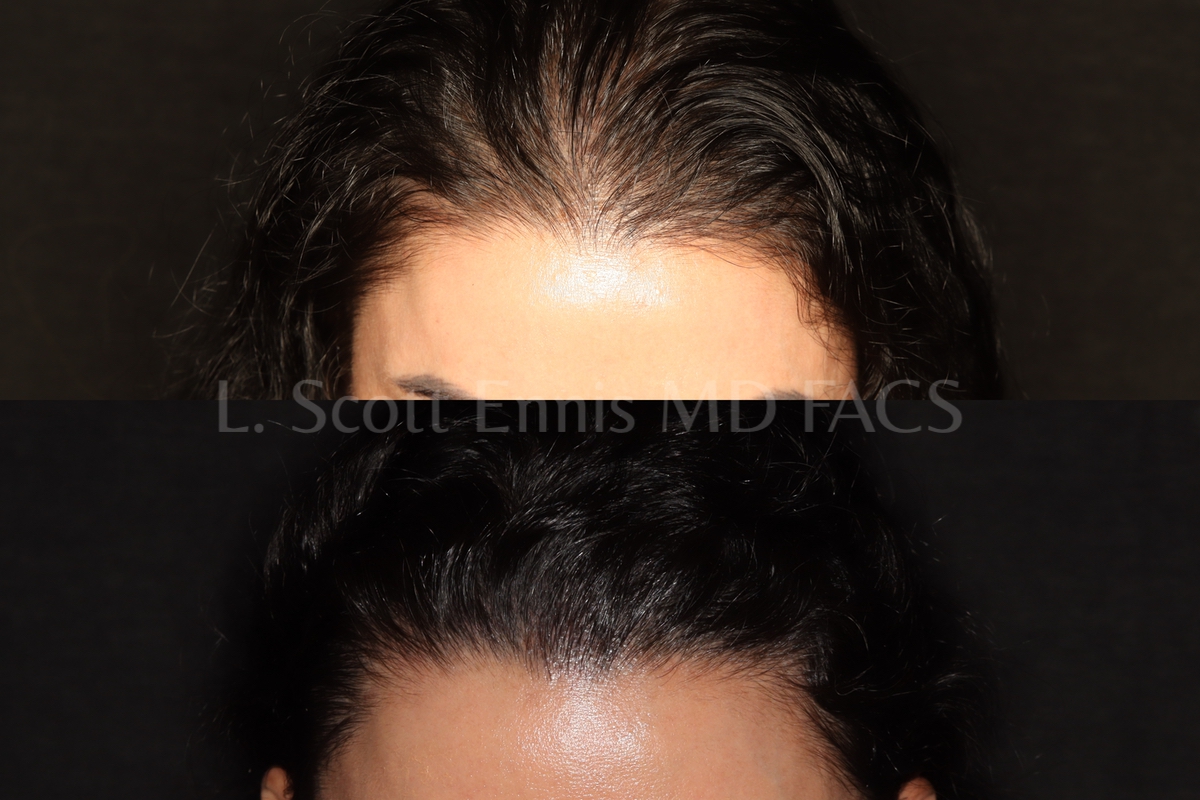
Hair
Hair restoration
Hair restoration comparison from Dr. Ennis’s published collection.
Explore comparison — Hair restorationView all hair restoration before and after photos
Hair
Hair restoration
Hair restoration comparison from Dr. Ennis’s published collection.
Explore comparison — Hair restorationView all hair restoration before and after photos
Hair
Hair restoration
Hair restoration comparison from Dr. Ennis’s published collection.
Explore comparison — Hair restorationView all hair restoration before and after photos
Hair
Hair restoration
Hair restoration comparison from Dr. Ennis’s published collection.
Explore comparison — Hair restorationView all hair restoration before and after photos
Labiaplasty
Labiaplasty
Labiaplasty comparison. The source does not identify this as revision surgery.
Explore comparison — LabiaplastyView all labiaplasty before and after photos
Labiaplasty
Labiaplasty
Labiaplasty comparison. The source does not identify this as revision surgery.
Explore comparison — LabiaplastyView all labiaplasty before and after photos
Labiaplasty
Labiaplasty
Labiaplasty comparison from Dr. Ennis’s published collection.
Explore comparison — LabiaplastyView all labiaplasty before and after photos
Labiaplasty
Labiaplasty
Labiaplasty comparison from Dr. Ennis’s published collection.
Explore comparison — LabiaplastyView all labiaplasty before and after photos

Labiaplasty
Labiaplasty
Labiaplasty comparison from Dr. Ennis’s published collection.
Explore comparison — LabiaplastyView all labiaplasty before and after photos
Labiaplasty
Labiaplasty
Labiaplasty comparison from Dr. Ennis’s published collection.
Explore comparison — LabiaplastyView all labiaplasty before and after photos
Labiaplasty
Labiaplasty
Labiaplasty comparison from Dr. Ennis’s published collection.
Explore comparison — LabiaplastyView all labiaplasty before and after photos

Labiaplasty
Labiaplasty
Labiaplasty comparison from Dr. Ennis’s published collection.
Explore comparison — LabiaplastyView all labiaplasty before and after photos


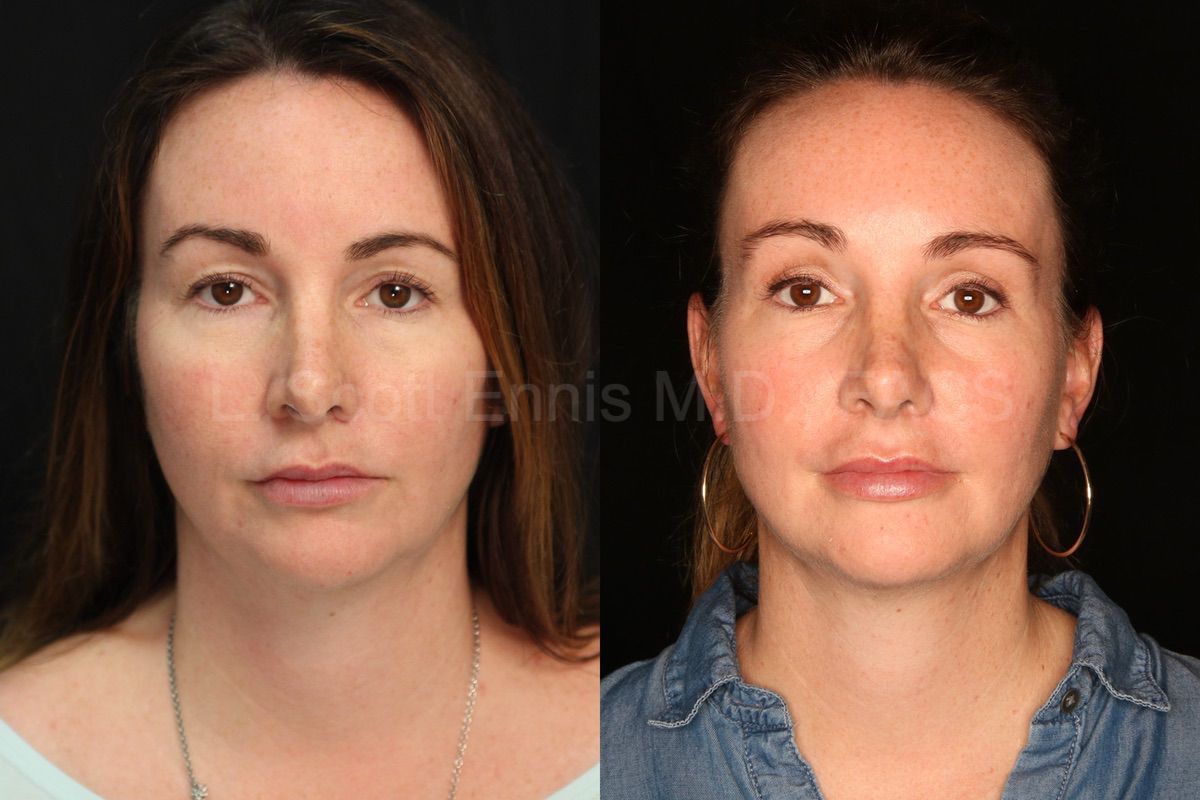


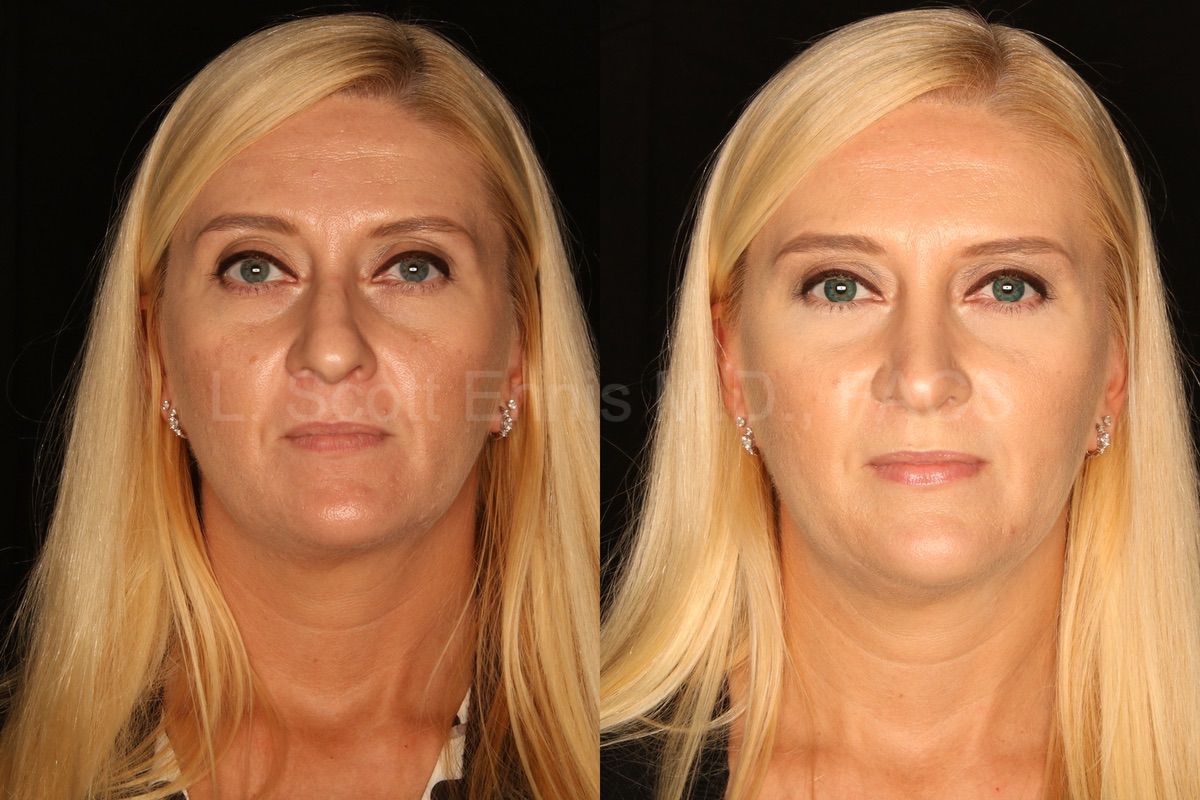


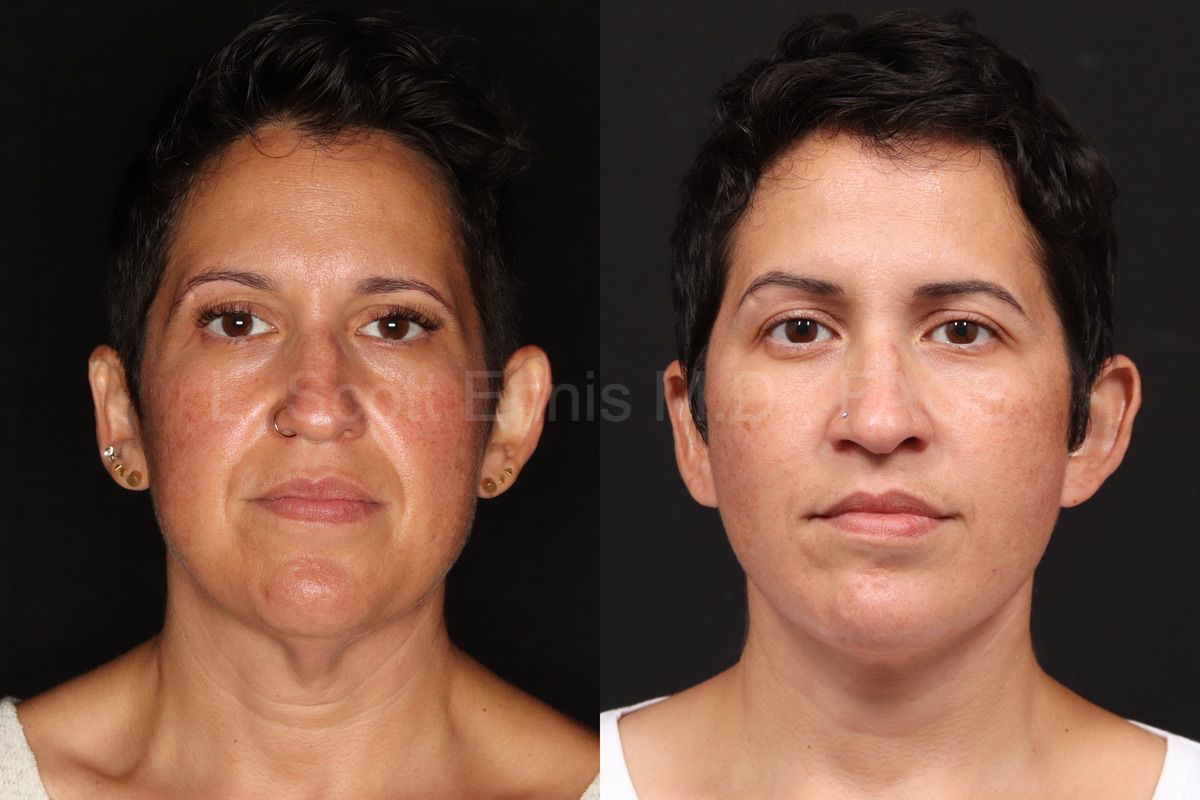


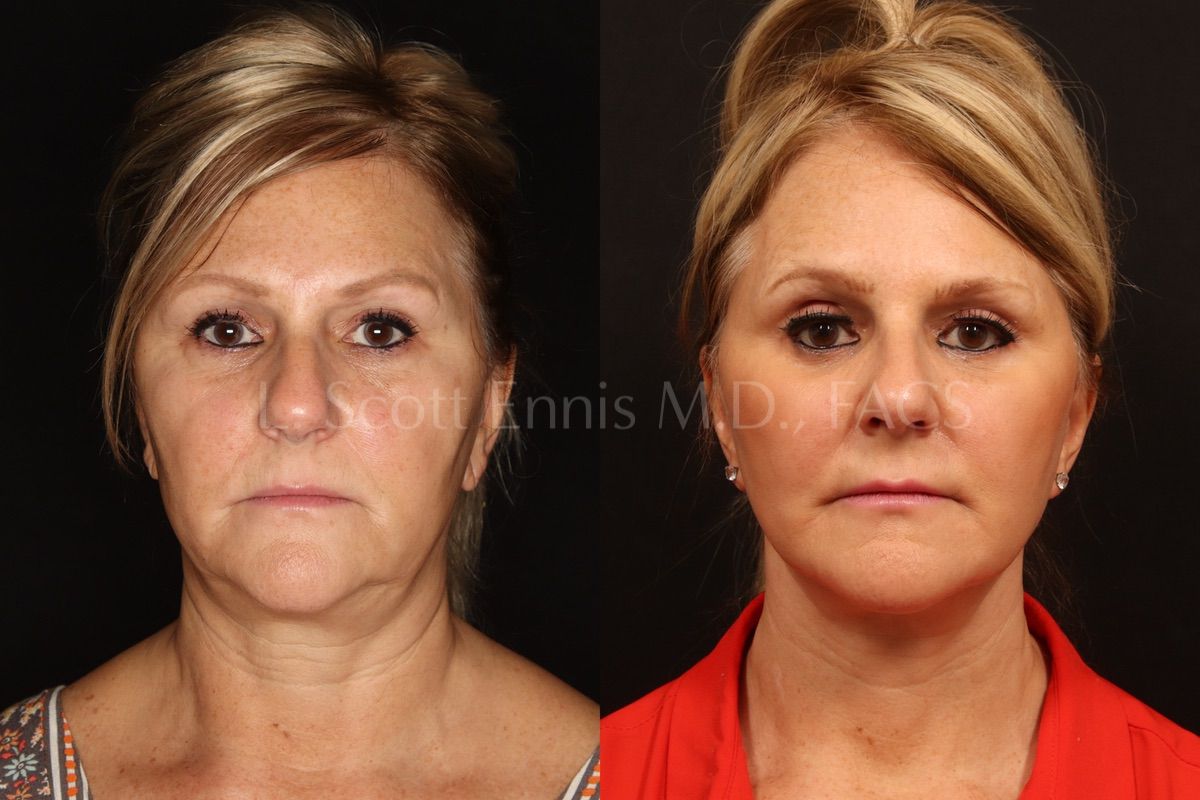





Before & after
Mini-abdominoplasty, Liposuction 360 & AlloClae
Enlarge to inspect details. Scroll across the image with touch, a trackpad, or the arrow keys.
About this comparison
Mini-abdominoplasty, liposuction 360, and gluteal fat grafting with AlloClae. These photographs show the combined result.
Combined procedures: Mini-abdominoplasty, Liposuction 360, Gluteal fat grafting with AlloClae.
Individual results vary. Where procedures were combined, the photographs show the overall result.
Before & after
Deep plane facelift & lower eyelid surgery
Enlarge to inspect details. Scroll across the image with touch, a trackpad, or the arrow keys.
About this comparison
A combined procedure: deep plane facelift and lower blepharoplasty.
Individual results vary. Where procedures were combined, the photographs show the overall result.
Before & after
Deep plane facelift & complementary procedures
Enlarge to inspect details. Scroll across the image with touch, a trackpad, or the arrow keys.
About this comparison
Combined with buccal fat pad removal, lower blepharoplasty and an Obagi Blue Peel.
Individual results vary. Where procedures were combined, the photographs show the overall result.
Before & after
Deep plane facelift & lip lift
Enlarge to inspect details. Scroll across the image with touch, a trackpad, or the arrow keys.
About this comparison
Combined with lower blepharoplasty, upper lip lift, nasal filler and an Obagi Blue Peel.
Individual results vary. Where procedures were combined, the photographs show the overall result.
Before & after
Deep plane facelift & brow lift
Enlarge to inspect details. Scroll across the image with touch, a trackpad, or the arrow keys.
About this comparison
Combined with endoscopic brow lift, buccal fat pad removal and an Obagi Blue Peel.
Individual results vary. Where procedures were combined, the photographs show the overall result.
Before & after
Facelift & neck lift
Enlarge to inspect details. Scroll across the image with touch, a trackpad, or the arrow keys.
About this comparison
Combined with lower blepharoplasty and an Obagi Blue Peel.
Individual results vary. Where procedures were combined, the photographs show the overall result.
Before & after
Neck liposuction & mini facelift
Enlarge to inspect details. Scroll across the image with touch, a trackpad, or the arrow keys.
About this comparison
A combined approach to fullness beneath the chin and lower-face contour.
Individual results vary. Where procedures were combined, the photographs show the overall result.
Before & after
Mini facelift
Enlarge to inspect details. Scroll across the image with touch, a trackpad, or the arrow keys.
About this comparison
Published in the practice’s neck lift gallery; this case is identified as a mini facelift.
Individual results vary. Where procedures were combined, the photographs show the overall result.
Before & after
SMAS facelift & skin resurfacing
Enlarge to inspect details. Scroll across the image with touch, a trackpad, or the arrow keys.
About this comparison
SMAS facelift combined with an Obagi Blue Peel, from the practice’s neck lift gallery.
Individual results vary. Where procedures were combined, the photographs show the overall result.
Before & after
Lower blepharoplasty
Enlarge to inspect details. Scroll across the image with touch, a trackpad, or the arrow keys.
About this comparison
A closer look at the lower eyelids in front-facing views.
Individual results vary. Where procedures were combined, the photographs show the overall result.
Before & after
Upper & lower blepharoplasty
Enlarge to inspect details. Scroll across the image with touch, a trackpad, or the arrow keys.
About this comparison
The upper and lower eyelids shown from two angles.
Individual results vary. Where procedures were combined, the photographs show the overall result.
Before & after
Upper & lower blepharoplasty
Enlarge to inspect details. Scroll across the image with touch, a trackpad, or the arrow keys.
About this comparison
Front and three-quarter views from the practice’s published gallery.
Individual results vary. Where procedures were combined, the photographs show the overall result.
Before & after
Lower blepharoplasty
Enlarge to inspect details. Scroll across the image with touch, a trackpad, or the arrow keys.
About this comparison
Lower eyelid surgery shown in three-quarter views.
Individual results vary. Where procedures were combined, the photographs show the overall result.
Before & after
Brow lift
Enlarge to inspect details. Scroll across the image with touch, a trackpad, or the arrow keys.
About this comparison
A case from the practice’s published baby brow lift series.
Individual results vary. Where procedures were combined, the photographs show the overall result.
Before & after
Modified endoscopic brow lift
Enlarge to inspect details. Scroll across the image with touch, a trackpad, or the arrow keys.
About this comparison
Combined with lower blepharoplasty and an Obagi Blue Peel.
Individual results vary. Where procedures were combined, the photographs show the overall result.
Before & after
Brow lift & lower blepharoplasty
Enlarge to inspect details. Scroll across the image with touch, a trackpad, or the arrow keys.
About this comparison
Brow and lower eyelid surgery shown together from three angles.
Individual results vary. Where procedures were combined, the photographs show the overall result.
Before & after
Endoscopic brow lift & facelift
Enlarge to inspect details. Scroll across the image with touch, a trackpad, or the arrow keys.
About this comparison
Combined with a deep plane facelift and an Obagi Blue Peel.
Individual results vary. Where procedures were combined, the photographs show the overall result.
Before & after
Neck liposuction
Enlarge to inspect details. Scroll across the image with touch, a trackpad, or the arrow keys.
About this comparison
Case 55703: profile comparison.
Individual results vary. Where procedures were combined, the photographs show the overall result.
Before & after
Neck liposuction & buccal fat removal
Enlarge to inspect details. Scroll across the image with touch, a trackpad, or the arrow keys.
About this comparison
Case 57221: combined neck and cheek treatment.
Individual results vary. Where procedures were combined, the photographs show the overall result.
Before & after
Neck liposuction
Enlarge to inspect details. Scroll across the image with touch, a trackpad, or the arrow keys.
About this comparison
Two views of one patient from the published procedure page.
Individual results vary. Where procedures were combined, the photographs show the overall result.
Before & after
Secondary facelift & buccal fat removal
Enlarge to inspect details. Scroll across the image with touch, a trackpad, or the arrow keys.
About this comparison
Case 50479: a combined secondary facelift and buccal fat pad removal.
Individual results vary. Where procedures were combined, the photographs show the overall result.
Before & after
Rhinoplasty
Enlarge to inspect details. Scroll across the image with touch, a trackpad, or the arrow keys.
About this comparison
Case 41217: three-angle comparison.
Individual results vary. Where procedures were combined, the photographs show the overall result.
Before & after
Rhinoplasty
Enlarge to inspect details. Scroll across the image with touch, a trackpad, or the arrow keys.
About this comparison
Case 37624: three-angle comparison.
Individual results vary. Where procedures were combined, the photographs show the overall result.
Before & after
Rhinoplasty
Enlarge to inspect details. Scroll across the image with touch, a trackpad, or the arrow keys.
About this comparison
Case 27198: three-angle comparison.
Individual results vary. Where procedures were combined, the photographs show the overall result.
Before & after
Rhinoplasty
Enlarge to inspect details. Scroll across the image with touch, a trackpad, or the arrow keys.
About this comparison
Two close-up views from the practice’s published nose-surgery gallery.
Individual results vary. Where procedures were combined, the photographs show the overall result.
Before & after
Upper lip lift
Enlarge to inspect details. Scroll across the image with touch, a trackpad, or the arrow keys.
About this comparison
Close-up comparison from the practice’s published lip lift series.
Individual results vary. Where procedures were combined, the photographs show the overall result.
Before & after
Upper lip lift
Enlarge to inspect details. Scroll across the image with touch, a trackpad, or the arrow keys.
About this comparison
A second close-up comparison from the published lip lift series.
Individual results vary. Where procedures were combined, the photographs show the overall result.
Before & after
Lip lift & facial rejuvenation
Enlarge to inspect details. Scroll across the image with touch, a trackpad, or the arrow keys.
About this comparison
Combined with endoscopic brow lift, lower blepharoplasty, deep plane facelift and buccal fat removal.
Individual results vary. Where procedures were combined, the photographs show the overall result.
Before & after
Lip lift & facelift
Enlarge to inspect details. Scroll across the image with touch, a trackpad, or the arrow keys.
About this comparison
Case 53626: combined with facelift and buccal fat pad removal.
Individual results vary. Where procedures were combined, the photographs show the overall result.
Before & after
Buccal fat removal & facelift
Enlarge to inspect details. Scroll across the image with touch, a trackpad, or the arrow keys.
About this comparison
Case 39602: combined lower-face treatment.
Individual results vary. Where procedures were combined, the photographs show the overall result.
Before & after
Buccal fat removal & facial rejuvenation
Enlarge to inspect details. Scroll across the image with touch, a trackpad, or the arrow keys.
About this comparison
Case 26979: combined with endoscopic brow lift, lower blepharoplasty and deep plane facelift.
Individual results vary. Where procedures were combined, the photographs show the overall result.
Before & after
Buccal fat pad removal
Enlarge to inspect details. Scroll across the image with touch, a trackpad, or the arrow keys.
About this comparison
Case 51059: front-view comparison.
Individual results vary. Where procedures were combined, the photographs show the overall result.
Before & after
Otoplasty
Enlarge to inspect details. Scroll across the image with touch, a trackpad, or the arrow keys.
About this comparison
Case 43481: three-angle comparison.
Individual results vary. Where procedures were combined, the photographs show the overall result.
Before & after
Bilateral otoplasty
Enlarge to inspect details. Scroll across the image with touch, a trackpad, or the arrow keys.
About this comparison
Case 14078: both ears treated.
Individual results vary. Where procedures were combined, the photographs show the overall result.
Before & after
Otoplasty
Enlarge to inspect details. Scroll across the image with touch, a trackpad, or the arrow keys.
About this comparison
Three views of one patient from the published ear-surgery gallery.
Individual results vary. Where procedures were combined, the photographs show the overall result.
Before & after
Otoplasty
Enlarge to inspect details. Scroll across the image with touch, a trackpad, or the arrow keys.
About this comparison
An additional patient from the practice’s published gallery.
Individual results vary. Where procedures were combined, the photographs show the overall result.
Before & after
Breast augmentation
Enlarge to inspect details. Scroll across the image with touch, a trackpad, or the arrow keys.
About this comparison
Breast augmentation. Original multi-view patient comparison.
Individual results vary. Where procedures were combined, the photographs show the overall result.
Before & after
Breast augmentation
Enlarge to inspect details. Scroll across the image with touch, a trackpad, or the arrow keys.
About this comparison
Breast augmentation. Original multi-view patient comparison.
Individual results vary. Where procedures were combined, the photographs show the overall result.
Before & after
Breast Augmentation
Enlarge to inspect details. Scroll across the image with touch, a trackpad, or the arrow keys.
About this comparison
Individual results vary. Where procedures were combined, the photographs show the overall result.
Before & after
Breast augmentation
Enlarge to inspect details. Scroll across the image with touch, a trackpad, or the arrow keys.
About this comparison
Mentor implants. Original patient comparison from Dr. Ennis’s breast augmentation gallery.
Individual results vary. Where procedures were combined, the photographs show the overall result.
Before & after
Breast augmentation
Enlarge to inspect details. Scroll across the image with touch, a trackpad, or the arrow keys.
About this comparison
Silicone implants. Original patient comparison from Dr. Ennis’s breast augmentation gallery.
Individual results vary. Where procedures were combined, the photographs show the overall result.
Before & after
Breast augmentation
Enlarge to inspect details. Scroll across the image with touch, a trackpad, or the arrow keys.
About this comparison
Silicone implants. Original patient comparison from Dr. Ennis’s breast augmentation gallery.
Individual results vary. Where procedures were combined, the photographs show the overall result.
Before & after
Breast augmentation
Enlarge to inspect details. Scroll across the image with touch, a trackpad, or the arrow keys.
About this comparison
Sientra implants. Original patient comparison from Dr. Ennis’s underarm augmentation gallery.
Individual results vary. Where procedures were combined, the photographs show the overall result.
Before & after
Breast augmentation
Enlarge to inspect details. Scroll across the image with touch, a trackpad, or the arrow keys.
About this comparison
Sientra implants. Original patient comparison from Dr. Ennis’s underarm augmentation gallery.
Individual results vary. Where procedures were combined, the photographs show the overall result.
Before & after
Breast augmentation
Enlarge to inspect details. Scroll across the image with touch, a trackpad, or the arrow keys.
About this comparison
Silicone implants. Original patient comparison from Dr. Ennis’s underarm augmentation gallery.
Individual results vary. Where procedures were combined, the photographs show the overall result.
Before & after
Breast augmentation
Enlarge to inspect details. Scroll across the image with touch, a trackpad, or the arrow keys.
About this comparison
Breast augmentation comparison. These photographs are not verified as Preservé or Motiva results.
Individual results vary. Where procedures were combined, the photographs show the overall result.
Before & after
Breast augmentation
Enlarge to inspect details. Scroll across the image with touch, a trackpad, or the arrow keys.
About this comparison
Breast augmentation comparison. These photographs are not verified as Preservé or Motiva results.
Individual results vary. Where procedures were combined, the photographs show the overall result.
Before & after
Body contouring
Enlarge to inspect details. Scroll across the image with touch, a trackpad, or the arrow keys.
About this comparison
Individual results vary. Where procedures were combined, the photographs show the overall result.
A historical case by Dr. L. Scott Ennis. Current treatment-provider assignments may differ.
Before & after
Mommy makeover
Enlarge to inspect details. Scroll across the image with touch, a trackpad, or the arrow keys.
About this comparison
Individual results vary. Where procedures were combined, the photographs show the overall result.
A historical case by Dr. L. Scott Ennis. Current treatment-provider assignments may differ.
Before & after
Hair restoration
Enlarge to inspect details. Scroll across the image with touch, a trackpad, or the arrow keys.
About this comparison
Individual results vary. Where procedures were combined, the photographs show the overall result.
Before & after
Hair restoration
Enlarge to inspect details. Scroll across the image with touch, a trackpad, or the arrow keys.
About this comparison
Individual results vary. Where procedures were combined, the photographs show the overall result.
Before & after
Hair restoration
Enlarge to inspect details. Scroll across the image with touch, a trackpad, or the arrow keys.
About this comparison
Hair restoration comparison from Dr. Ennis’s published collection.
Individual results vary. Where procedures were combined, the photographs show the overall result.
Before & after
Hair restoration
Enlarge to inspect details. Scroll across the image with touch, a trackpad, or the arrow keys.
About this comparison
Hair restoration comparison from Dr. Ennis’s published collection.
Individual results vary. Where procedures were combined, the photographs show the overall result.
Before & after
Hair restoration
Enlarge to inspect details. Scroll across the image with touch, a trackpad, or the arrow keys.
About this comparison
Hair restoration comparison from Dr. Ennis’s published collection.
Individual results vary. Where procedures were combined, the photographs show the overall result.
Before & after
Hair restoration
Enlarge to inspect details. Scroll across the image with touch, a trackpad, or the arrow keys.
About this comparison
Hair restoration comparison from Dr. Ennis’s published collection.
Individual results vary. Where procedures were combined, the photographs show the overall result.
Before & after
Hair restoration
Enlarge to inspect details. Scroll across the image with touch, a trackpad, or the arrow keys.
About this comparison
Hair restoration comparison from Dr. Ennis’s published collection.
Individual results vary. Where procedures were combined, the photographs show the overall result.
Before & after
Hair restoration
Enlarge to inspect details. Scroll across the image with touch, a trackpad, or the arrow keys.
About this comparison
Hair restoration comparison from Dr. Ennis’s published collection.
Individual results vary. Where procedures were combined, the photographs show the overall result.
Before & after
Hair restoration
Enlarge to inspect details. Scroll across the image with touch, a trackpad, or the arrow keys.
About this comparison
Hair restoration comparison from Dr. Ennis’s published collection.
Individual results vary. Where procedures were combined, the photographs show the overall result.
Before & after
Hair restoration
Enlarge to inspect details. Scroll across the image with touch, a trackpad, or the arrow keys.
About this comparison
Hair restoration comparison from Dr. Ennis’s published collection.
Individual results vary. Where procedures were combined, the photographs show the overall result.
Before & after
Hair restoration
Enlarge to inspect details. Scroll across the image with touch, a trackpad, or the arrow keys.
About this comparison
Hair restoration comparison from Dr. Ennis’s published collection.
Individual results vary. Where procedures were combined, the photographs show the overall result.
Before & after
Labiaplasty
Enlarge to inspect details. Scroll across the image with touch, a trackpad, or the arrow keys.
About this comparison
Labiaplasty comparison. The source does not identify this as revision surgery.
Individual results vary. Where procedures were combined, the photographs show the overall result.
Before & after
Labiaplasty
Enlarge to inspect details. Scroll across the image with touch, a trackpad, or the arrow keys.
About this comparison
Labiaplasty comparison. The source does not identify this as revision surgery.
Individual results vary. Where procedures were combined, the photographs show the overall result.
Before & after
Labiaplasty
Enlarge to inspect details. Scroll across the image with touch, a trackpad, or the arrow keys.
About this comparison
Labiaplasty comparison from Dr. Ennis’s published collection.
Individual results vary. Where procedures were combined, the photographs show the overall result.
Before & after
Labiaplasty
Enlarge to inspect details. Scroll across the image with touch, a trackpad, or the arrow keys.
About this comparison
Labiaplasty comparison from Dr. Ennis’s published collection.
Individual results vary. Where procedures were combined, the photographs show the overall result.
Before & after
Labiaplasty
Enlarge to inspect details. Scroll across the image with touch, a trackpad, or the arrow keys.
About this comparison
Labiaplasty comparison from Dr. Ennis’s published collection.
Individual results vary. Where procedures were combined, the photographs show the overall result.
Before & after
Labiaplasty
Enlarge to inspect details. Scroll across the image with touch, a trackpad, or the arrow keys.
About this comparison
Labiaplasty comparison from Dr. Ennis’s published collection.
Individual results vary. Where procedures were combined, the photographs show the overall result.
Before & after
Labiaplasty
Enlarge to inspect details. Scroll across the image with touch, a trackpad, or the arrow keys.
About this comparison
Labiaplasty comparison from Dr. Ennis’s published collection.
Individual results vary. Where procedures were combined, the photographs show the overall result.
Before & after
Labiaplasty
Enlarge to inspect details. Scroll across the image with touch, a trackpad, or the arrow keys.
About this comparison
Labiaplasty comparison from Dr. Ennis’s published collection.
Individual results vary. Where procedures were combined, the photographs show the overall result.
Before & after
Facelift
Enlarge to inspect details. Scroll across the image with touch, a trackpad, or the arrow keys.
About this comparison
Individual results vary. Where procedures were combined, the photographs show the overall result.
Before & after
Rhinoplasty
Enlarge to inspect details. Scroll across the image with touch, a trackpad, or the arrow keys.
About this comparison
Individual results vary. Where procedures were combined, the photographs show the overall result.
Before & after
Rhinoplasty
Enlarge to inspect details. Scroll across the image with touch, a trackpad, or the arrow keys.
About this comparison
Individual results vary. Where procedures were combined, the photographs show the overall result.
Before & after
Neck Liposuction
Enlarge to inspect details. Scroll across the image with touch, a trackpad, or the arrow keys.
About this comparison
Individual results vary. Where procedures were combined, the photographs show the overall result.
Before & after
Eyelid Surgery
Enlarge to inspect details. Scroll across the image with touch, a trackpad, or the arrow keys.
About this comparison
Individual results vary. Where procedures were combined, the photographs show the overall result.
Before & after
Brow Lift
Enlarge to inspect details. Scroll across the image with touch, a trackpad, or the arrow keys.
About this comparison
Individual results vary. Where procedures were combined, the photographs show the overall result.
Before & after
Eyelid Surgery
Enlarge to inspect details. Scroll across the image with touch, a trackpad, or the arrow keys.
About this comparison
Individual results vary. Where procedures were combined, the photographs show the overall result.
Before & after
Rhinoplasty
Enlarge to inspect details. Scroll across the image with touch, a trackpad, or the arrow keys.
About this comparison
Individual results vary. Where procedures were combined, the photographs show the overall result.
Before & after
Rhinoplasty
Enlarge to inspect details. Scroll across the image with touch, a trackpad, or the arrow keys.
About this comparison
Individual results vary. Where procedures were combined, the photographs show the overall result.
Before & after
Eyelid Surgery
Enlarge to inspect details. Scroll across the image with touch, a trackpad, or the arrow keys.
About this comparison
Individual results vary. Where procedures were combined, the photographs show the overall result.
Before & after
Eyelid Surgery
Enlarge to inspect details. Scroll across the image with touch, a trackpad, or the arrow keys.
About this comparison
Individual results vary. Where procedures were combined, the photographs show the overall result.
Before & after
Eyelid Surgery
Enlarge to inspect details. Scroll across the image with touch, a trackpad, or the arrow keys.
About this comparison
Individual results vary. Where procedures were combined, the photographs show the overall result.
Before & after
Eyelid Surgery
Enlarge to inspect details. Scroll across the image with touch, a trackpad, or the arrow keys.
About this comparison
Individual results vary. Where procedures were combined, the photographs show the overall result.
Before & after
Eyelid Surgery
Enlarge to inspect details. Scroll across the image with touch, a trackpad, or the arrow keys.
About this comparison
Individual results vary. Where procedures were combined, the photographs show the overall result.
Before & after
Brow Lift
Enlarge to inspect details. Scroll across the image with touch, a trackpad, or the arrow keys.
About this comparison
Individual results vary. Where procedures were combined, the photographs show the overall result.
Before & after
Buccal Fat Removal
Enlarge to inspect details. Scroll across the image with touch, a trackpad, or the arrow keys.
About this comparison
Individual results vary. Where procedures were combined, the photographs show the overall result.
Before & after
Facelift
Enlarge to inspect details. Scroll across the image with touch, a trackpad, or the arrow keys.
About this comparison
Individual results vary. Where procedures were combined, the photographs show the overall result.
Before & after
Neck Liposuction
Enlarge to inspect details. Scroll across the image with touch, a trackpad, or the arrow keys.
About this comparison
Individual results vary. Where procedures were combined, the photographs show the overall result.
Before & after
Buccal Fat Removal
Enlarge to inspect details. Scroll across the image with touch, a trackpad, or the arrow keys.
About this comparison
Individual results vary. Where procedures were combined, the photographs show the overall result.
Before & after
Neck Liposuction
Enlarge to inspect details. Scroll across the image with touch, a trackpad, or the arrow keys.
About this comparison
Individual results vary. Where procedures were combined, the photographs show the overall result.
Before & after
Neck Liposuction
Enlarge to inspect details. Scroll across the image with touch, a trackpad, or the arrow keys.
About this comparison
Individual results vary. Where procedures were combined, the photographs show the overall result.
Before & after
Earlobe Repair
Enlarge to inspect details. Scroll across the image with touch, a trackpad, or the arrow keys.
About this comparison
Individual results vary. Where procedures were combined, the photographs show the overall result.
Before & after
Deep Plane Facelift
Enlarge to inspect details. Scroll across the image with touch, a trackpad, or the arrow keys.
About this comparison
Individual results vary. Where procedures were combined, the photographs show the overall result.
Before & after
Eyelid Surgery
Enlarge to inspect details. Scroll across the image with touch, a trackpad, or the arrow keys.
About this comparison
Individual results vary. Where procedures were combined, the photographs show the overall result.
Before & after
Eyelid Surgery
Enlarge to inspect details. Scroll across the image with touch, a trackpad, or the arrow keys.
About this comparison
Individual results vary. Where procedures were combined, the photographs show the overall result.
Before & after
Brow Lift
Enlarge to inspect details. Scroll across the image with touch, a trackpad, or the arrow keys.
About this comparison
Individual results vary. Where procedures were combined, the photographs show the overall result.
Before & after
Deep Plane Facelift
Enlarge to inspect details. Scroll across the image with touch, a trackpad, or the arrow keys.
About this comparison
Individual results vary. Where procedures were combined, the photographs show the overall result.
Before & after
Facelift
Enlarge to inspect details. Scroll across the image with touch, a trackpad, or the arrow keys.
About this comparison
Individual results vary. Where procedures were combined, the photographs show the overall result.
Before & after
Neck Liposuction
Enlarge to inspect details. Scroll across the image with touch, a trackpad, or the arrow keys.
About this comparison
Individual results vary. Where procedures were combined, the photographs show the overall result.
Before & after
Deep Plane Facelift
Enlarge to inspect details. Scroll across the image with touch, a trackpad, or the arrow keys.
About this comparison
Individual results vary. Where procedures were combined, the photographs show the overall result.
Before & after
Deep Plane Facelift
Enlarge to inspect details. Scroll across the image with touch, a trackpad, or the arrow keys.
About this comparison
Individual results vary. Where procedures were combined, the photographs show the overall result.
Before & after
Rhinoplasty
Enlarge to inspect details. Scroll across the image with touch, a trackpad, or the arrow keys.
About this comparison
Individual results vary. Where procedures were combined, the photographs show the overall result.
Before & after
Earlobe Repair
Enlarge to inspect details. Scroll across the image with touch, a trackpad, or the arrow keys.
About this comparison
Individual results vary. Where procedures were combined, the photographs show the overall result.
Before & after
Facelift
Enlarge to inspect details. Scroll across the image with touch, a trackpad, or the arrow keys.
About this comparison
Individual results vary. Where procedures were combined, the photographs show the overall result.
Before & after
Eyelid Surgery
Enlarge to inspect details. Scroll across the image with touch, a trackpad, or the arrow keys.
About this comparison
Individual results vary. Where procedures were combined, the photographs show the overall result.
Before & after
Deep Plane Facelift
Enlarge to inspect details. Scroll across the image with touch, a trackpad, or the arrow keys.
About this comparison
Individual results vary. Where procedures were combined, the photographs show the overall result.
Before & after
Buccal Fat Removal
Enlarge to inspect details. Scroll across the image with touch, a trackpad, or the arrow keys.
About this comparison
Individual results vary. Where procedures were combined, the photographs show the overall result.
Before & after
Eyelid Surgery
Enlarge to inspect details. Scroll across the image with touch, a trackpad, or the arrow keys.
About this comparison
Individual results vary. Where procedures were combined, the photographs show the overall result.
Before & after
Brow Lift
Enlarge to inspect details. Scroll across the image with touch, a trackpad, or the arrow keys.
About this comparison
Individual results vary. Where procedures were combined, the photographs show the overall result.
Before & after
Brow Lift
Enlarge to inspect details. Scroll across the image with touch, a trackpad, or the arrow keys.
About this comparison
Individual results vary. Where procedures were combined, the photographs show the overall result.
Before & after
Brow Lift
Enlarge to inspect details. Scroll across the image with touch, a trackpad, or the arrow keys.
About this comparison
Individual results vary. Where procedures were combined, the photographs show the overall result.
Before & after
Brow Lift
Enlarge to inspect details. Scroll across the image with touch, a trackpad, or the arrow keys.
About this comparison
Individual results vary. Where procedures were combined, the photographs show the overall result.
Before & after
Brow Lift
Enlarge to inspect details. Scroll across the image with touch, a trackpad, or the arrow keys.
About this comparison
Individual results vary. Where procedures were combined, the photographs show the overall result.
Before & after
Brow Lift
Enlarge to inspect details. Scroll across the image with touch, a trackpad, or the arrow keys.
About this comparison
Individual results vary. Where procedures were combined, the photographs show the overall result.
Before & after
Brow Lift
Enlarge to inspect details. Scroll across the image with touch, a trackpad, or the arrow keys.
About this comparison
Individual results vary. Where procedures were combined, the photographs show the overall result.
Before & after
Brow Lift
Enlarge to inspect details. Scroll across the image with touch, a trackpad, or the arrow keys.
About this comparison
Individual results vary. Where procedures were combined, the photographs show the overall result.
Before & after
Brow Lift
Enlarge to inspect details. Scroll across the image with touch, a trackpad, or the arrow keys.
About this comparison
Individual results vary. Where procedures were combined, the photographs show the overall result.
Before & after
Brow Lift
Enlarge to inspect details. Scroll across the image with touch, a trackpad, or the arrow keys.
About this comparison
Individual results vary. Where procedures were combined, the photographs show the overall result.
Before & after
Lip Lift
Enlarge to inspect details. Scroll across the image with touch, a trackpad, or the arrow keys.
About this comparison
Individual results vary. Where procedures were combined, the photographs show the overall result.
Before & after
Brow Lift
Enlarge to inspect details. Scroll across the image with touch, a trackpad, or the arrow keys.
About this comparison
Individual results vary. Where procedures were combined, the photographs show the overall result.
Before & after
Brow Lift
Enlarge to inspect details. Scroll across the image with touch, a trackpad, or the arrow keys.
About this comparison
Individual results vary. Where procedures were combined, the photographs show the overall result.
Before & after
Brow Lift
Enlarge to inspect details. Scroll across the image with touch, a trackpad, or the arrow keys.
About this comparison
Individual results vary. Where procedures were combined, the photographs show the overall result.
Before & after
Brow Lift
Enlarge to inspect details. Scroll across the image with touch, a trackpad, or the arrow keys.
About this comparison
Individual results vary. Where procedures were combined, the photographs show the overall result.
Before & after
Breast Augmentation
Enlarge to inspect details. Scroll across the image with touch, a trackpad, or the arrow keys.
About this comparison
Individual results vary. Where procedures were combined, the photographs show the overall result.
Before & after
Breast Augmentation
Enlarge to inspect details. Scroll across the image with touch, a trackpad, or the arrow keys.
About this comparison
Individual results vary. Where procedures were combined, the photographs show the overall result.
Before & after
Breast Lift with Augmentation
Enlarge to inspect details. Scroll across the image with touch, a trackpad, or the arrow keys.
About this comparison
Individual results vary. Where procedures were combined, the photographs show the overall result.
A historical case by Dr. L. Scott Ennis. Current treatment-provider assignments may differ.
Before & after
Breast Augmentation
Enlarge to inspect details. Scroll across the image with touch, a trackpad, or the arrow keys.
About this comparison
Individual results vary. Where procedures were combined, the photographs show the overall result.
Before & after
Breast Implant Removal
Enlarge to inspect details. Scroll across the image with touch, a trackpad, or the arrow keys.
About this comparison
Individual results vary. Where procedures were combined, the photographs show the overall result.
A historical case by Dr. L. Scott Ennis. Current treatment-provider assignments may differ.
Before & after
Breast Augmentation
Enlarge to inspect details. Scroll across the image with touch, a trackpad, or the arrow keys.
About this comparison
Individual results vary. Where procedures were combined, the photographs show the overall result.
Before & after
Breast Augmentation
Enlarge to inspect details. Scroll across the image with touch, a trackpad, or the arrow keys.
About this comparison
Individual results vary. Where procedures were combined, the photographs show the overall result.
Before & after
Breast Augmentation
Enlarge to inspect details. Scroll across the image with touch, a trackpad, or the arrow keys.
About this comparison
Individual results vary. Where procedures were combined, the photographs show the overall result.
Before & after
Breast Augmentation
Enlarge to inspect details. Scroll across the image with touch, a trackpad, or the arrow keys.
About this comparison
Individual results vary. Where procedures were combined, the photographs show the overall result.
Before & after
Breast Augmentation
Enlarge to inspect details. Scroll across the image with touch, a trackpad, or the arrow keys.
About this comparison
Individual results vary. Where procedures were combined, the photographs show the overall result.
Before & after
Breast Augmentation
Enlarge to inspect details. Scroll across the image with touch, a trackpad, or the arrow keys.
About this comparison
Individual results vary. Where procedures were combined, the photographs show the overall result.
A historical case by Dr. L. Scott Ennis. Current treatment-provider assignments may differ.
Before & after
Breast Augmentation
Enlarge to inspect details. Scroll across the image with touch, a trackpad, or the arrow keys.
About this comparison
Individual results vary. Where procedures were combined, the photographs show the overall result.
Before & after
Breast Augmentation
Enlarge to inspect details. Scroll across the image with touch, a trackpad, or the arrow keys.
About this comparison
Individual results vary. Where procedures were combined, the photographs show the overall result.
Before & after
Breast Augmentation
Enlarge to inspect details. Scroll across the image with touch, a trackpad, or the arrow keys.
About this comparison
Individual results vary. Where procedures were combined, the photographs show the overall result.
Before & after
Breast Augmentation
Enlarge to inspect details. Scroll across the image with touch, a trackpad, or the arrow keys.
About this comparison
Individual results vary. Where procedures were combined, the photographs show the overall result.
Before & after
Breast Augmentation
Enlarge to inspect details. Scroll across the image with touch, a trackpad, or the arrow keys.
About this comparison
Individual results vary. Where procedures were combined, the photographs show the overall result.
Before & after
Breast Augmentation
Enlarge to inspect details. Scroll across the image with touch, a trackpad, or the arrow keys.
About this comparison
Individual results vary. Where procedures were combined, the photographs show the overall result.
Before & after
Breast Augmentation
Enlarge to inspect details. Scroll across the image with touch, a trackpad, or the arrow keys.
About this comparison
Individual results vary. Where procedures were combined, the photographs show the overall result.
Before & after
Breast Augmentation
Enlarge to inspect details. Scroll across the image with touch, a trackpad, or the arrow keys.
About this comparison
Individual results vary. Where procedures were combined, the photographs show the overall result.
Before & after
Breast Augmentation
Enlarge to inspect details. Scroll across the image with touch, a trackpad, or the arrow keys.
About this comparison
Individual results vary. Where procedures were combined, the photographs show the overall result.
Before & after
Breast Augmentation
Enlarge to inspect details. Scroll across the image with touch, a trackpad, or the arrow keys.
About this comparison
Individual results vary. Where procedures were combined, the photographs show the overall result.
Before & after
Breast Augmentation
Enlarge to inspect details. Scroll across the image with touch, a trackpad, or the arrow keys.
About this comparison
Individual results vary. Where procedures were combined, the photographs show the overall result.
Before & after
Breast Augmentation
Enlarge to inspect details. Scroll across the image with touch, a trackpad, or the arrow keys.
About this comparison
Individual results vary. Where procedures were combined, the photographs show the overall result.
Before & after
Breast Augmentation
Enlarge to inspect details. Scroll across the image with touch, a trackpad, or the arrow keys.
About this comparison
Individual results vary. Where procedures were combined, the photographs show the overall result.
Before & after
Breast Lift with Augmentation
Enlarge to inspect details. Scroll across the image with touch, a trackpad, or the arrow keys.
About this comparison
Individual results vary. Where procedures were combined, the photographs show the overall result.
A historical case by Dr. L. Scott Ennis. Current treatment-provider assignments may differ.
Before & after
Breast Augmentation
Enlarge to inspect details. Scroll across the image with touch, a trackpad, or the arrow keys.
About this comparison
Individual results vary. Where procedures were combined, the photographs show the overall result.
Before & after
Breast Augmentation
Enlarge to inspect details. Scroll across the image with touch, a trackpad, or the arrow keys.
About this comparison
Individual results vary. Where procedures were combined, the photographs show the overall result.
Before & after
Breast Augmentation
Enlarge to inspect details. Scroll across the image with touch, a trackpad, or the arrow keys.
About this comparison
Individual results vary. Where procedures were combined, the photographs show the overall result.
Before & after
Breast Augmentation
Enlarge to inspect details. Scroll across the image with touch, a trackpad, or the arrow keys.
About this comparison
Individual results vary. Where procedures were combined, the photographs show the overall result.
Before & after
Breast Augmentation
Enlarge to inspect details. Scroll across the image with touch, a trackpad, or the arrow keys.
About this comparison
Individual results vary. Where procedures were combined, the photographs show the overall result.
Before & after
Breast Augmentation
Enlarge to inspect details. Scroll across the image with touch, a trackpad, or the arrow keys.
About this comparison
Individual results vary. Where procedures were combined, the photographs show the overall result.
Before & after
Breast Augmentation
Enlarge to inspect details. Scroll across the image with touch, a trackpad, or the arrow keys.
About this comparison
Individual results vary. Where procedures were combined, the photographs show the overall result.
Before & after
Breast Augmentation
Enlarge to inspect details. Scroll across the image with touch, a trackpad, or the arrow keys.
About this comparison
Individual results vary. Where procedures were combined, the photographs show the overall result.
Before & after
Breast Augmentation
Enlarge to inspect details. Scroll across the image with touch, a trackpad, or the arrow keys.
About this comparison
Individual results vary. Where procedures were combined, the photographs show the overall result.
Before & after
Breast Implant Removal
Enlarge to inspect details. Scroll across the image with touch, a trackpad, or the arrow keys.
About this comparison
Individual results vary. Where procedures were combined, the photographs show the overall result.
A historical case by Dr. L. Scott Ennis. Current treatment-provider assignments may differ.
Before & after
Breast Augmentation
Enlarge to inspect details. Scroll across the image with touch, a trackpad, or the arrow keys.
About this comparison
Individual results vary. Where procedures were combined, the photographs show the overall result.
Before & after
Breast Augmentation
Enlarge to inspect details. Scroll across the image with touch, a trackpad, or the arrow keys.
About this comparison
Individual results vary. Where procedures were combined, the photographs show the overall result.
Before & after
Breast Augmentation
Enlarge to inspect details. Scroll across the image with touch, a trackpad, or the arrow keys.
About this comparison
Individual results vary. Where procedures were combined, the photographs show the overall result.
Before & after
Breast Augmentation
Enlarge to inspect details. Scroll across the image with touch, a trackpad, or the arrow keys.
About this comparison
Individual results vary. Where procedures were combined, the photographs show the overall result.
Before & after
Breast Augmentation
Enlarge to inspect details. Scroll across the image with touch, a trackpad, or the arrow keys.
About this comparison
Individual results vary. Where procedures were combined, the photographs show the overall result.
Before & after
Breast Augmentation
Enlarge to inspect details. Scroll across the image with touch, a trackpad, or the arrow keys.
About this comparison
Individual results vary. Where procedures were combined, the photographs show the overall result.
Before & after
Breast Augmentation
Enlarge to inspect details. Scroll across the image with touch, a trackpad, or the arrow keys.
About this comparison
Individual results vary. Where procedures were combined, the photographs show the overall result.
Before & after
Breast Augmentation
Enlarge to inspect details. Scroll across the image with touch, a trackpad, or the arrow keys.
About this comparison
Individual results vary. Where procedures were combined, the photographs show the overall result.
Before & after
Breast Augmentation
Enlarge to inspect details. Scroll across the image with touch, a trackpad, or the arrow keys.
About this comparison
Individual results vary. Where procedures were combined, the photographs show the overall result.
Before & after
Breast Lift
Enlarge to inspect details. Scroll across the image with touch, a trackpad, or the arrow keys.
About this comparison
Individual results vary. Where procedures were combined, the photographs show the overall result.
A historical case by Dr. L. Scott Ennis. Current treatment-provider assignments may differ.
Before & after
Breast Lift
Enlarge to inspect details. Scroll across the image with touch, a trackpad, or the arrow keys.
About this comparison
Individual results vary. Where procedures were combined, the photographs show the overall result.
A historical case by Dr. L. Scott Ennis. Current treatment-provider assignments may differ.
Before & after
Breast Augmentation
Enlarge to inspect details. Scroll across the image with touch, a trackpad, or the arrow keys.
About this comparison
Individual results vary. Where procedures were combined, the photographs show the overall result.
Before & after
Breast Augmentation
Enlarge to inspect details. Scroll across the image with touch, a trackpad, or the arrow keys.
About this comparison
Individual results vary. Where procedures were combined, the photographs show the overall result.
Before & after
Breast Augmentation
Enlarge to inspect details. Scroll across the image with touch, a trackpad, or the arrow keys.
About this comparison
Individual results vary. Where procedures were combined, the photographs show the overall result.
Before & after
Breast Augmentation
Enlarge to inspect details. Scroll across the image with touch, a trackpad, or the arrow keys.
About this comparison
Individual results vary. Where procedures were combined, the photographs show the overall result.
Before & after
Breast Augmentation
Enlarge to inspect details. Scroll across the image with touch, a trackpad, or the arrow keys.
About this comparison
Individual results vary. Where procedures were combined, the photographs show the overall result.
Before & after
Breast Augmentation
Enlarge to inspect details. Scroll across the image with touch, a trackpad, or the arrow keys.
About this comparison
Individual results vary. Where procedures were combined, the photographs show the overall result.
Before & after
Breast Augmentation
Enlarge to inspect details. Scroll across the image with touch, a trackpad, or the arrow keys.
About this comparison
Individual results vary. Where procedures were combined, the photographs show the overall result.
Before & after
Breast Augmentation
Enlarge to inspect details. Scroll across the image with touch, a trackpad, or the arrow keys.
About this comparison
Individual results vary. Where procedures were combined, the photographs show the overall result.
Before & after
Breast Augmentation
Enlarge to inspect details. Scroll across the image with touch, a trackpad, or the arrow keys.
About this comparison
Individual results vary. Where procedures were combined, the photographs show the overall result.
Before & after
Breast Augmentation
Enlarge to inspect details. Scroll across the image with touch, a trackpad, or the arrow keys.
About this comparison
Individual results vary. Where procedures were combined, the photographs show the overall result.
Before & after
Breast Augmentation
Enlarge to inspect details. Scroll across the image with touch, a trackpad, or the arrow keys.
About this comparison
Individual results vary. Where procedures were combined, the photographs show the overall result.
Before & after
Breast Augmentation
Enlarge to inspect details. Scroll across the image with touch, a trackpad, or the arrow keys.
About this comparison
Individual results vary. Where procedures were combined, the photographs show the overall result.
Before & after
Breast Augmentation
Enlarge to inspect details. Scroll across the image with touch, a trackpad, or the arrow keys.
About this comparison
Individual results vary. Where procedures were combined, the photographs show the overall result.
Before & after
Breast Implant Exchange
Enlarge to inspect details. Scroll across the image with touch, a trackpad, or the arrow keys.
About this comparison
Individual results vary. Where procedures were combined, the photographs show the overall result.
A historical case by Dr. L. Scott Ennis. Current treatment-provider assignments may differ.
Before & after
Breast Augmentation
Enlarge to inspect details. Scroll across the image with touch, a trackpad, or the arrow keys.
About this comparison
Individual results vary. Where procedures were combined, the photographs show the overall result.
Before & after
Breast Augmentation
Enlarge to inspect details. Scroll across the image with touch, a trackpad, or the arrow keys.
About this comparison
Individual results vary. Where procedures were combined, the photographs show the overall result.
Before & after
Breast Implant Removal
Enlarge to inspect details. Scroll across the image with touch, a trackpad, or the arrow keys.
About this comparison
Individual results vary. Where procedures were combined, the photographs show the overall result.
A historical case by Dr. L. Scott Ennis. Current treatment-provider assignments may differ.
Before & after
Breast Augmentation
Enlarge to inspect details. Scroll across the image with touch, a trackpad, or the arrow keys.
About this comparison
Individual results vary. Where procedures were combined, the photographs show the overall result.
Before & after
Breast Augmentation
Enlarge to inspect details. Scroll across the image with touch, a trackpad, or the arrow keys.
About this comparison
Individual results vary. Where procedures were combined, the photographs show the overall result.
Before & after
Breast Augmentation
Enlarge to inspect details. Scroll across the image with touch, a trackpad, or the arrow keys.
About this comparison
Individual results vary. Where procedures were combined, the photographs show the overall result.
Before & after
Breast Augmentation
Enlarge to inspect details. Scroll across the image with touch, a trackpad, or the arrow keys.
About this comparison
Individual results vary. Where procedures were combined, the photographs show the overall result.
Before & after
Breast Augmentation
Enlarge to inspect details. Scroll across the image with touch, a trackpad, or the arrow keys.
About this comparison
Individual results vary. Where procedures were combined, the photographs show the overall result.
Before & after
Breast Augmentation
Enlarge to inspect details. Scroll across the image with touch, a trackpad, or the arrow keys.
About this comparison
Individual results vary. Where procedures were combined, the photographs show the overall result.
Before & after
Breast Augmentation
Enlarge to inspect details. Scroll across the image with touch, a trackpad, or the arrow keys.
About this comparison
Individual results vary. Where procedures were combined, the photographs show the overall result.
Before & after
Breast Augmentation
Enlarge to inspect details. Scroll across the image with touch, a trackpad, or the arrow keys.
About this comparison
Individual results vary. Where procedures were combined, the photographs show the overall result.
Before & after
Breast Augmentation
Enlarge to inspect details. Scroll across the image with touch, a trackpad, or the arrow keys.
About this comparison
Individual results vary. Where procedures were combined, the photographs show the overall result.
Before & after
Breast Augmentation
Enlarge to inspect details. Scroll across the image with touch, a trackpad, or the arrow keys.
About this comparison
Individual results vary. Where procedures were combined, the photographs show the overall result.
Before & after
Breast Augmentation
Enlarge to inspect details. Scroll across the image with touch, a trackpad, or the arrow keys.
About this comparison
Individual results vary. Where procedures were combined, the photographs show the overall result.
Before & after
Breast Augmentation
Enlarge to inspect details. Scroll across the image with touch, a trackpad, or the arrow keys.
About this comparison
Individual results vary. Where procedures were combined, the photographs show the overall result.
Before & after
Breast Augmentation
Enlarge to inspect details. Scroll across the image with touch, a trackpad, or the arrow keys.
About this comparison
Individual results vary. Where procedures were combined, the photographs show the overall result.
Before & after
Breast Augmentation
Enlarge to inspect details. Scroll across the image with touch, a trackpad, or the arrow keys.
About this comparison
Individual results vary. Where procedures were combined, the photographs show the overall result.
Before & after
Breast Augmentation
Enlarge to inspect details. Scroll across the image with touch, a trackpad, or the arrow keys.
About this comparison
Individual results vary. Where procedures were combined, the photographs show the overall result.
Before & after
Breast Augmentation
Enlarge to inspect details. Scroll across the image with touch, a trackpad, or the arrow keys.
About this comparison
Individual results vary. Where procedures were combined, the photographs show the overall result.
Before & after
Breast Augmentation
Enlarge to inspect details. Scroll across the image with touch, a trackpad, or the arrow keys.
About this comparison
Individual results vary. Where procedures were combined, the photographs show the overall result.
Before & after
Breast Augmentation
Enlarge to inspect details. Scroll across the image with touch, a trackpad, or the arrow keys.
About this comparison
Individual results vary. Where procedures were combined, the photographs show the overall result.
Before & after
Breast Augmentation
Enlarge to inspect details. Scroll across the image with touch, a trackpad, or the arrow keys.
About this comparison
Individual results vary. Where procedures were combined, the photographs show the overall result.
Before & after
Breast Augmentation
Enlarge to inspect details. Scroll across the image with touch, a trackpad, or the arrow keys.
About this comparison
Individual results vary. Where procedures were combined, the photographs show the overall result.
Before & after
Breast Augmentation
Enlarge to inspect details. Scroll across the image with touch, a trackpad, or the arrow keys.
About this comparison
Individual results vary. Where procedures were combined, the photographs show the overall result.
Before & after
Breast Augmentation
Enlarge to inspect details. Scroll across the image with touch, a trackpad, or the arrow keys.
About this comparison
Individual results vary. Where procedures were combined, the photographs show the overall result.
Before & after
Breast Augmentation
Enlarge to inspect details. Scroll across the image with touch, a trackpad, or the arrow keys.
About this comparison
Individual results vary. Where procedures were combined, the photographs show the overall result.
Before & after
Breast Augmentation
Enlarge to inspect details. Scroll across the image with touch, a trackpad, or the arrow keys.
About this comparison
Individual results vary. Where procedures were combined, the photographs show the overall result.
Before & after
Breast Augmentation
Enlarge to inspect details. Scroll across the image with touch, a trackpad, or the arrow keys.
About this comparison
Individual results vary. Where procedures were combined, the photographs show the overall result.
Before & after
Breast Implant Exchange
Enlarge to inspect details. Scroll across the image with touch, a trackpad, or the arrow keys.
About this comparison
Individual results vary. Where procedures were combined, the photographs show the overall result.
A historical case by Dr. L. Scott Ennis. Current treatment-provider assignments may differ.
Before & after
Transaxillary Breast Augmentation
Enlarge to inspect details. Scroll across the image with touch, a trackpad, or the arrow keys.
About this comparison
Individual results vary. Where procedures were combined, the photographs show the overall result.
Before & after
Breast Augmentation
Enlarge to inspect details. Scroll across the image with touch, a trackpad, or the arrow keys.
About this comparison
Individual results vary. Where procedures were combined, the photographs show the overall result.
Before & after
Breast Augmentation
Enlarge to inspect details. Scroll across the image with touch, a trackpad, or the arrow keys.
About this comparison
Individual results vary. Where procedures were combined, the photographs show the overall result.
Before & after
Breast Augmentation
Enlarge to inspect details. Scroll across the image with touch, a trackpad, or the arrow keys.
About this comparison
Individual results vary. Where procedures were combined, the photographs show the overall result.
Before & after
Breast Augmentation
Enlarge to inspect details. Scroll across the image with touch, a trackpad, or the arrow keys.
About this comparison
Individual results vary. Where procedures were combined, the photographs show the overall result.
Before & after
Breast Augmentation
Enlarge to inspect details. Scroll across the image with touch, a trackpad, or the arrow keys.
About this comparison
Individual results vary. Where procedures were combined, the photographs show the overall result.
Before & after
Breast Augmentation
Enlarge to inspect details. Scroll across the image with touch, a trackpad, or the arrow keys.
About this comparison
Individual results vary. Where procedures were combined, the photographs show the overall result.
Before & after
Breast Augmentation
Enlarge to inspect details. Scroll across the image with touch, a trackpad, or the arrow keys.
About this comparison
Individual results vary. Where procedures were combined, the photographs show the overall result.
Before & after
Breast Augmentation
Enlarge to inspect details. Scroll across the image with touch, a trackpad, or the arrow keys.
About this comparison
Individual results vary. Where procedures were combined, the photographs show the overall result.
Before & after
Breast Augmentation
Enlarge to inspect details. Scroll across the image with touch, a trackpad, or the arrow keys.
About this comparison
Individual results vary. Where procedures were combined, the photographs show the overall result.
Before & after
Breast Implant Exchange
Enlarge to inspect details. Scroll across the image with touch, a trackpad, or the arrow keys.
About this comparison
Individual results vary. Where procedures were combined, the photographs show the overall result.
A historical case by Dr. L. Scott Ennis. Current treatment-provider assignments may differ.
Before & after
Breast Lift
Enlarge to inspect details. Scroll across the image with touch, a trackpad, or the arrow keys.
About this comparison
Individual results vary. Where procedures were combined, the photographs show the overall result.
A historical case by Dr. L. Scott Ennis. Current treatment-provider assignments may differ.
Before & after
Breast Reduction
Enlarge to inspect details. Scroll across the image with touch, a trackpad, or the arrow keys.
About this comparison
Individual results vary. Where procedures were combined, the photographs show the overall result.
A historical case by Dr. L. Scott Ennis. Current treatment-provider assignments may differ.
Before & after
Breast Augmentation
Enlarge to inspect details. Scroll across the image with touch, a trackpad, or the arrow keys.
About this comparison
Individual results vary. Where procedures were combined, the photographs show the overall result.
Before & after
Breast Lift
Enlarge to inspect details. Scroll across the image with touch, a trackpad, or the arrow keys.
About this comparison
Individual results vary. Where procedures were combined, the photographs show the overall result.
A historical case by Dr. L. Scott Ennis. Current treatment-provider assignments may differ.
Before & after
Breast Lift
Enlarge to inspect details. Scroll across the image with touch, a trackpad, or the arrow keys.
About this comparison
Individual results vary. Where procedures were combined, the photographs show the overall result.
A historical case by Dr. L. Scott Ennis. Current treatment-provider assignments may differ.
Before & after
Breast Lift
Enlarge to inspect details. Scroll across the image with touch, a trackpad, or the arrow keys.
About this comparison
Individual results vary. Where procedures were combined, the photographs show the overall result.
A historical case by Dr. L. Scott Ennis. Current treatment-provider assignments may differ.
Before & after
Breast Augmentation
Enlarge to inspect details. Scroll across the image with touch, a trackpad, or the arrow keys.
About this comparison
Individual results vary. Where procedures were combined, the photographs show the overall result.
Before & after
Breast Lift
Enlarge to inspect details. Scroll across the image with touch, a trackpad, or the arrow keys.
About this comparison
Individual results vary. Where procedures were combined, the photographs show the overall result.
A historical case by Dr. L. Scott Ennis. Current treatment-provider assignments may differ.
Before & after
Breast Lift
Enlarge to inspect details. Scroll across the image with touch, a trackpad, or the arrow keys.
About this comparison
Individual results vary. Where procedures were combined, the photographs show the overall result.
A historical case by Dr. L. Scott Ennis. Current treatment-provider assignments may differ.
Before & after
Breast Lift
Enlarge to inspect details. Scroll across the image with touch, a trackpad, or the arrow keys.
About this comparison
Individual results vary. Where procedures were combined, the photographs show the overall result.
A historical case by Dr. L. Scott Ennis. Current treatment-provider assignments may differ.
Before & after
Breast Lift
Enlarge to inspect details. Scroll across the image with touch, a trackpad, or the arrow keys.
About this comparison
Individual results vary. Where procedures were combined, the photographs show the overall result.
A historical case by Dr. L. Scott Ennis. Current treatment-provider assignments may differ.
Before & after
Breast Augmentation
Enlarge to inspect details. Scroll across the image with touch, a trackpad, or the arrow keys.
About this comparison
Individual results vary. Where procedures were combined, the photographs show the overall result.
Before & after
Breast Lift with Augmentation
Enlarge to inspect details. Scroll across the image with touch, a trackpad, or the arrow keys.
About this comparison
Individual results vary. Where procedures were combined, the photographs show the overall result.
A historical case by Dr. L. Scott Ennis. Current treatment-provider assignments may differ.
Before & after
Breast Lift with Augmentation
Enlarge to inspect details. Scroll across the image with touch, a trackpad, or the arrow keys.
About this comparison
Individual results vary. Where procedures were combined, the photographs show the overall result.
A historical case by Dr. L. Scott Ennis. Current treatment-provider assignments may differ.
Before & after
Breast Lift with Augmentation
Enlarge to inspect details. Scroll across the image with touch, a trackpad, or the arrow keys.
About this comparison
Individual results vary. Where procedures were combined, the photographs show the overall result.
A historical case by Dr. L. Scott Ennis. Current treatment-provider assignments may differ.
Before & after
Breast Augmentation
Enlarge to inspect details. Scroll across the image with touch, a trackpad, or the arrow keys.
About this comparison
Individual results vary. Where procedures were combined, the photographs show the overall result.
A historical case by Dr. L. Scott Ennis. Current treatment-provider assignments may differ.
Before & after
Breast Augmentation
Enlarge to inspect details. Scroll across the image with touch, a trackpad, or the arrow keys.
About this comparison
Individual results vary. Where procedures were combined, the photographs show the overall result.
Before & after
Breast Implant Exchange
Enlarge to inspect details. Scroll across the image with touch, a trackpad, or the arrow keys.
About this comparison
Individual results vary. Where procedures were combined, the photographs show the overall result.
A historical case by Dr. L. Scott Ennis. Current treatment-provider assignments may differ.
Before & after
Breast Implant Exchange
Enlarge to inspect details. Scroll across the image with touch, a trackpad, or the arrow keys.
About this comparison
Individual results vary. Where procedures were combined, the photographs show the overall result.
A historical case by Dr. L. Scott Ennis. Current treatment-provider assignments may differ.
Before & after
Breast Lift
Enlarge to inspect details. Scroll across the image with touch, a trackpad, or the arrow keys.
About this comparison
Individual results vary. Where procedures were combined, the photographs show the overall result.
A historical case by Dr. L. Scott Ennis. Current treatment-provider assignments may differ.
Before & after
Breast Augmentation
Enlarge to inspect details. Scroll across the image with touch, a trackpad, or the arrow keys.
About this comparison
Individual results vary. Where procedures were combined, the photographs show the overall result.
Before & after
Breast Augmentation
Enlarge to inspect details. Scroll across the image with touch, a trackpad, or the arrow keys.
About this comparison
Individual results vary. Where procedures were combined, the photographs show the overall result.
Before & after
Breast Augmentation
Enlarge to inspect details. Scroll across the image with touch, a trackpad, or the arrow keys.
About this comparison
Individual results vary. Where procedures were combined, the photographs show the overall result.
Before & after
Breast Implant Exchange
Enlarge to inspect details. Scroll across the image with touch, a trackpad, or the arrow keys.
About this comparison
Individual results vary. Where procedures were combined, the photographs show the overall result.
A historical case by Dr. L. Scott Ennis. Current treatment-provider assignments may differ.
Before & after
Breast Augmentation
Enlarge to inspect details. Scroll across the image with touch, a trackpad, or the arrow keys.
About this comparison
Individual results vary. Where procedures were combined, the photographs show the overall result.
A historical case by Dr. L. Scott Ennis. Current treatment-provider assignments may differ.
Before & after
Breast Augmentation
Enlarge to inspect details. Scroll across the image with touch, a trackpad, or the arrow keys.
About this comparison
Individual results vary. Where procedures were combined, the photographs show the overall result.
A historical case by Dr. L. Scott Ennis. Current treatment-provider assignments may differ.
Before & after
Breast Augmentation
Enlarge to inspect details. Scroll across the image with touch, a trackpad, or the arrow keys.
About this comparison
Individual results vary. Where procedures were combined, the photographs show the overall result.
Before & after
Breast Augmentation
Enlarge to inspect details. Scroll across the image with touch, a trackpad, or the arrow keys.
About this comparison
Individual results vary. Where procedures were combined, the photographs show the overall result.
Before & after
Breast Augmentation
Enlarge to inspect details. Scroll across the image with touch, a trackpad, or the arrow keys.
About this comparison
Individual results vary. Where procedures were combined, the photographs show the overall result.
Before & after
Breast Implant Exchange
Enlarge to inspect details. Scroll across the image with touch, a trackpad, or the arrow keys.
About this comparison
Individual results vary. Where procedures were combined, the photographs show the overall result.
A historical case by Dr. L. Scott Ennis. Current treatment-provider assignments may differ.
Before & after
Breast Augmentation
Enlarge to inspect details. Scroll across the image with touch, a trackpad, or the arrow keys.
About this comparison
Individual results vary. Where procedures were combined, the photographs show the overall result.
Before & after
Breast Implant Exchange
Enlarge to inspect details. Scroll across the image with touch, a trackpad, or the arrow keys.
About this comparison
Individual results vary. Where procedures were combined, the photographs show the overall result.
A historical case by Dr. L. Scott Ennis. Current treatment-provider assignments may differ.
Before & after
Breast Revision
Enlarge to inspect details. Scroll across the image with touch, a trackpad, or the arrow keys.
About this comparison
Individual results vary. Where procedures were combined, the photographs show the overall result.
A historical case by Dr. L. Scott Ennis. Current treatment-provider assignments may differ.
Before & after
Breast Augmentation
Enlarge to inspect details. Scroll across the image with touch, a trackpad, or the arrow keys.
About this comparison
Individual results vary. Where procedures were combined, the photographs show the overall result.
Before & after
Breast Revision
Enlarge to inspect details. Scroll across the image with touch, a trackpad, or the arrow keys.
About this comparison
Individual results vary. Where procedures were combined, the photographs show the overall result.
A historical case by Dr. L. Scott Ennis. Current treatment-provider assignments may differ.
Before & after
Breast Revision
Enlarge to inspect details. Scroll across the image with touch, a trackpad, or the arrow keys.
About this comparison
Individual results vary. Where procedures were combined, the photographs show the overall result.
A historical case by Dr. L. Scott Ennis. Current treatment-provider assignments may differ.
Before & after
Breast Implant Exchange
Enlarge to inspect details. Scroll across the image with touch, a trackpad, or the arrow keys.
About this comparison
Individual results vary. Where procedures were combined, the photographs show the overall result.
A historical case by Dr. L. Scott Ennis. Current treatment-provider assignments may differ.
Before & after
Breast Augmentation
Enlarge to inspect details. Scroll across the image with touch, a trackpad, or the arrow keys.
About this comparison
Individual results vary. Where procedures were combined, the photographs show the overall result.
Before & after
Breast Implant Exchange
Enlarge to inspect details. Scroll across the image with touch, a trackpad, or the arrow keys.
About this comparison
Individual results vary. Where procedures were combined, the photographs show the overall result.
A historical case by Dr. L. Scott Ennis. Current treatment-provider assignments may differ.
Before & after
Breast Augmentation
Enlarge to inspect details. Scroll across the image with touch, a trackpad, or the arrow keys.
About this comparison
Individual results vary. Where procedures were combined, the photographs show the overall result.
Before & after
Breast Reduction
Enlarge to inspect details. Scroll across the image with touch, a trackpad, or the arrow keys.
About this comparison
Individual results vary. Where procedures were combined, the photographs show the overall result.
A historical case by Dr. L. Scott Ennis. Current treatment-provider assignments may differ.
Before & after
Breast Lift
Enlarge to inspect details. Scroll across the image with touch, a trackpad, or the arrow keys.
About this comparison
Individual results vary. Where procedures were combined, the photographs show the overall result.
A historical case by Dr. L. Scott Ennis. Current treatment-provider assignments may differ.
Before & after
Breast Lift
Enlarge to inspect details. Scroll across the image with touch, a trackpad, or the arrow keys.
About this comparison
Individual results vary. Where procedures were combined, the photographs show the overall result.
A historical case by Dr. L. Scott Ennis. Current treatment-provider assignments may differ.
Before & after
Breast Lift with Augmentation
Enlarge to inspect details. Scroll across the image with touch, a trackpad, or the arrow keys.
About this comparison
Individual results vary. Where procedures were combined, the photographs show the overall result.
A historical case by Dr. L. Scott Ennis. Current treatment-provider assignments may differ.
Before & after
Breast Augmentation
Enlarge to inspect details. Scroll across the image with touch, a trackpad, or the arrow keys.
About this comparison
Individual results vary. Where procedures were combined, the photographs show the overall result.
Before & after
Breast Augmentation
Enlarge to inspect details. Scroll across the image with touch, a trackpad, or the arrow keys.
About this comparison
Individual results vary. Where procedures were combined, the photographs show the overall result.
Before & after
Breast Implant Exchange
Enlarge to inspect details. Scroll across the image with touch, a trackpad, or the arrow keys.
About this comparison
Individual results vary. Where procedures were combined, the photographs show the overall result.
A historical case by Dr. L. Scott Ennis. Current treatment-provider assignments may differ.
Before & after
Breast Augmentation
Enlarge to inspect details. Scroll across the image with touch, a trackpad, or the arrow keys.
About this comparison
Individual results vary. Where procedures were combined, the photographs show the overall result.
Before & after
Breast Augmentation
Enlarge to inspect details. Scroll across the image with touch, a trackpad, or the arrow keys.
About this comparison
Individual results vary. Where procedures were combined, the photographs show the overall result.
Before & after
Breast Augmentation
Enlarge to inspect details. Scroll across the image with touch, a trackpad, or the arrow keys.
About this comparison
Individual results vary. Where procedures were combined, the photographs show the overall result.
A historical case by Dr. L. Scott Ennis. Current treatment-provider assignments may differ.
Before & after
Breast Implant Exchange
Enlarge to inspect details. Scroll across the image with touch, a trackpad, or the arrow keys.
About this comparison
Individual results vary. Where procedures were combined, the photographs show the overall result.
A historical case by Dr. L. Scott Ennis. Current treatment-provider assignments may differ.
Before & after
Breast Implant Exchange
Enlarge to inspect details. Scroll across the image with touch, a trackpad, or the arrow keys.
About this comparison
Individual results vary. Where procedures were combined, the photographs show the overall result.
A historical case by Dr. L. Scott Ennis. Current treatment-provider assignments may differ.
Before & after
Breast Augmentation
Enlarge to inspect details. Scroll across the image with touch, a trackpad, or the arrow keys.
About this comparison
Individual results vary. Where procedures were combined, the photographs show the overall result.
Before & after
Breast Lift
Enlarge to inspect details. Scroll across the image with touch, a trackpad, or the arrow keys.
About this comparison
Individual results vary. Where procedures were combined, the photographs show the overall result.
A historical case by Dr. L. Scott Ennis. Current treatment-provider assignments may differ.
Before & after
Breast Augmentation
Enlarge to inspect details. Scroll across the image with touch, a trackpad, or the arrow keys.
About this comparison
Individual results vary. Where procedures were combined, the photographs show the overall result.
Before & after
Breast Augmentation
Enlarge to inspect details. Scroll across the image with touch, a trackpad, or the arrow keys.
About this comparison
Individual results vary. Where procedures were combined, the photographs show the overall result.
Before & after
Breast Implant Exchange
Enlarge to inspect details. Scroll across the image with touch, a trackpad, or the arrow keys.
About this comparison
Individual results vary. Where procedures were combined, the photographs show the overall result.
A historical case by Dr. L. Scott Ennis. Current treatment-provider assignments may differ.
Before & after
Breast Augmentation
Enlarge to inspect details. Scroll across the image with touch, a trackpad, or the arrow keys.
About this comparison
Individual results vary. Where procedures were combined, the photographs show the overall result.
Before & after
Breast Lift
Enlarge to inspect details. Scroll across the image with touch, a trackpad, or the arrow keys.
About this comparison
Individual results vary. Where procedures were combined, the photographs show the overall result.
A historical case by Dr. L. Scott Ennis. Current treatment-provider assignments may differ.
Before & after
Breast Lift with Augmentation
Enlarge to inspect details. Scroll across the image with touch, a trackpad, or the arrow keys.
About this comparison
Individual results vary. Where procedures were combined, the photographs show the overall result.
A historical case by Dr. L. Scott Ennis. Current treatment-provider assignments may differ.
Before & after
Breast Augmentation
Enlarge to inspect details. Scroll across the image with touch, a trackpad, or the arrow keys.
About this comparison
Individual results vary. Where procedures were combined, the photographs show the overall result.
Before & after
Breast Augmentation
Enlarge to inspect details. Scroll across the image with touch, a trackpad, or the arrow keys.
About this comparison
Individual results vary. Where procedures were combined, the photographs show the overall result.
Before & after
Breast Implant Removal
Enlarge to inspect details. Scroll across the image with touch, a trackpad, or the arrow keys.
About this comparison
Individual results vary. Where procedures were combined, the photographs show the overall result.
A historical case by Dr. L. Scott Ennis. Current treatment-provider assignments may differ.
Before & after
Breast Augmentation
Enlarge to inspect details. Scroll across the image with touch, a trackpad, or the arrow keys.
About this comparison
Individual results vary. Where procedures were combined, the photographs show the overall result.
Before & after
Breast Augmentation
Enlarge to inspect details. Scroll across the image with touch, a trackpad, or the arrow keys.
About this comparison
Individual results vary. Where procedures were combined, the photographs show the overall result.
Before & after
Breast Augmentation
Enlarge to inspect details. Scroll across the image with touch, a trackpad, or the arrow keys.
About this comparison
Individual results vary. Where procedures were combined, the photographs show the overall result.
Before & after
Breast Augmentation
Enlarge to inspect details. Scroll across the image with touch, a trackpad, or the arrow keys.
About this comparison
Individual results vary. Where procedures were combined, the photographs show the overall result.
Before & after
Breast Augmentation
Enlarge to inspect details. Scroll across the image with touch, a trackpad, or the arrow keys.
About this comparison
Individual results vary. Where procedures were combined, the photographs show the overall result.
Before & after
Breast Implant Exchange
Enlarge to inspect details. Scroll across the image with touch, a trackpad, or the arrow keys.
About this comparison
Individual results vary. Where procedures were combined, the photographs show the overall result.
A historical case by Dr. L. Scott Ennis. Current treatment-provider assignments may differ.
Before & after
Breast Augmentation
Enlarge to inspect details. Scroll across the image with touch, a trackpad, or the arrow keys.
About this comparison
Individual results vary. Where procedures were combined, the photographs show the overall result.
Before & after
Breast Augmentation
Enlarge to inspect details. Scroll across the image with touch, a trackpad, or the arrow keys.
About this comparison
Individual results vary. Where procedures were combined, the photographs show the overall result.
Before & after
Breast Augmentation
Enlarge to inspect details. Scroll across the image with touch, a trackpad, or the arrow keys.
About this comparison
Individual results vary. Where procedures were combined, the photographs show the overall result.
Before & after
Breast Reduction
Enlarge to inspect details. Scroll across the image with touch, a trackpad, or the arrow keys.
About this comparison
Individual results vary. Where procedures were combined, the photographs show the overall result.
A historical case by Dr. L. Scott Ennis. Current treatment-provider assignments may differ.
Before & after
Breast Augmentation
Enlarge to inspect details. Scroll across the image with touch, a trackpad, or the arrow keys.
About this comparison
Individual results vary. Where procedures were combined, the photographs show the overall result.
Before & after
Breast Augmentation
Enlarge to inspect details. Scroll across the image with touch, a trackpad, or the arrow keys.
About this comparison
Individual results vary. Where procedures were combined, the photographs show the overall result.
Before & after
Breast Augmentation
Enlarge to inspect details. Scroll across the image with touch, a trackpad, or the arrow keys.
About this comparison
Individual results vary. Where procedures were combined, the photographs show the overall result.
Before & after
Breast Augmentation
Enlarge to inspect details. Scroll across the image with touch, a trackpad, or the arrow keys.
About this comparison
Individual results vary. Where procedures were combined, the photographs show the overall result.
Before & after
Breast Augmentation
Enlarge to inspect details. Scroll across the image with touch, a trackpad, or the arrow keys.
About this comparison
Individual results vary. Where procedures were combined, the photographs show the overall result.
Before & after
Breast Lift
Enlarge to inspect details. Scroll across the image with touch, a trackpad, or the arrow keys.
About this comparison
Individual results vary. Where procedures were combined, the photographs show the overall result.
A historical case by Dr. L. Scott Ennis. Current treatment-provider assignments may differ.
Before & after
Breast Lift with Augmentation
Enlarge to inspect details. Scroll across the image with touch, a trackpad, or the arrow keys.
About this comparison
Individual results vary. Where procedures were combined, the photographs show the overall result.
A historical case by Dr. L. Scott Ennis. Current treatment-provider assignments may differ.
Before & after
Breast Augmentation
Enlarge to inspect details. Scroll across the image with touch, a trackpad, or the arrow keys.
About this comparison
Individual results vary. Where procedures were combined, the photographs show the overall result.
Before & after
Breast Augmentation
Enlarge to inspect details. Scroll across the image with touch, a trackpad, or the arrow keys.
About this comparison
Individual results vary. Where procedures were combined, the photographs show the overall result.
A historical case by Dr. L. Scott Ennis. Current treatment-provider assignments may differ.
Before & after
Breast Augmentation
Enlarge to inspect details. Scroll across the image with touch, a trackpad, or the arrow keys.
About this comparison
Individual results vary. Where procedures were combined, the photographs show the overall result.
Before & after
Breast Augmentation
Enlarge to inspect details. Scroll across the image with touch, a trackpad, or the arrow keys.
About this comparison
Individual results vary. Where procedures were combined, the photographs show the overall result.
Before & after
Breast Reduction
Enlarge to inspect details. Scroll across the image with touch, a trackpad, or the arrow keys.
About this comparison
Individual results vary. Where procedures were combined, the photographs show the overall result.
A historical case by Dr. L. Scott Ennis. Current treatment-provider assignments may differ.
Before & after
Breast Implant Exchange
Enlarge to inspect details. Scroll across the image with touch, a trackpad, or the arrow keys.
About this comparison
Individual results vary. Where procedures were combined, the photographs show the overall result.
A historical case by Dr. L. Scott Ennis. Current treatment-provider assignments may differ.
Before & after
Breast Augmentation
Enlarge to inspect details. Scroll across the image with touch, a trackpad, or the arrow keys.
About this comparison
Individual results vary. Where procedures were combined, the photographs show the overall result.
Before & after
Breast Augmentation
Enlarge to inspect details. Scroll across the image with touch, a trackpad, or the arrow keys.
About this comparison
Individual results vary. Where procedures were combined, the photographs show the overall result.
Before & after
Breast Implant Exchange
Enlarge to inspect details. Scroll across the image with touch, a trackpad, or the arrow keys.
About this comparison
Individual results vary. Where procedures were combined, the photographs show the overall result.
A historical case by Dr. L. Scott Ennis. Current treatment-provider assignments may differ.
Before & after
Breast Lift with Augmentation
Enlarge to inspect details. Scroll across the image with touch, a trackpad, or the arrow keys.
About this comparison
Individual results vary. Where procedures were combined, the photographs show the overall result.
A historical case by Dr. L. Scott Ennis. Current treatment-provider assignments may differ.
Before & after
Breast Lift with Augmentation
Enlarge to inspect details. Scroll across the image with touch, a trackpad, or the arrow keys.
About this comparison
Individual results vary. Where procedures were combined, the photographs show the overall result.
A historical case by Dr. L. Scott Ennis. Current treatment-provider assignments may differ.
Before & after
Breast Augmentation
Enlarge to inspect details. Scroll across the image with touch, a trackpad, or the arrow keys.
About this comparison
Individual results vary. Where procedures were combined, the photographs show the overall result.
Before & after
Breast Implant Removal
Enlarge to inspect details. Scroll across the image with touch, a trackpad, or the arrow keys.
About this comparison
Individual results vary. Where procedures were combined, the photographs show the overall result.
A historical case by Dr. L. Scott Ennis. Current treatment-provider assignments may differ.
Before & after
Breast Augmentation
Enlarge to inspect details. Scroll across the image with touch, a trackpad, or the arrow keys.
About this comparison
Individual results vary. Where procedures were combined, the photographs show the overall result.
Before & after
Breast Implant Exchange
Enlarge to inspect details. Scroll across the image with touch, a trackpad, or the arrow keys.
About this comparison
Individual results vary. Where procedures were combined, the photographs show the overall result.
A historical case by Dr. L. Scott Ennis. Current treatment-provider assignments may differ.
Before & after
Breast Reduction
Enlarge to inspect details. Scroll across the image with touch, a trackpad, or the arrow keys.
About this comparison
Individual results vary. Where procedures were combined, the photographs show the overall result.
A historical case by Dr. L. Scott Ennis. Current treatment-provider assignments may differ.
Before & after
Breast Lift with Augmentation
Enlarge to inspect details. Scroll across the image with touch, a trackpad, or the arrow keys.
About this comparison
Individual results vary. Where procedures were combined, the photographs show the overall result.
A historical case by Dr. L. Scott Ennis. Current treatment-provider assignments may differ.
Before & after
Breast Augmentation
Enlarge to inspect details. Scroll across the image with touch, a trackpad, or the arrow keys.
About this comparison
Individual results vary. Where procedures were combined, the photographs show the overall result.
Before & after
Breast Augmentation
Enlarge to inspect details. Scroll across the image with touch, a trackpad, or the arrow keys.
About this comparison
Individual results vary. Where procedures were combined, the photographs show the overall result.
A historical case by Dr. L. Scott Ennis. Current treatment-provider assignments may differ.
Before & after
Breast Augmentation
Enlarge to inspect details. Scroll across the image with touch, a trackpad, or the arrow keys.
About this comparison
Individual results vary. Where procedures were combined, the photographs show the overall result.
Before & after
Breast Augmentation
Enlarge to inspect details. Scroll across the image with touch, a trackpad, or the arrow keys.
About this comparison
Individual results vary. Where procedures were combined, the photographs show the overall result.
Before & after
Transaxillary Breast Augmentation
Enlarge to inspect details. Scroll across the image with touch, a trackpad, or the arrow keys.
About this comparison
Individual results vary. Where procedures were combined, the photographs show the overall result.
Before & after
Breast Lift with Augmentation
Enlarge to inspect details. Scroll across the image with touch, a trackpad, or the arrow keys.
About this comparison
Individual results vary. Where procedures were combined, the photographs show the overall result.
A historical case by Dr. L. Scott Ennis. Current treatment-provider assignments may differ.
Before & after
Breast Augmentation
Enlarge to inspect details. Scroll across the image with touch, a trackpad, or the arrow keys.
About this comparison
Individual results vary. Where procedures were combined, the photographs show the overall result.
Before & after
Breast Augmentation
Enlarge to inspect details. Scroll across the image with touch, a trackpad, or the arrow keys.
About this comparison
Individual results vary. Where procedures were combined, the photographs show the overall result.
Before & after
Breast Implant Exchange
Enlarge to inspect details. Scroll across the image with touch, a trackpad, or the arrow keys.
About this comparison
Individual results vary. Where procedures were combined, the photographs show the overall result.
A historical case by Dr. L. Scott Ennis. Current treatment-provider assignments may differ.
Before & after
Breast Augmentation
Enlarge to inspect details. Scroll across the image with touch, a trackpad, or the arrow keys.
About this comparison
Individual results vary. Where procedures were combined, the photographs show the overall result.
Before & after
Breast Augmentation
Enlarge to inspect details. Scroll across the image with touch, a trackpad, or the arrow keys.
About this comparison
Individual results vary. Where procedures were combined, the photographs show the overall result.
A historical case by Dr. L. Scott Ennis. Current treatment-provider assignments may differ.
Before & after
Breast Augmentation
Enlarge to inspect details. Scroll across the image with touch, a trackpad, or the arrow keys.
About this comparison
Individual results vary. Where procedures were combined, the photographs show the overall result.
Before & after
Breast Augmentation
Enlarge to inspect details. Scroll across the image with touch, a trackpad, or the arrow keys.
About this comparison
Individual results vary. Where procedures were combined, the photographs show the overall result.
A historical case by Dr. L. Scott Ennis. Current treatment-provider assignments may differ.
Before & after
Breast Augmentation
Enlarge to inspect details. Scroll across the image with touch, a trackpad, or the arrow keys.
About this comparison
Individual results vary. Where procedures were combined, the photographs show the overall result.
Before & after
Breast Augmentation
Enlarge to inspect details. Scroll across the image with touch, a trackpad, or the arrow keys.
About this comparison
Individual results vary. Where procedures were combined, the photographs show the overall result.
Before & after
Breast Augmentation
Enlarge to inspect details. Scroll across the image with touch, a trackpad, or the arrow keys.
About this comparison
Individual results vary. Where procedures were combined, the photographs show the overall result.
Before & after
Breast Augmentation
Enlarge to inspect details. Scroll across the image with touch, a trackpad, or the arrow keys.
About this comparison
Individual results vary. Where procedures were combined, the photographs show the overall result.
Before & after
Breast Lift with Augmentation
Enlarge to inspect details. Scroll across the image with touch, a trackpad, or the arrow keys.
About this comparison
Individual results vary. Where procedures were combined, the photographs show the overall result.
A historical case by Dr. L. Scott Ennis. Current treatment-provider assignments may differ.
Before & after
Breast Lift with Augmentation
Enlarge to inspect details. Scroll across the image with touch, a trackpad, or the arrow keys.
About this comparison
Individual results vary. Where procedures were combined, the photographs show the overall result.
A historical case by Dr. L. Scott Ennis. Current treatment-provider assignments may differ.
Before & after
Breast Lift
Enlarge to inspect details. Scroll across the image with touch, a trackpad, or the arrow keys.
About this comparison
Individual results vary. Where procedures were combined, the photographs show the overall result.
A historical case by Dr. L. Scott Ennis. Current treatment-provider assignments may differ.
Before & after
Breast Lift
Enlarge to inspect details. Scroll across the image with touch, a trackpad, or the arrow keys.
About this comparison
Individual results vary. Where procedures were combined, the photographs show the overall result.
A historical case by Dr. L. Scott Ennis. Current treatment-provider assignments may differ.
Before & after
Breast Augmentation
Enlarge to inspect details. Scroll across the image with touch, a trackpad, or the arrow keys.
About this comparison
Individual results vary. Where procedures were combined, the photographs show the overall result.
Before & after
Breast Implant Exchange
Enlarge to inspect details. Scroll across the image with touch, a trackpad, or the arrow keys.
About this comparison
Individual results vary. Where procedures were combined, the photographs show the overall result.
A historical case by Dr. L. Scott Ennis. Current treatment-provider assignments may differ.
Before & after
Breast Augmentation
Enlarge to inspect details. Scroll across the image with touch, a trackpad, or the arrow keys.
About this comparison
Individual results vary. Where procedures were combined, the photographs show the overall result.
Before & after
Breast Augmentation
Enlarge to inspect details. Scroll across the image with touch, a trackpad, or the arrow keys.
About this comparison
Individual results vary. Where procedures were combined, the photographs show the overall result.
Before & after
Breast Lift
Enlarge to inspect details. Scroll across the image with touch, a trackpad, or the arrow keys.
About this comparison
Individual results vary. Where procedures were combined, the photographs show the overall result.
A historical case by Dr. L. Scott Ennis. Current treatment-provider assignments may differ.
Before & after
Breast Augmentation
Enlarge to inspect details. Scroll across the image with touch, a trackpad, or the arrow keys.
About this comparison
Individual results vary. Where procedures were combined, the photographs show the overall result.
Before & after
Breast Lift
Enlarge to inspect details. Scroll across the image with touch, a trackpad, or the arrow keys.
About this comparison
Individual results vary. Where procedures were combined, the photographs show the overall result.
A historical case by Dr. L. Scott Ennis. Current treatment-provider assignments may differ.
Before & after
Breast Augmentation
Enlarge to inspect details. Scroll across the image with touch, a trackpad, or the arrow keys.
About this comparison
Individual results vary. Where procedures were combined, the photographs show the overall result.
Before & after
Breast Augmentation
Enlarge to inspect details. Scroll across the image with touch, a trackpad, or the arrow keys.
About this comparison
Individual results vary. Where procedures were combined, the photographs show the overall result.
Before & after
Breast Augmentation
Enlarge to inspect details. Scroll across the image with touch, a trackpad, or the arrow keys.
About this comparison
Individual results vary. Where procedures were combined, the photographs show the overall result.
Before & after
Breast Augmentation
Enlarge to inspect details. Scroll across the image with touch, a trackpad, or the arrow keys.
About this comparison
Individual results vary. Where procedures were combined, the photographs show the overall result.
Before & after
Breast Augmentation
Enlarge to inspect details. Scroll across the image with touch, a trackpad, or the arrow keys.
About this comparison
Individual results vary. Where procedures were combined, the photographs show the overall result.
Before & after
Breast Lift
Enlarge to inspect details. Scroll across the image with touch, a trackpad, or the arrow keys.
About this comparison
Individual results vary. Where procedures were combined, the photographs show the overall result.
A historical case by Dr. L. Scott Ennis. Current treatment-provider assignments may differ.
Before & after
Breast Implant Exchange
Enlarge to inspect details. Scroll across the image with touch, a trackpad, or the arrow keys.
About this comparison
Individual results vary. Where procedures were combined, the photographs show the overall result.
A historical case by Dr. L. Scott Ennis. Current treatment-provider assignments may differ.
Before & after
Breast Augmentation
Enlarge to inspect details. Scroll across the image with touch, a trackpad, or the arrow keys.
About this comparison
Individual results vary. Where procedures were combined, the photographs show the overall result.
Before & after
Breast Implant Exchange
Enlarge to inspect details. Scroll across the image with touch, a trackpad, or the arrow keys.
About this comparison
Individual results vary. Where procedures were combined, the photographs show the overall result.
A historical case by Dr. L. Scott Ennis. Current treatment-provider assignments may differ.
Before & after
Breast Augmentation
Enlarge to inspect details. Scroll across the image with touch, a trackpad, or the arrow keys.
About this comparison
Individual results vary. Where procedures were combined, the photographs show the overall result.
Before & after
Breast Augmentation
Enlarge to inspect details. Scroll across the image with touch, a trackpad, or the arrow keys.
About this comparison
Individual results vary. Where procedures were combined, the photographs show the overall result.
Before & after
Breast Reduction
Enlarge to inspect details. Scroll across the image with touch, a trackpad, or the arrow keys.
About this comparison
Individual results vary. Where procedures were combined, the photographs show the overall result.
A historical case by Dr. L. Scott Ennis. Current treatment-provider assignments may differ.
Before & after
Breast Lift with Augmentation
Enlarge to inspect details. Scroll across the image with touch, a trackpad, or the arrow keys.
About this comparison
Individual results vary. Where procedures were combined, the photographs show the overall result.
A historical case by Dr. L. Scott Ennis. Current treatment-provider assignments may differ.
Before & after
Breast Augmentation
Enlarge to inspect details. Scroll across the image with touch, a trackpad, or the arrow keys.
About this comparison
Individual results vary. Where procedures were combined, the photographs show the overall result.
Before & after
Breast Augmentation
Enlarge to inspect details. Scroll across the image with touch, a trackpad, or the arrow keys.
About this comparison
Individual results vary. Where procedures were combined, the photographs show the overall result.
Before & after
Breast Augmentation
Enlarge to inspect details. Scroll across the image with touch, a trackpad, or the arrow keys.
About this comparison
Individual results vary. Where procedures were combined, the photographs show the overall result.
A historical case by Dr. L. Scott Ennis. Current treatment-provider assignments may differ.
Before & after
Breast Augmentation
Enlarge to inspect details. Scroll across the image with touch, a trackpad, or the arrow keys.
About this comparison
Individual results vary. Where procedures were combined, the photographs show the overall result.
A historical case by Dr. L. Scott Ennis. Current treatment-provider assignments may differ.
Before & after
Breast Lift
Enlarge to inspect details. Scroll across the image with touch, a trackpad, or the arrow keys.
About this comparison
Individual results vary. Where procedures were combined, the photographs show the overall result.
A historical case by Dr. L. Scott Ennis. Current treatment-provider assignments may differ.
Before & after
Breast Augmentation
Enlarge to inspect details. Scroll across the image with touch, a trackpad, or the arrow keys.
About this comparison
Individual results vary. Where procedures were combined, the photographs show the overall result.
Before & after
Transaxillary Breast Augmentation
Enlarge to inspect details. Scroll across the image with touch, a trackpad, or the arrow keys.
About this comparison
Individual results vary. Where procedures were combined, the photographs show the overall result.
Before & after
Breast Implant Exchange
Enlarge to inspect details. Scroll across the image with touch, a trackpad, or the arrow keys.
About this comparison
Individual results vary. Where procedures were combined, the photographs show the overall result.
A historical case by Dr. L. Scott Ennis. Current treatment-provider assignments may differ.
Before & after
Breast Augmentation
Enlarge to inspect details. Scroll across the image with touch, a trackpad, or the arrow keys.
About this comparison
Individual results vary. Where procedures were combined, the photographs show the overall result.
Before & after
Breast Augmentation
Enlarge to inspect details. Scroll across the image with touch, a trackpad, or the arrow keys.
About this comparison
Individual results vary. Where procedures were combined, the photographs show the overall result.
Before & after
Breast Implant Removal
Enlarge to inspect details. Scroll across the image with touch, a trackpad, or the arrow keys.
About this comparison
Individual results vary. Where procedures were combined, the photographs show the overall result.
A historical case by Dr. L. Scott Ennis. Current treatment-provider assignments may differ.
Before & after
Breast Augmentation
Enlarge to inspect details. Scroll across the image with touch, a trackpad, or the arrow keys.
About this comparison
Individual results vary. Where procedures were combined, the photographs show the overall result.
Before & after
Breast Lift
Enlarge to inspect details. Scroll across the image with touch, a trackpad, or the arrow keys.
About this comparison
Individual results vary. Where procedures were combined, the photographs show the overall result.
A historical case by Dr. L. Scott Ennis. Current treatment-provider assignments may differ.
Before & after
Breast Augmentation
Enlarge to inspect details. Scroll across the image with touch, a trackpad, or the arrow keys.
About this comparison
Individual results vary. Where procedures were combined, the photographs show the overall result.
Before & after
Breast Implant Exchange
Enlarge to inspect details. Scroll across the image with touch, a trackpad, or the arrow keys.
About this comparison
Individual results vary. Where procedures were combined, the photographs show the overall result.
A historical case by Dr. L. Scott Ennis. Current treatment-provider assignments may differ.
Before & after
Breast Implant Exchange
Enlarge to inspect details. Scroll across the image with touch, a trackpad, or the arrow keys.
About this comparison
Individual results vary. Where procedures were combined, the photographs show the overall result.
A historical case by Dr. L. Scott Ennis. Current treatment-provider assignments may differ.
Before & after
Breast Augmentation
Enlarge to inspect details. Scroll across the image with touch, a trackpad, or the arrow keys.
About this comparison
Individual results vary. Where procedures were combined, the photographs show the overall result.
Before & after
Breast Augmentation
Enlarge to inspect details. Scroll across the image with touch, a trackpad, or the arrow keys.
About this comparison
Individual results vary. Where procedures were combined, the photographs show the overall result.
Before & after
Breast Lift
Enlarge to inspect details. Scroll across the image with touch, a trackpad, or the arrow keys.
About this comparison
Individual results vary. Where procedures were combined, the photographs show the overall result.
A historical case by Dr. L. Scott Ennis. Current treatment-provider assignments may differ.
Before & after
Nipple Reduction
Enlarge to inspect details. Scroll across the image with touch, a trackpad, or the arrow keys.
About this comparison
Individual results vary. Where procedures were combined, the photographs show the overall result.
A historical case by Dr. L. Scott Ennis. Current treatment-provider assignments may differ.
Before & after
Breast Reduction
Enlarge to inspect details. Scroll across the image with touch, a trackpad, or the arrow keys.
About this comparison
Individual results vary. Where procedures were combined, the photographs show the overall result.
A historical case by Dr. L. Scott Ennis. Current treatment-provider assignments may differ.
Before & after
Breast Implant Exchange
Enlarge to inspect details. Scroll across the image with touch, a trackpad, or the arrow keys.
About this comparison
Individual results vary. Where procedures were combined, the photographs show the overall result.
A historical case by Dr. L. Scott Ennis. Current treatment-provider assignments may differ.
Before & after
Breast Augmentation
Enlarge to inspect details. Scroll across the image with touch, a trackpad, or the arrow keys.
About this comparison
Individual results vary. Where procedures were combined, the photographs show the overall result.
Before & after
Breast Lift with Augmentation
Enlarge to inspect details. Scroll across the image with touch, a trackpad, or the arrow keys.
About this comparison
Individual results vary. Where procedures were combined, the photographs show the overall result.
A historical case by Dr. L. Scott Ennis. Current treatment-provider assignments may differ.
Before & after
Breast Augmentation
Enlarge to inspect details. Scroll across the image with touch, a trackpad, or the arrow keys.
About this comparison
Individual results vary. Where procedures were combined, the photographs show the overall result.
Before & after
Breast Lift with Augmentation
Enlarge to inspect details. Scroll across the image with touch, a trackpad, or the arrow keys.
About this comparison
Individual results vary. Where procedures were combined, the photographs show the overall result.
A historical case by Dr. L. Scott Ennis. Current treatment-provider assignments may differ.
Before & after
Breast Augmentation
Enlarge to inspect details. Scroll across the image with touch, a trackpad, or the arrow keys.
About this comparison
Individual results vary. Where procedures were combined, the photographs show the overall result.
Before & after
Breast Augmentation
Enlarge to inspect details. Scroll across the image with touch, a trackpad, or the arrow keys.
About this comparison
Individual results vary. Where procedures were combined, the photographs show the overall result.
Before & after
Breast Augmentation
Enlarge to inspect details. Scroll across the image with touch, a trackpad, or the arrow keys.
About this comparison
Individual results vary. Where procedures were combined, the photographs show the overall result.
Before & after
Breast Implant Exchange
Enlarge to inspect details. Scroll across the image with touch, a trackpad, or the arrow keys.
About this comparison
Individual results vary. Where procedures were combined, the photographs show the overall result.
A historical case by Dr. L. Scott Ennis. Current treatment-provider assignments may differ.
Before & after
Breast Augmentation
Enlarge to inspect details. Scroll across the image with touch, a trackpad, or the arrow keys.
About this comparison
Individual results vary. Where procedures were combined, the photographs show the overall result.
Before & after
Breast Implant Exchange
Enlarge to inspect details. Scroll across the image with touch, a trackpad, or the arrow keys.
About this comparison
Individual results vary. Where procedures were combined, the photographs show the overall result.
A historical case by Dr. L. Scott Ennis. Current treatment-provider assignments may differ.
Before & after
Breast Augmentation
Enlarge to inspect details. Scroll across the image with touch, a trackpad, or the arrow keys.
About this comparison
Individual results vary. Where procedures were combined, the photographs show the overall result.
Before & after
Breast Augmentation
Enlarge to inspect details. Scroll across the image with touch, a trackpad, or the arrow keys.
About this comparison
Individual results vary. Where procedures were combined, the photographs show the overall result.
Before & after
Breast Augmentation
Enlarge to inspect details. Scroll across the image with touch, a trackpad, or the arrow keys.
About this comparison
Individual results vary. Where procedures were combined, the photographs show the overall result.
Before & after
Breast Augmentation
Enlarge to inspect details. Scroll across the image with touch, a trackpad, or the arrow keys.
About this comparison
Individual results vary. Where procedures were combined, the photographs show the overall result.
Before & after
Breast Lift with Augmentation
Enlarge to inspect details. Scroll across the image with touch, a trackpad, or the arrow keys.
About this comparison
Individual results vary. Where procedures were combined, the photographs show the overall result.
A historical case by Dr. L. Scott Ennis. Current treatment-provider assignments may differ.
Before & after
Breast Augmentation
Enlarge to inspect details. Scroll across the image with touch, a trackpad, or the arrow keys.
About this comparison
Individual results vary. Where procedures were combined, the photographs show the overall result.
Before & after
Breast Lift with Augmentation
Enlarge to inspect details. Scroll across the image with touch, a trackpad, or the arrow keys.
About this comparison
Individual results vary. Where procedures were combined, the photographs show the overall result.
A historical case by Dr. L. Scott Ennis. Current treatment-provider assignments may differ.
Before & after
Breast Augmentation
Enlarge to inspect details. Scroll across the image with touch, a trackpad, or the arrow keys.
About this comparison
Individual results vary. Where procedures were combined, the photographs show the overall result.
Before & after
Breast Augmentation
Enlarge to inspect details. Scroll across the image with touch, a trackpad, or the arrow keys.
About this comparison
Individual results vary. Where procedures were combined, the photographs show the overall result.
Before & after
Breast Augmentation
Enlarge to inspect details. Scroll across the image with touch, a trackpad, or the arrow keys.
About this comparison
Individual results vary. Where procedures were combined, the photographs show the overall result.
Before & after
Breast Augmentation
Enlarge to inspect details. Scroll across the image with touch, a trackpad, or the arrow keys.
About this comparison
Individual results vary. Where procedures were combined, the photographs show the overall result.
Before & after
Breast Augmentation
Enlarge to inspect details. Scroll across the image with touch, a trackpad, or the arrow keys.
About this comparison
Individual results vary. Where procedures were combined, the photographs show the overall result.
Before & after
Breast Augmentation
Enlarge to inspect details. Scroll across the image with touch, a trackpad, or the arrow keys.
About this comparison
Individual results vary. Where procedures were combined, the photographs show the overall result.
Before & after
Breast Augmentation
Enlarge to inspect details. Scroll across the image with touch, a trackpad, or the arrow keys.
About this comparison
Individual results vary. Where procedures were combined, the photographs show the overall result.
Before & after
Breast Augmentation
Enlarge to inspect details. Scroll across the image with touch, a trackpad, or the arrow keys.
About this comparison
Individual results vary. Where procedures were combined, the photographs show the overall result.
Before & after
Breast Augmentation
Enlarge to inspect details. Scroll across the image with touch, a trackpad, or the arrow keys.
About this comparison
Individual results vary. Where procedures were combined, the photographs show the overall result.
Before & after
Breast Augmentation
Enlarge to inspect details. Scroll across the image with touch, a trackpad, or the arrow keys.
About this comparison
Individual results vary. Where procedures were combined, the photographs show the overall result.
Before & after
Breast Augmentation
Enlarge to inspect details. Scroll across the image with touch, a trackpad, or the arrow keys.
About this comparison
Individual results vary. Where procedures were combined, the photographs show the overall result.
Before & after
Breast Augmentation
Enlarge to inspect details. Scroll across the image with touch, a trackpad, or the arrow keys.
About this comparison
Individual results vary. Where procedures were combined, the photographs show the overall result.
Before & after
Breast Augmentation
Enlarge to inspect details. Scroll across the image with touch, a trackpad, or the arrow keys.
About this comparison
Individual results vary. Where procedures were combined, the photographs show the overall result.
Before & after
Breast Augmentation
Enlarge to inspect details. Scroll across the image with touch, a trackpad, or the arrow keys.
About this comparison
Individual results vary. Where procedures were combined, the photographs show the overall result.
Before & after
Breast Implant Exchange
Enlarge to inspect details. Scroll across the image with touch, a trackpad, or the arrow keys.
About this comparison
Individual results vary. Where procedures were combined, the photographs show the overall result.
A historical case by Dr. L. Scott Ennis. Current treatment-provider assignments may differ.
Before & after
Breast Augmentation
Enlarge to inspect details. Scroll across the image with touch, a trackpad, or the arrow keys.
About this comparison
Individual results vary. Where procedures were combined, the photographs show the overall result.
Before & after
Breast Augmentation
Enlarge to inspect details. Scroll across the image with touch, a trackpad, or the arrow keys.
About this comparison
Individual results vary. Where procedures were combined, the photographs show the overall result.
Before & after
Breast Augmentation
Enlarge to inspect details. Scroll across the image with touch, a trackpad, or the arrow keys.
About this comparison
Individual results vary. Where procedures were combined, the photographs show the overall result.
Before & after
Breast Augmentation
Enlarge to inspect details. Scroll across the image with touch, a trackpad, or the arrow keys.
About this comparison
Individual results vary. Where procedures were combined, the photographs show the overall result.
Before & after
Breast Augmentation
Enlarge to inspect details. Scroll across the image with touch, a trackpad, or the arrow keys.
About this comparison
Individual results vary. Where procedures were combined, the photographs show the overall result.
Before & after
Breast Augmentation
Enlarge to inspect details. Scroll across the image with touch, a trackpad, or the arrow keys.
About this comparison
Individual results vary. Where procedures were combined, the photographs show the overall result.
Before & after
Breast Augmentation
Enlarge to inspect details. Scroll across the image with touch, a trackpad, or the arrow keys.
About this comparison
Individual results vary. Where procedures were combined, the photographs show the overall result.
Before & after
Breast Augmentation
Enlarge to inspect details. Scroll across the image with touch, a trackpad, or the arrow keys.
About this comparison
Individual results vary. Where procedures were combined, the photographs show the overall result.
Before & after
Breast Augmentation
Enlarge to inspect details. Scroll across the image with touch, a trackpad, or the arrow keys.
About this comparison
Individual results vary. Where procedures were combined, the photographs show the overall result.
Before & after
Breast Augmentation
Enlarge to inspect details. Scroll across the image with touch, a trackpad, or the arrow keys.
About this comparison
Individual results vary. Where procedures were combined, the photographs show the overall result.
Before & after
Breast Augmentation
Enlarge to inspect details. Scroll across the image with touch, a trackpad, or the arrow keys.
About this comparison
Individual results vary. Where procedures were combined, the photographs show the overall result.
Before & after
Breast Augmentation
Enlarge to inspect details. Scroll across the image with touch, a trackpad, or the arrow keys.
About this comparison
Individual results vary. Where procedures were combined, the photographs show the overall result.
Before & after
Breast Augmentation
Enlarge to inspect details. Scroll across the image with touch, a trackpad, or the arrow keys.
About this comparison
Individual results vary. Where procedures were combined, the photographs show the overall result.
Before & after
Breast Augmentation
Enlarge to inspect details. Scroll across the image with touch, a trackpad, or the arrow keys.
About this comparison
Individual results vary. Where procedures were combined, the photographs show the overall result.
Before & after
Breast Augmentation
Enlarge to inspect details. Scroll across the image with touch, a trackpad, or the arrow keys.
About this comparison
Individual results vary. Where procedures were combined, the photographs show the overall result.
Before & after
Breast Augmentation
Enlarge to inspect details. Scroll across the image with touch, a trackpad, or the arrow keys.
About this comparison
Individual results vary. Where procedures were combined, the photographs show the overall result.
Before & after
Breast Augmentation
Enlarge to inspect details. Scroll across the image with touch, a trackpad, or the arrow keys.
About this comparison
Individual results vary. Where procedures were combined, the photographs show the overall result.
Before & after
Breast Augmentation
Enlarge to inspect details. Scroll across the image with touch, a trackpad, or the arrow keys.
About this comparison
Individual results vary. Where procedures were combined, the photographs show the overall result.
Before & after
Breast Augmentation
Enlarge to inspect details. Scroll across the image with touch, a trackpad, or the arrow keys.
About this comparison
Individual results vary. Where procedures were combined, the photographs show the overall result.
Before & after
Breast Augmentation
Enlarge to inspect details. Scroll across the image with touch, a trackpad, or the arrow keys.
About this comparison
Individual results vary. Where procedures were combined, the photographs show the overall result.
Before & after
Breast Augmentation
Enlarge to inspect details. Scroll across the image with touch, a trackpad, or the arrow keys.
About this comparison
Individual results vary. Where procedures were combined, the photographs show the overall result.
Before & after
Breast Augmentation
Enlarge to inspect details. Scroll across the image with touch, a trackpad, or the arrow keys.
About this comparison
Individual results vary. Where procedures were combined, the photographs show the overall result.
Before & after
Breast Augmentation
Enlarge to inspect details. Scroll across the image with touch, a trackpad, or the arrow keys.
About this comparison
Individual results vary. Where procedures were combined, the photographs show the overall result.
Before & after
Breast Augmentation
Enlarge to inspect details. Scroll across the image with touch, a trackpad, or the arrow keys.
About this comparison
Individual results vary. Where procedures were combined, the photographs show the overall result.
Before & after
Breast Augmentation
Enlarge to inspect details. Scroll across the image with touch, a trackpad, or the arrow keys.
About this comparison
Individual results vary. Where procedures were combined, the photographs show the overall result.
Before & after
Breast Augmentation
Enlarge to inspect details. Scroll across the image with touch, a trackpad, or the arrow keys.
About this comparison
Individual results vary. Where procedures were combined, the photographs show the overall result.
Before & after
Breast Implant Removal
Enlarge to inspect details. Scroll across the image with touch, a trackpad, or the arrow keys.
About this comparison
Individual results vary. Where procedures were combined, the photographs show the overall result.
A historical case by Dr. L. Scott Ennis. Current treatment-provider assignments may differ.
Before & after
Breast Implant Exchange
Enlarge to inspect details. Scroll across the image with touch, a trackpad, or the arrow keys.
About this comparison
Individual results vary. Where procedures were combined, the photographs show the overall result.
A historical case by Dr. L. Scott Ennis. Current treatment-provider assignments may differ.
Before & after
Breast Augmentation
Enlarge to inspect details. Scroll across the image with touch, a trackpad, or the arrow keys.
About this comparison
Individual results vary. Where procedures were combined, the photographs show the overall result.
Before & after
Breast Revision
Enlarge to inspect details. Scroll across the image with touch, a trackpad, or the arrow keys.
About this comparison
Individual results vary. Where procedures were combined, the photographs show the overall result.
A historical case by Dr. L. Scott Ennis. Current treatment-provider assignments may differ.
Before & after
Breast Lift with Augmentation
Enlarge to inspect details. Scroll across the image with touch, a trackpad, or the arrow keys.
About this comparison
Individual results vary. Where procedures were combined, the photographs show the overall result.
A historical case by Dr. L. Scott Ennis. Current treatment-provider assignments may differ.
Before & after
Breast Implant Exchange
Enlarge to inspect details. Scroll across the image with touch, a trackpad, or the arrow keys.
About this comparison
Individual results vary. Where procedures were combined, the photographs show the overall result.
A historical case by Dr. L. Scott Ennis. Current treatment-provider assignments may differ.
Before & after
Mommy Makeover
Enlarge to inspect details. Scroll across the image with touch, a trackpad, or the arrow keys.
About this comparison
Individual results vary. Where procedures were combined, the photographs show the overall result.
A historical case by Dr. L. Scott Ennis. Current treatment-provider assignments may differ.
Before & after
Brazilian Butt Lift
Enlarge to inspect details. Scroll across the image with touch, a trackpad, or the arrow keys.
About this comparison
Individual results vary. Where procedures were combined, the photographs show the overall result.
A historical case by Dr. L. Scott Ennis. Current treatment-provider assignments may differ.
Before & after
Tummy Tuck
Enlarge to inspect details. Scroll across the image with touch, a trackpad, or the arrow keys.
About this comparison
Individual results vary. Where procedures were combined, the photographs show the overall result.
A historical case by Dr. L. Scott Ennis. Current treatment-provider assignments may differ.
Before & after
Brazilian Butt Lift
Enlarge to inspect details. Scroll across the image with touch, a trackpad, or the arrow keys.
About this comparison
Individual results vary. Where procedures were combined, the photographs show the overall result.
A historical case by Dr. L. Scott Ennis. Current treatment-provider assignments may differ.
Before & after
Tummy Tuck
Enlarge to inspect details. Scroll across the image with touch, a trackpad, or the arrow keys.
About this comparison
Individual results vary. Where procedures were combined, the photographs show the overall result.
A historical case by Dr. L. Scott Ennis. Current treatment-provider assignments may differ.
Before & after
Labiaplasty
Enlarge to inspect details. Scroll across the image with touch, a trackpad, or the arrow keys.
About this comparison
Individual results vary. Where procedures were combined, the photographs show the overall result.
Before & after
Gynecomastia
Enlarge to inspect details. Scroll across the image with touch, a trackpad, or the arrow keys.
About this comparison
Individual results vary. Where procedures were combined, the photographs show the overall result.
A historical case by Dr. L. Scott Ennis. Current treatment-provider assignments may differ.
Before & after
Mommy Makeover
Enlarge to inspect details. Scroll across the image with touch, a trackpad, or the arrow keys.
About this comparison
Individual results vary. Where procedures were combined, the photographs show the overall result.
A historical case by Dr. L. Scott Ennis. Current treatment-provider assignments may differ.
Before & after
Liposuction
Enlarge to inspect details. Scroll across the image with touch, a trackpad, or the arrow keys.
About this comparison
Individual results vary. Where procedures were combined, the photographs show the overall result.
A historical case by Dr. L. Scott Ennis. Current treatment-provider assignments may differ.
Before & after
Liposuction
Enlarge to inspect details. Scroll across the image with touch, a trackpad, or the arrow keys.
About this comparison
Individual results vary. Where procedures were combined, the photographs show the overall result.
A historical case by Dr. L. Scott Ennis. Current treatment-provider assignments may differ.
Before & after
Gynecomastia
Enlarge to inspect details. Scroll across the image with touch, a trackpad, or the arrow keys.
About this comparison
Individual results vary. Where procedures were combined, the photographs show the overall result.
A historical case by Dr. L. Scott Ennis. Current treatment-provider assignments may differ.
Before & after
Tummy Tuck
Enlarge to inspect details. Scroll across the image with touch, a trackpad, or the arrow keys.
About this comparison
Individual results vary. Where procedures were combined, the photographs show the overall result.
A historical case by Dr. L. Scott Ennis. Current treatment-provider assignments may differ.
Before & after
Liposuction
Enlarge to inspect details. Scroll across the image with touch, a trackpad, or the arrow keys.
About this comparison
Individual results vary. Where procedures were combined, the photographs show the overall result.
A historical case by Dr. L. Scott Ennis. Current treatment-provider assignments may differ.
Before & after
Liposuction
Enlarge to inspect details. Scroll across the image with touch, a trackpad, or the arrow keys.
About this comparison
Individual results vary. Where procedures were combined, the photographs show the overall result.
A historical case by Dr. L. Scott Ennis. Current treatment-provider assignments may differ.
Before & after
Labiaplasty
Enlarge to inspect details. Scroll across the image with touch, a trackpad, or the arrow keys.
About this comparison
Individual results vary. Where procedures were combined, the photographs show the overall result.
Before & after
Tummy Tuck
Enlarge to inspect details. Scroll across the image with touch, a trackpad, or the arrow keys.
About this comparison
Individual results vary. Where procedures were combined, the photographs show the overall result.
A historical case by Dr. L. Scott Ennis. Current treatment-provider assignments may differ.
Before & after
Tummy Tuck
Enlarge to inspect details. Scroll across the image with touch, a trackpad, or the arrow keys.
About this comparison
Individual results vary. Where procedures were combined, the photographs show the overall result.
A historical case by Dr. L. Scott Ennis. Current treatment-provider assignments may differ.
Before & after
Liposuction
Enlarge to inspect details. Scroll across the image with touch, a trackpad, or the arrow keys.
About this comparison
Individual results vary. Where procedures were combined, the photographs show the overall result.
A historical case by Dr. L. Scott Ennis. Current treatment-provider assignments may differ.
Before & after
Tummy Tuck
Enlarge to inspect details. Scroll across the image with touch, a trackpad, or the arrow keys.
About this comparison
Individual results vary. Where procedures were combined, the photographs show the overall result.
A historical case by Dr. L. Scott Ennis. Current treatment-provider assignments may differ.
Before & after
Liposuction
Enlarge to inspect details. Scroll across the image with touch, a trackpad, or the arrow keys.
About this comparison
Individual results vary. Where procedures were combined, the photographs show the overall result.
A historical case by Dr. L. Scott Ennis. Current treatment-provider assignments may differ.
Before & after
Liposuction
Enlarge to inspect details. Scroll across the image with touch, a trackpad, or the arrow keys.
About this comparison
Individual results vary. Where procedures were combined, the photographs show the overall result.
A historical case by Dr. L. Scott Ennis. Current treatment-provider assignments may differ.
Before & after
Liposuction
Enlarge to inspect details. Scroll across the image with touch, a trackpad, or the arrow keys.
About this comparison
Individual results vary. Where procedures were combined, the photographs show the overall result.
A historical case by Dr. L. Scott Ennis. Current treatment-provider assignments may differ.
Before & after
Tummy Tuck
Enlarge to inspect details. Scroll across the image with touch, a trackpad, or the arrow keys.
About this comparison
Individual results vary. Where procedures were combined, the photographs show the overall result.
A historical case by Dr. L. Scott Ennis. Current treatment-provider assignments may differ.
Before & after
Liposuction
Enlarge to inspect details. Scroll across the image with touch, a trackpad, or the arrow keys.
About this comparison
Individual results vary. Where procedures were combined, the photographs show the overall result.
A historical case by Dr. L. Scott Ennis. Current treatment-provider assignments may differ.
Before & after
Gynecomastia
Enlarge to inspect details. Scroll across the image with touch, a trackpad, or the arrow keys.
About this comparison
Individual results vary. Where procedures were combined, the photographs show the overall result.
A historical case by Dr. L. Scott Ennis. Current treatment-provider assignments may differ.
Before & after
Gynecomastia
Enlarge to inspect details. Scroll across the image with touch, a trackpad, or the arrow keys.
About this comparison
Individual results vary. Where procedures were combined, the photographs show the overall result.
A historical case by Dr. L. Scott Ennis. Current treatment-provider assignments may differ.
Before & after
Brazilian Butt Lift
Enlarge to inspect details. Scroll across the image with touch, a trackpad, or the arrow keys.
About this comparison
Individual results vary. Where procedures were combined, the photographs show the overall result.
A historical case by Dr. L. Scott Ennis. Current treatment-provider assignments may differ.
Before & after
Liposuction
Enlarge to inspect details. Scroll across the image with touch, a trackpad, or the arrow keys.
About this comparison
Individual results vary. Where procedures were combined, the photographs show the overall result.
A historical case by Dr. L. Scott Ennis. Current treatment-provider assignments may differ.
Before & after
Liposuction
Enlarge to inspect details. Scroll across the image with touch, a trackpad, or the arrow keys.
About this comparison
Individual results vary. Where procedures were combined, the photographs show the overall result.
A historical case by Dr. L. Scott Ennis. Current treatment-provider assignments may differ.
Before & after
Brazilian Butt Lift
Enlarge to inspect details. Scroll across the image with touch, a trackpad, or the arrow keys.
About this comparison
Individual results vary. Where procedures were combined, the photographs show the overall result.
A historical case by Dr. L. Scott Ennis. Current treatment-provider assignments may differ.
Before & after
Labiaplasty
Enlarge to inspect details. Scroll across the image with touch, a trackpad, or the arrow keys.
About this comparison
Individual results vary. Where procedures were combined, the photographs show the overall result.
Before & after
Gynecomastia
Enlarge to inspect details. Scroll across the image with touch, a trackpad, or the arrow keys.
About this comparison
Individual results vary. Where procedures were combined, the photographs show the overall result.
A historical case by Dr. L. Scott Ennis. Current treatment-provider assignments may differ.
Before & after
Tummy Tuck
Enlarge to inspect details. Scroll across the image with touch, a trackpad, or the arrow keys.
About this comparison
Individual results vary. Where procedures were combined, the photographs show the overall result.
A historical case by Dr. L. Scott Ennis. Current treatment-provider assignments may differ.
Before & after
Liposuction
Enlarge to inspect details. Scroll across the image with touch, a trackpad, or the arrow keys.
About this comparison
Individual results vary. Where procedures were combined, the photographs show the overall result.
A historical case by Dr. L. Scott Ennis. Current treatment-provider assignments may differ.
Before & after
Tummy Tuck
Enlarge to inspect details. Scroll across the image with touch, a trackpad, or the arrow keys.
About this comparison
Individual results vary. Where procedures were combined, the photographs show the overall result.
A historical case by Dr. L. Scott Ennis. Current treatment-provider assignments may differ.
Before & after
Liposuction
Enlarge to inspect details. Scroll across the image with touch, a trackpad, or the arrow keys.
About this comparison
Individual results vary. Where procedures were combined, the photographs show the overall result.
A historical case by Dr. L. Scott Ennis. Current treatment-provider assignments may differ.
Before & after
Tummy Tuck
Enlarge to inspect details. Scroll across the image with touch, a trackpad, or the arrow keys.
About this comparison
Individual results vary. Where procedures were combined, the photographs show the overall result.
A historical case by Dr. L. Scott Ennis. Current treatment-provider assignments may differ.
Before & after
Tummy Tuck
Enlarge to inspect details. Scroll across the image with touch, a trackpad, or the arrow keys.
About this comparison
Individual results vary. Where procedures were combined, the photographs show the overall result.
A historical case by Dr. L. Scott Ennis. Current treatment-provider assignments may differ.
Before & after
Tummy Tuck
Enlarge to inspect details. Scroll across the image with touch, a trackpad, or the arrow keys.
About this comparison
Individual results vary. Where procedures were combined, the photographs show the overall result.
A historical case by Dr. L. Scott Ennis. Current treatment-provider assignments may differ.
Before & after
Mommy Makeover
Enlarge to inspect details. Scroll across the image with touch, a trackpad, or the arrow keys.
About this comparison
Individual results vary. Where procedures were combined, the photographs show the overall result.
A historical case by Dr. L. Scott Ennis. Current treatment-provider assignments may differ.
Before & after
Liposuction
Enlarge to inspect details. Scroll across the image with touch, a trackpad, or the arrow keys.
About this comparison
Individual results vary. Where procedures were combined, the photographs show the overall result.
A historical case by Dr. L. Scott Ennis. Current treatment-provider assignments may differ.
Before & after
Liposuction
Enlarge to inspect details. Scroll across the image with touch, a trackpad, or the arrow keys.
About this comparison
Individual results vary. Where procedures were combined, the photographs show the overall result.
A historical case by Dr. L. Scott Ennis. Current treatment-provider assignments may differ.
Before & after
Tummy Tuck
Enlarge to inspect details. Scroll across the image with touch, a trackpad, or the arrow keys.
About this comparison
Individual results vary. Where procedures were combined, the photographs show the overall result.
A historical case by Dr. L. Scott Ennis. Current treatment-provider assignments may differ.
Before & after
Tummy Tuck
Enlarge to inspect details. Scroll across the image with touch, a trackpad, or the arrow keys.
About this comparison
Individual results vary. Where procedures were combined, the photographs show the overall result.
A historical case by Dr. L. Scott Ennis. Current treatment-provider assignments may differ.
Before & after
Liposuction
Enlarge to inspect details. Scroll across the image with touch, a trackpad, or the arrow keys.
About this comparison
Individual results vary. Where procedures were combined, the photographs show the overall result.
A historical case by Dr. L. Scott Ennis. Current treatment-provider assignments may differ.
Before & after
Liposuction
Enlarge to inspect details. Scroll across the image with touch, a trackpad, or the arrow keys.
About this comparison
Individual results vary. Where procedures were combined, the photographs show the overall result.
A historical case by Dr. L. Scott Ennis. Current treatment-provider assignments may differ.
Before & after
Labiaplasty
Enlarge to inspect details. Scroll across the image with touch, a trackpad, or the arrow keys.
About this comparison
Individual results vary. Where procedures were combined, the photographs show the overall result.
Before & after
Tummy Tuck
Enlarge to inspect details. Scroll across the image with touch, a trackpad, or the arrow keys.
About this comparison
Individual results vary. Where procedures were combined, the photographs show the overall result.
A historical case by Dr. L. Scott Ennis. Current treatment-provider assignments may differ.
Before & after
Labiaplasty
Enlarge to inspect details. Scroll across the image with touch, a trackpad, or the arrow keys.
About this comparison
Individual results vary. Where procedures were combined, the photographs show the overall result.
Before & after
Tummy Tuck
Enlarge to inspect details. Scroll across the image with touch, a trackpad, or the arrow keys.
About this comparison
Individual results vary. Where procedures were combined, the photographs show the overall result.
A historical case by Dr. L. Scott Ennis. Current treatment-provider assignments may differ.
Before & after
Liposuction
Enlarge to inspect details. Scroll across the image with touch, a trackpad, or the arrow keys.
About this comparison
Individual results vary. Where procedures were combined, the photographs show the overall result.
A historical case by Dr. L. Scott Ennis. Current treatment-provider assignments may differ.
Before & after
Tummy Tuck
Enlarge to inspect details. Scroll across the image with touch, a trackpad, or the arrow keys.
About this comparison
Individual results vary. Where procedures were combined, the photographs show the overall result.
A historical case by Dr. L. Scott Ennis. Current treatment-provider assignments may differ.
Before & after
Brazilian Butt Lift
Enlarge to inspect details. Scroll across the image with touch, a trackpad, or the arrow keys.
About this comparison
Individual results vary. Where procedures were combined, the photographs show the overall result.
A historical case by Dr. L. Scott Ennis. Current treatment-provider assignments may differ.
Before & after
Liposuction
Enlarge to inspect details. Scroll across the image with touch, a trackpad, or the arrow keys.
About this comparison
Individual results vary. Where procedures were combined, the photographs show the overall result.
A historical case by Dr. L. Scott Ennis. Current treatment-provider assignments may differ.
Before & after
Brazilian Butt Lift
Enlarge to inspect details. Scroll across the image with touch, a trackpad, or the arrow keys.
About this comparison
Individual results vary. Where procedures were combined, the photographs show the overall result.
A historical case by Dr. L. Scott Ennis. Current treatment-provider assignments may differ.
Before & after
Liposuction
Enlarge to inspect details. Scroll across the image with touch, a trackpad, or the arrow keys.
About this comparison
Individual results vary. Where procedures were combined, the photographs show the overall result.
A historical case by Dr. L. Scott Ennis. Current treatment-provider assignments may differ.
Before & after
Tummy Tuck
Enlarge to inspect details. Scroll across the image with touch, a trackpad, or the arrow keys.
About this comparison
Individual results vary. Where procedures were combined, the photographs show the overall result.
A historical case by Dr. L. Scott Ennis. Current treatment-provider assignments may differ.
Before & after
Tummy Tuck
Enlarge to inspect details. Scroll across the image with touch, a trackpad, or the arrow keys.
About this comparison
Individual results vary. Where procedures were combined, the photographs show the overall result.
A historical case by Dr. L. Scott Ennis. Current treatment-provider assignments may differ.
Before & after
Liposuction
Enlarge to inspect details. Scroll across the image with touch, a trackpad, or the arrow keys.
About this comparison
Individual results vary. Where procedures were combined, the photographs show the overall result.
A historical case by Dr. L. Scott Ennis. Current treatment-provider assignments may differ.
Before & after
Liposuction
Enlarge to inspect details. Scroll across the image with touch, a trackpad, or the arrow keys.
About this comparison
Individual results vary. Where procedures were combined, the photographs show the overall result.
A historical case by Dr. L. Scott Ennis. Current treatment-provider assignments may differ.
Before & after
Liposuction
Enlarge to inspect details. Scroll across the image with touch, a trackpad, or the arrow keys.
About this comparison
Individual results vary. Where procedures were combined, the photographs show the overall result.
A historical case by Dr. L. Scott Ennis. Current treatment-provider assignments may differ.
Before & after
Liposuction
Enlarge to inspect details. Scroll across the image with touch, a trackpad, or the arrow keys.
About this comparison
Individual results vary. Where procedures were combined, the photographs show the overall result.
A historical case by Dr. L. Scott Ennis. Current treatment-provider assignments may differ.
Before & after
Tummy Tuck
Enlarge to inspect details. Scroll across the image with touch, a trackpad, or the arrow keys.
About this comparison
Individual results vary. Where procedures were combined, the photographs show the overall result.
A historical case by Dr. L. Scott Ennis. Current treatment-provider assignments may differ.
Before & after
Tummy Tuck
Enlarge to inspect details. Scroll across the image with touch, a trackpad, or the arrow keys.
About this comparison
Individual results vary. Where procedures were combined, the photographs show the overall result.
A historical case by Dr. L. Scott Ennis. Current treatment-provider assignments may differ.
Before & after
Liposuction
Enlarge to inspect details. Scroll across the image with touch, a trackpad, or the arrow keys.
About this comparison
Individual results vary. Where procedures were combined, the photographs show the overall result.
A historical case by Dr. L. Scott Ennis. Current treatment-provider assignments may differ.
Before & after
Liposuction
Enlarge to inspect details. Scroll across the image with touch, a trackpad, or the arrow keys.
About this comparison
Individual results vary. Where procedures were combined, the photographs show the overall result.
A historical case by Dr. L. Scott Ennis. Current treatment-provider assignments may differ.
Before & after
Labiaplasty
Enlarge to inspect details. Scroll across the image with touch, a trackpad, or the arrow keys.
About this comparison
Individual results vary. Where procedures were combined, the photographs show the overall result.
Before & after
Liposuction
Enlarge to inspect details. Scroll across the image with touch, a trackpad, or the arrow keys.
About this comparison
Individual results vary. Where procedures were combined, the photographs show the overall result.
A historical case by Dr. L. Scott Ennis. Current treatment-provider assignments may differ.
Before & after
Tummy Tuck
Enlarge to inspect details. Scroll across the image with touch, a trackpad, or the arrow keys.
About this comparison
Individual results vary. Where procedures were combined, the photographs show the overall result.
A historical case by Dr. L. Scott Ennis. Current treatment-provider assignments may differ.
Before & after
Liposuction
Enlarge to inspect details. Scroll across the image with touch, a trackpad, or the arrow keys.
About this comparison
Individual results vary. Where procedures were combined, the photographs show the overall result.
A historical case by Dr. L. Scott Ennis. Current treatment-provider assignments may differ.
Before & after
Tummy Tuck
Enlarge to inspect details. Scroll across the image with touch, a trackpad, or the arrow keys.
About this comparison
Individual results vary. Where procedures were combined, the photographs show the overall result.
A historical case by Dr. L. Scott Ennis. Current treatment-provider assignments may differ.
Before & after
Liposuction
Enlarge to inspect details. Scroll across the image with touch, a trackpad, or the arrow keys.
About this comparison
Individual results vary. Where procedures were combined, the photographs show the overall result.
A historical case by Dr. L. Scott Ennis. Current treatment-provider assignments may differ.
Before & after
Liposuction
Enlarge to inspect details. Scroll across the image with touch, a trackpad, or the arrow keys.
About this comparison
Individual results vary. Where procedures were combined, the photographs show the overall result.
A historical case by Dr. L. Scott Ennis. Current treatment-provider assignments may differ.
Before & after
Liposuction
Enlarge to inspect details. Scroll across the image with touch, a trackpad, or the arrow keys.
About this comparison
Individual results vary. Where procedures were combined, the photographs show the overall result.
A historical case by Dr. L. Scott Ennis. Current treatment-provider assignments may differ.
Before & after
Liposuction
Enlarge to inspect details. Scroll across the image with touch, a trackpad, or the arrow keys.
About this comparison
Individual results vary. Where procedures were combined, the photographs show the overall result.
A historical case by Dr. L. Scott Ennis. Current treatment-provider assignments may differ.
Before & after
Liposuction
Enlarge to inspect details. Scroll across the image with touch, a trackpad, or the arrow keys.
About this comparison
Individual results vary. Where procedures were combined, the photographs show the overall result.
A historical case by Dr. L. Scott Ennis. Current treatment-provider assignments may differ.
Before & after
Liposuction
Enlarge to inspect details. Scroll across the image with touch, a trackpad, or the arrow keys.
About this comparison
Individual results vary. Where procedures were combined, the photographs show the overall result.
A historical case by Dr. L. Scott Ennis. Current treatment-provider assignments may differ.
Before & after
Tummy Tuck
Enlarge to inspect details. Scroll across the image with touch, a trackpad, or the arrow keys.
About this comparison
Individual results vary. Where procedures were combined, the photographs show the overall result.
A historical case by Dr. L. Scott Ennis. Current treatment-provider assignments may differ.
Before & after
Tummy Tuck
Enlarge to inspect details. Scroll across the image with touch, a trackpad, or the arrow keys.
About this comparison
Individual results vary. Where procedures were combined, the photographs show the overall result.
A historical case by Dr. L. Scott Ennis. Current treatment-provider assignments may differ.
Before & after
Liposuction
Enlarge to inspect details. Scroll across the image with touch, a trackpad, or the arrow keys.
About this comparison
Individual results vary. Where procedures were combined, the photographs show the overall result.
A historical case by Dr. L. Scott Ennis. Current treatment-provider assignments may differ.
Before & after
Liposuction
Enlarge to inspect details. Scroll across the image with touch, a trackpad, or the arrow keys.
About this comparison
Individual results vary. Where procedures were combined, the photographs show the overall result.
A historical case by Dr. L. Scott Ennis. Current treatment-provider assignments may differ.
Before & after
Liposuction
Enlarge to inspect details. Scroll across the image with touch, a trackpad, or the arrow keys.
About this comparison
Individual results vary. Where procedures were combined, the photographs show the overall result.
A historical case by Dr. L. Scott Ennis. Current treatment-provider assignments may differ.
Before & after
Tummy Tuck
Enlarge to inspect details. Scroll across the image with touch, a trackpad, or the arrow keys.
About this comparison
Individual results vary. Where procedures were combined, the photographs show the overall result.
A historical case by Dr. L. Scott Ennis. Current treatment-provider assignments may differ.
Before & after
Liposuction
Enlarge to inspect details. Scroll across the image with touch, a trackpad, or the arrow keys.
About this comparison
Individual results vary. Where procedures were combined, the photographs show the overall result.
A historical case by Dr. L. Scott Ennis. Current treatment-provider assignments may differ.
Before & after
Liposuction
Enlarge to inspect details. Scroll across the image with touch, a trackpad, or the arrow keys.
About this comparison
Individual results vary. Where procedures were combined, the photographs show the overall result.
A historical case by Dr. L. Scott Ennis. Current treatment-provider assignments may differ.
Before & after
Liposuction
Enlarge to inspect details. Scroll across the image with touch, a trackpad, or the arrow keys.
About this comparison
Individual results vary. Where procedures were combined, the photographs show the overall result.
A historical case by Dr. L. Scott Ennis. Current treatment-provider assignments may differ.
Before & after
Liposuction
Enlarge to inspect details. Scroll across the image with touch, a trackpad, or the arrow keys.
About this comparison
Individual results vary. Where procedures were combined, the photographs show the overall result.
A historical case by Dr. L. Scott Ennis. Current treatment-provider assignments may differ.
Before & after
Liposuction
Enlarge to inspect details. Scroll across the image with touch, a trackpad, or the arrow keys.
About this comparison
Individual results vary. Where procedures were combined, the photographs show the overall result.
A historical case by Dr. L. Scott Ennis. Current treatment-provider assignments may differ.
Before & after
Tummy Tuck
Enlarge to inspect details. Scroll across the image with touch, a trackpad, or the arrow keys.
About this comparison
Individual results vary. Where procedures were combined, the photographs show the overall result.
A historical case by Dr. L. Scott Ennis. Current treatment-provider assignments may differ.
Before & after
Tummy Tuck
Enlarge to inspect details. Scroll across the image with touch, a trackpad, or the arrow keys.
About this comparison
Individual results vary. Where procedures were combined, the photographs show the overall result.
A historical case by Dr. L. Scott Ennis. Current treatment-provider assignments may differ.
Before & after
Tummy Tuck
Enlarge to inspect details. Scroll across the image with touch, a trackpad, or the arrow keys.
About this comparison
Individual results vary. Where procedures were combined, the photographs show the overall result.
A historical case by Dr. L. Scott Ennis. Current treatment-provider assignments may differ.
Before & after
Liposuction
Enlarge to inspect details. Scroll across the image with touch, a trackpad, or the arrow keys.
About this comparison
Individual results vary. Where procedures were combined, the photographs show the overall result.
A historical case by Dr. L. Scott Ennis. Current treatment-provider assignments may differ.
Before & after
Tummy Tuck
Enlarge to inspect details. Scroll across the image with touch, a trackpad, or the arrow keys.
About this comparison
Individual results vary. Where procedures were combined, the photographs show the overall result.
A historical case by Dr. L. Scott Ennis. Current treatment-provider assignments may differ.
Before & after
Tummy Tuck
Enlarge to inspect details. Scroll across the image with touch, a trackpad, or the arrow keys.
About this comparison
Individual results vary. Where procedures were combined, the photographs show the overall result.
A historical case by Dr. L. Scott Ennis. Current treatment-provider assignments may differ.
Before & after
Tummy Tuck
Enlarge to inspect details. Scroll across the image with touch, a trackpad, or the arrow keys.
About this comparison
Individual results vary. Where procedures were combined, the photographs show the overall result.
A historical case by Dr. L. Scott Ennis. Current treatment-provider assignments may differ.
Before & after
Tummy Tuck
Enlarge to inspect details. Scroll across the image with touch, a trackpad, or the arrow keys.
About this comparison
Individual results vary. Where procedures were combined, the photographs show the overall result.
A historical case by Dr. L. Scott Ennis. Current treatment-provider assignments may differ.
Before & after
Tummy Tuck
Enlarge to inspect details. Scroll across the image with touch, a trackpad, or the arrow keys.
About this comparison
Individual results vary. Where procedures were combined, the photographs show the overall result.
A historical case by Dr. L. Scott Ennis. Current treatment-provider assignments may differ.
Before & after
Tummy Tuck
Enlarge to inspect details. Scroll across the image with touch, a trackpad, or the arrow keys.
About this comparison
Individual results vary. Where procedures were combined, the photographs show the overall result.
A historical case by Dr. L. Scott Ennis. Current treatment-provider assignments may differ.
Before & after
Liposuction
Enlarge to inspect details. Scroll across the image with touch, a trackpad, or the arrow keys.
About this comparison
Individual results vary. Where procedures were combined, the photographs show the overall result.
A historical case by Dr. L. Scott Ennis. Current treatment-provider assignments may differ.
Before & after
Tummy Tuck
Enlarge to inspect details. Scroll across the image with touch, a trackpad, or the arrow keys.
About this comparison
Individual results vary. Where procedures were combined, the photographs show the overall result.
A historical case by Dr. L. Scott Ennis. Current treatment-provider assignments may differ.
Before & after
Liposuction
Enlarge to inspect details. Scroll across the image with touch, a trackpad, or the arrow keys.
About this comparison
Individual results vary. Where procedures were combined, the photographs show the overall result.
A historical case by Dr. L. Scott Ennis. Current treatment-provider assignments may differ.
Before & after
Tummy Tuck
Enlarge to inspect details. Scroll across the image with touch, a trackpad, or the arrow keys.
About this comparison
Individual results vary. Where procedures were combined, the photographs show the overall result.
A historical case by Dr. L. Scott Ennis. Current treatment-provider assignments may differ.
Before & after
Liposuction
Enlarge to inspect details. Scroll across the image with touch, a trackpad, or the arrow keys.
About this comparison
Individual results vary. Where procedures were combined, the photographs show the overall result.
A historical case by Dr. L. Scott Ennis. Current treatment-provider assignments may differ.
Before & after
Labiaplasty
Enlarge to inspect details. Scroll across the image with touch, a trackpad, or the arrow keys.
About this comparison
Individual results vary. Where procedures were combined, the photographs show the overall result.
Before & after
Mommy Makeover
Enlarge to inspect details. Scroll across the image with touch, a trackpad, or the arrow keys.
About this comparison
Individual results vary. Where procedures were combined, the photographs show the overall result.
A historical case by Dr. L. Scott Ennis. Current treatment-provider assignments may differ.
Before & after
Gynecomastia
Enlarge to inspect details. Scroll across the image with touch, a trackpad, or the arrow keys.
About this comparison
Individual results vary. Where procedures were combined, the photographs show the overall result.
A historical case by Dr. L. Scott Ennis. Current treatment-provider assignments may differ.
Before & after
Tummy Tuck
Enlarge to inspect details. Scroll across the image with touch, a trackpad, or the arrow keys.
About this comparison
Individual results vary. Where procedures were combined, the photographs show the overall result.
A historical case by Dr. L. Scott Ennis. Current treatment-provider assignments may differ.
Before & after
Tummy Tuck
Enlarge to inspect details. Scroll across the image with touch, a trackpad, or the arrow keys.
About this comparison
Individual results vary. Where procedures were combined, the photographs show the overall result.
A historical case by Dr. L. Scott Ennis. Current treatment-provider assignments may differ.
Before & after
Tummy Tuck
Enlarge to inspect details. Scroll across the image with touch, a trackpad, or the arrow keys.
About this comparison
Individual results vary. Where procedures were combined, the photographs show the overall result.
A historical case by Dr. L. Scott Ennis. Current treatment-provider assignments may differ.
Before & after
Tummy Tuck
Enlarge to inspect details. Scroll across the image with touch, a trackpad, or the arrow keys.
About this comparison
Individual results vary. Where procedures were combined, the photographs show the overall result.
A historical case by Dr. L. Scott Ennis. Current treatment-provider assignments may differ.
Before & after
Labiaplasty
Enlarge to inspect details. Scroll across the image with touch, a trackpad, or the arrow keys.
About this comparison
Individual results vary. Where procedures were combined, the photographs show the overall result.
Before & after
Labiaplasty
Enlarge to inspect details. Scroll across the image with touch, a trackpad, or the arrow keys.
About this comparison
Individual results vary. Where procedures were combined, the photographs show the overall result.
Before & after
Labiaplasty
Enlarge to inspect details. Scroll across the image with touch, a trackpad, or the arrow keys.
About this comparison
Individual results vary. Where procedures were combined, the photographs show the overall result.
Before & after
Liposuction
Enlarge to inspect details. Scroll across the image with touch, a trackpad, or the arrow keys.
About this comparison
Individual results vary. Where procedures were combined, the photographs show the overall result.
A historical case by Dr. L. Scott Ennis. Current treatment-provider assignments may differ.
Before & after
Liposuction
Enlarge to inspect details. Scroll across the image with touch, a trackpad, or the arrow keys.
About this comparison
Individual results vary. Where procedures were combined, the photographs show the overall result.
A historical case by Dr. L. Scott Ennis. Current treatment-provider assignments may differ.
Before & after
Tummy Tuck
Enlarge to inspect details. Scroll across the image with touch, a trackpad, or the arrow keys.
About this comparison
Individual results vary. Where procedures were combined, the photographs show the overall result.
A historical case by Dr. L. Scott Ennis. Current treatment-provider assignments may differ.
Before & after
Liposuction
Enlarge to inspect details. Scroll across the image with touch, a trackpad, or the arrow keys.
About this comparison
Individual results vary. Where procedures were combined, the photographs show the overall result.
A historical case by Dr. L. Scott Ennis. Current treatment-provider assignments may differ.
Before & after
Tummy Tuck
Enlarge to inspect details. Scroll across the image with touch, a trackpad, or the arrow keys.
About this comparison
Individual results vary. Where procedures were combined, the photographs show the overall result.
A historical case by Dr. L. Scott Ennis. Current treatment-provider assignments may differ.
Before & after
Gynecomastia
Enlarge to inspect details. Scroll across the image with touch, a trackpad, or the arrow keys.
About this comparison
Individual results vary. Where procedures were combined, the photographs show the overall result.
A historical case by Dr. L. Scott Ennis. Current treatment-provider assignments may differ.
Before & after
Liposuction
Enlarge to inspect details. Scroll across the image with touch, a trackpad, or the arrow keys.
About this comparison
Individual results vary. Where procedures were combined, the photographs show the overall result.
A historical case by Dr. L. Scott Ennis. Current treatment-provider assignments may differ.
Before & after
Liposuction
Enlarge to inspect details. Scroll across the image with touch, a trackpad, or the arrow keys.
About this comparison
Individual results vary. Where procedures were combined, the photographs show the overall result.
A historical case by Dr. L. Scott Ennis. Current treatment-provider assignments may differ.
Before & after
Labiaplasty
Enlarge to inspect details. Scroll across the image with touch, a trackpad, or the arrow keys.
About this comparison
Individual results vary. Where procedures were combined, the photographs show the overall result.
Before & after
Mommy Makeover
Enlarge to inspect details. Scroll across the image with touch, a trackpad, or the arrow keys.
About this comparison
Individual results vary. Where procedures were combined, the photographs show the overall result.
A historical case by Dr. L. Scott Ennis. Current treatment-provider assignments may differ.
Before & after
Liposuction
Enlarge to inspect details. Scroll across the image with touch, a trackpad, or the arrow keys.
About this comparison
Individual results vary. Where procedures were combined, the photographs show the overall result.
A historical case by Dr. L. Scott Ennis. Current treatment-provider assignments may differ.
Before & after
Labiaplasty
Enlarge to inspect details. Scroll across the image with touch, a trackpad, or the arrow keys.
About this comparison
Individual results vary. Where procedures were combined, the photographs show the overall result.
Before & after
Gynecomastia
Enlarge to inspect details. Scroll across the image with touch, a trackpad, or the arrow keys.
About this comparison
Individual results vary. Where procedures were combined, the photographs show the overall result.
A historical case by Dr. L. Scott Ennis. Current treatment-provider assignments may differ.
Before & after
Gynecomastia
Enlarge to inspect details. Scroll across the image with touch, a trackpad, or the arrow keys.
About this comparison
Individual results vary. Where procedures were combined, the photographs show the overall result.
A historical case by Dr. L. Scott Ennis. Current treatment-provider assignments may differ.
Before & after
Labiaplasty
Enlarge to inspect details. Scroll across the image with touch, a trackpad, or the arrow keys.
About this comparison
Individual results vary. Where procedures were combined, the photographs show the overall result.
Before & after
Labiaplasty
Enlarge to inspect details. Scroll across the image with touch, a trackpad, or the arrow keys.
About this comparison
Individual results vary. Where procedures were combined, the photographs show the overall result.
Before & after
Labiaplasty
Enlarge to inspect details. Scroll across the image with touch, a trackpad, or the arrow keys.
About this comparison
Individual results vary. Where procedures were combined, the photographs show the overall result.
Before & after
Labiaplasty
Enlarge to inspect details. Scroll across the image with touch, a trackpad, or the arrow keys.
About this comparison
Individual results vary. Where procedures were combined, the photographs show the overall result.
Before & after
Labiaplasty
Enlarge to inspect details. Scroll across the image with touch, a trackpad, or the arrow keys.
About this comparison
Individual results vary. Where procedures were combined, the photographs show the overall result.
Before & after
Labiaplasty
Enlarge to inspect details. Scroll across the image with touch, a trackpad, or the arrow keys.
About this comparison
Individual results vary. Where procedures were combined, the photographs show the overall result.
Before & after
Liposuction
Enlarge to inspect details. Scroll across the image with touch, a trackpad, or the arrow keys.
About this comparison
Individual results vary. Where procedures were combined, the photographs show the overall result.
A historical case by Dr. L. Scott Ennis. Current treatment-provider assignments may differ.
Before & after
Liposuction
Enlarge to inspect details. Scroll across the image with touch, a trackpad, or the arrow keys.
About this comparison
Individual results vary. Where procedures were combined, the photographs show the overall result.
A historical case by Dr. L. Scott Ennis. Current treatment-provider assignments may differ.
Before & after
Tummy Tuck
Enlarge to inspect details. Scroll across the image with touch, a trackpad, or the arrow keys.
About this comparison
Individual results vary. Where procedures were combined, the photographs show the overall result.
A historical case by Dr. L. Scott Ennis. Current treatment-provider assignments may differ.
Before & after
Tummy Tuck
Enlarge to inspect details. Scroll across the image with touch, a trackpad, or the arrow keys.
About this comparison
Individual results vary. Where procedures were combined, the photographs show the overall result.
A historical case by Dr. L. Scott Ennis. Current treatment-provider assignments may differ.
Before & after
Tummy Tuck
Enlarge to inspect details. Scroll across the image with touch, a trackpad, or the arrow keys.
About this comparison
Individual results vary. Where procedures were combined, the photographs show the overall result.
A historical case by Dr. L. Scott Ennis. Current treatment-provider assignments may differ.
Before & after
Liposuction
Enlarge to inspect details. Scroll across the image with touch, a trackpad, or the arrow keys.
About this comparison
Individual results vary. Where procedures were combined, the photographs show the overall result.
A historical case by Dr. L. Scott Ennis. Current treatment-provider assignments may differ.
Before & after
Mommy Makeover
Enlarge to inspect details. Scroll across the image with touch, a trackpad, or the arrow keys.
About this comparison
Individual results vary. Where procedures were combined, the photographs show the overall result.
A historical case by Dr. L. Scott Ennis. Current treatment-provider assignments may differ.
Before & after
Liposuction
Enlarge to inspect details. Scroll across the image with touch, a trackpad, or the arrow keys.
About this comparison
Individual results vary. Where procedures were combined, the photographs show the overall result.
A historical case by Dr. L. Scott Ennis. Current treatment-provider assignments may differ.
Before & after
Labiaplasty
Enlarge to inspect details. Scroll across the image with touch, a trackpad, or the arrow keys.
About this comparison
Individual results vary. Where procedures were combined, the photographs show the overall result.
Before & after
Gynecomastia
Enlarge to inspect details. Scroll across the image with touch, a trackpad, or the arrow keys.
About this comparison
Individual results vary. Where procedures were combined, the photographs show the overall result.
A historical case by Dr. L. Scott Ennis. Current treatment-provider assignments may differ.
Before & after
Chemical Peels & Blue Peel
Enlarge to inspect details. Scroll across the image with touch, a trackpad, or the arrow keys.
About this comparison
Individual results vary. Where procedures were combined, the photographs show the overall result.
Before & after
Chemical Peels & Blue Peel
Enlarge to inspect details. Scroll across the image with touch, a trackpad, or the arrow keys.
About this comparison
Individual results vary. Where procedures were combined, the photographs show the overall result.
Before & after
Hair Transplant
Enlarge to inspect details. Scroll across the image with touch, a trackpad, or the arrow keys.
About this comparison
Individual results vary. Where procedures were combined, the photographs show the overall result.
Before & after
Hair Transplant
Enlarge to inspect details. Scroll across the image with touch, a trackpad, or the arrow keys.
About this comparison
Individual results vary. Where procedures were combined, the photographs show the overall result.
Before & after
Hair Transplant
Enlarge to inspect details. Scroll across the image with touch, a trackpad, or the arrow keys.
About this comparison
Individual results vary. Where procedures were combined, the photographs show the overall result.
Before & after
Hair Transplant
Enlarge to inspect details. Scroll across the image with touch, a trackpad, or the arrow keys.
About this comparison
Individual results vary. Where procedures were combined, the photographs show the overall result.
Before & after
Hair Transplant
Enlarge to inspect details. Scroll across the image with touch, a trackpad, or the arrow keys.
About this comparison
Individual results vary. Where procedures were combined, the photographs show the overall result.
Before & after
Hair Transplant
Enlarge to inspect details. Scroll across the image with touch, a trackpad, or the arrow keys.
About this comparison
Individual results vary. Where procedures were combined, the photographs show the overall result.
Before & after
Hair Transplant
Enlarge to inspect details. Scroll across the image with touch, a trackpad, or the arrow keys.
About this comparison
Individual results vary. Where procedures were combined, the photographs show the overall result.
Before & after
Hair Transplant
Enlarge to inspect details. Scroll across the image with touch, a trackpad, or the arrow keys.
About this comparison
Individual results vary. Where procedures were combined, the photographs show the overall result.
Continue exploring
Browse by procedure.
Your consultation
Your next chapter
starts with a conversation.
Bring your questions and the results that interest you. We will help you understand your options and connect you with the appropriate provider.
Or call 561-405-9020